Tips for Getting Back to Work Faster After Restarting Your Mac

All too often, Mac users put off installing updates because of the bother of having to set everything up again afterward. We get it—you’re busy, and it can take time to relaunch apps, reopen documents, and repopulate Web browser tabs.

There’s no avoiding some downtime when installing a full macOS update, which is why we recommend starting such updates at the end of the day or before you leave for lunch. That’s why Apple introduced Rapid Security Responses, which generally install in just 3–4 minutes, including a restart if necessary.

But with a bit of setup, you can pick up where you left off before a restart within a minute or two. There are three settings that can reopen apps, documents, and folders, and all Web browsers have options that reload all previously open tabs.

Apps, Documents, and Folders

If you always want certain apps running or documents open, you can ensure they open at login. In macOS 13 Ventura, open System Settings > General > Login Items (shown below); in macOS 12 Monterey and earlier, look in System Preferences > Users & Groups > User > Login Items.

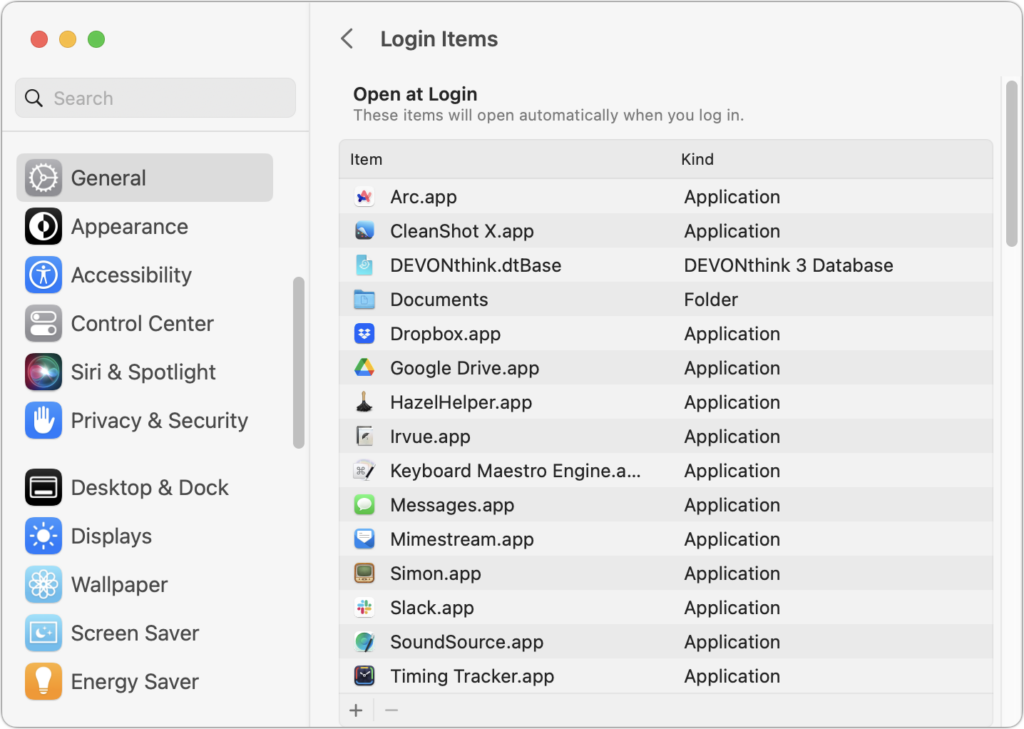
You can add apps, documents, and even folders to the Open at Login list. To remove an unwanted item, select it and click the – button. If there’s anything you don’t recognize, Control-click it and choose Show in Finder to see where it’s located.

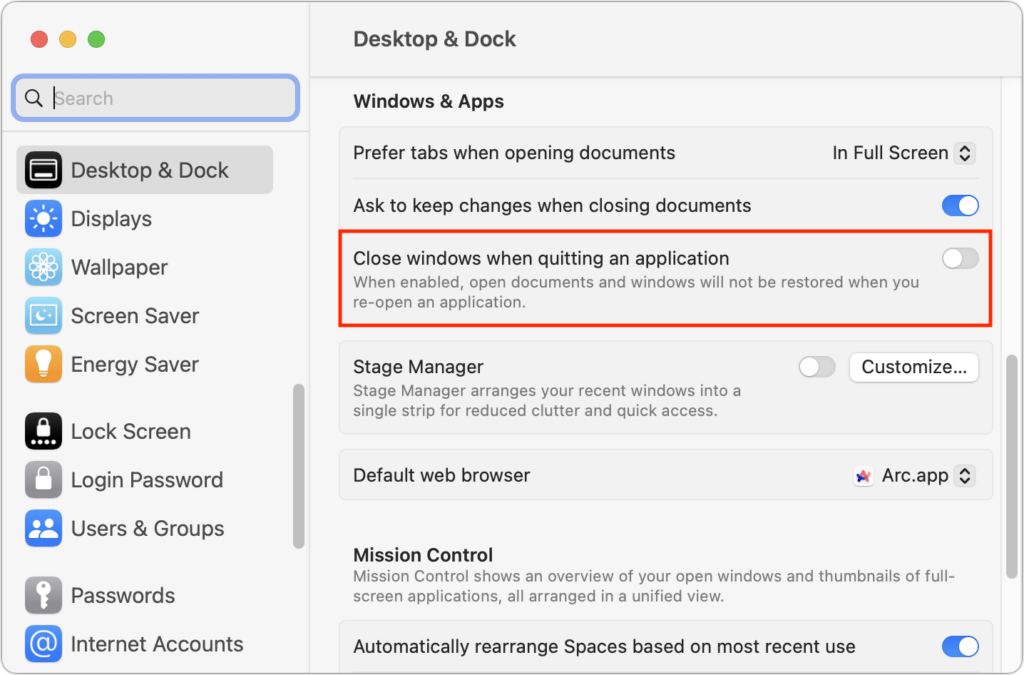
What if you have other apps or documents open that you want to return to immediately after relaunching an app? macOS offers another setting for that. In Ventura, look in System Settings > Desktop & Dock and scroll down to Windows & Apps. Deselect “Close windows when quitting an application” because reopening an app won’t restore its open documents and windows when that’s on. In Monterey and earlier, find this setting in System Preferences > General.

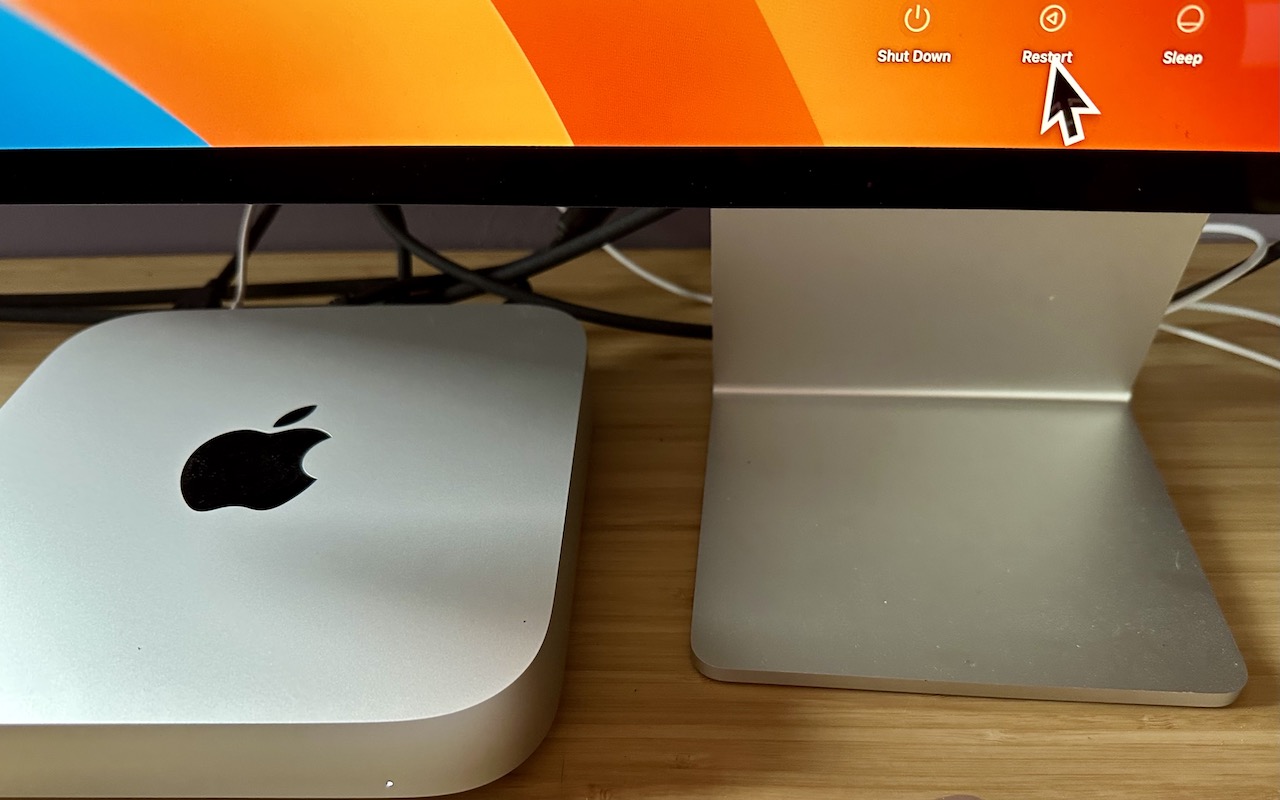
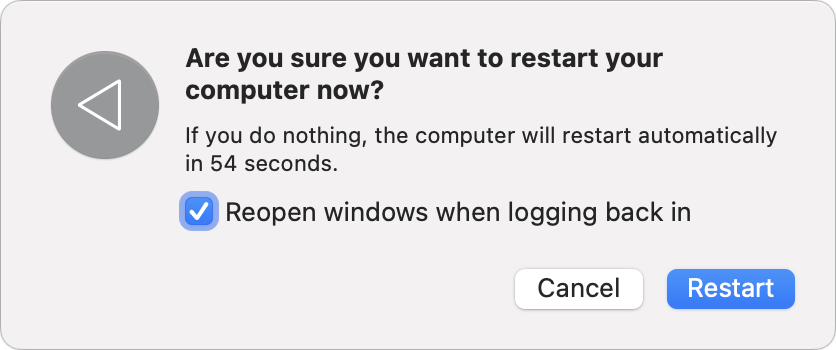
Choose Restart, Shut Down, or Log Out from the Apple menu to reveal the last and most important setting to ensure that your Mac environment is the same after a restart as it was before. In this dialog, select “Reopen windows when logging back in” and click Restart. macOS remembers this setting, so you shouldn’t have to select it each time.

As a bonus, if your Mac crashes or shuts down unexpectedly, it should come back as it was before the crash.

Web Browsers

The macOS settings above should work for most apps, but Web browsers are a special case. Open tabs aren’t quite the same as documents, and you might or might not want all those tabs to come back after relaunching your browser. Control the session settings in these popular Web browsers with the instructions below:

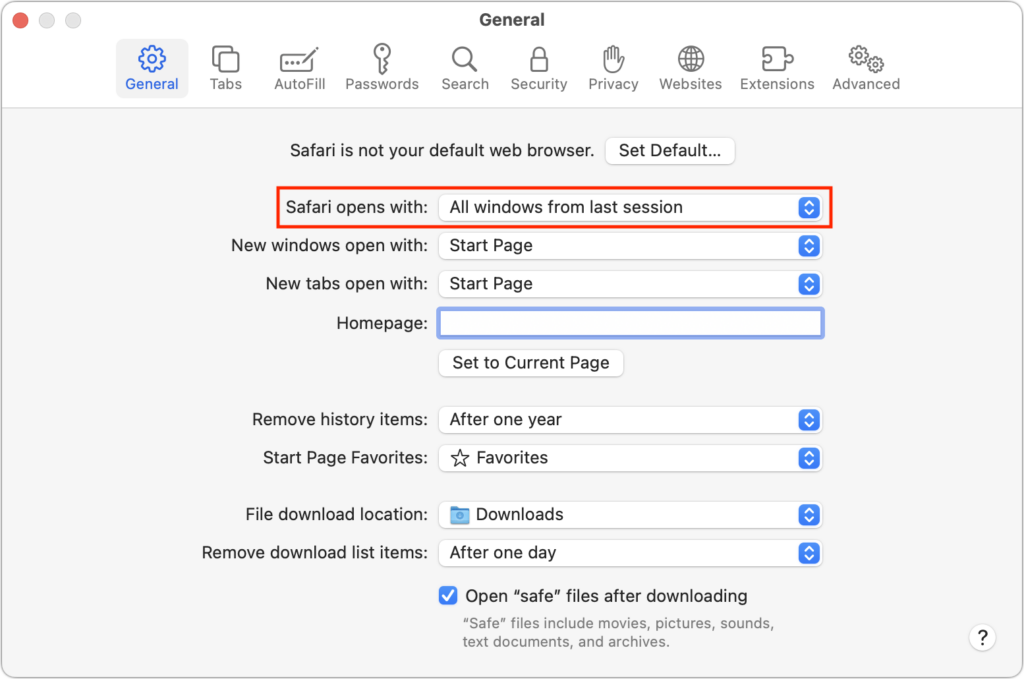
  • Safari: Recent versions of Safari always open with windows (and tabs) from your last session, though you can choose whether that includes all windows or just non-private ones in Safari > Settings > General.
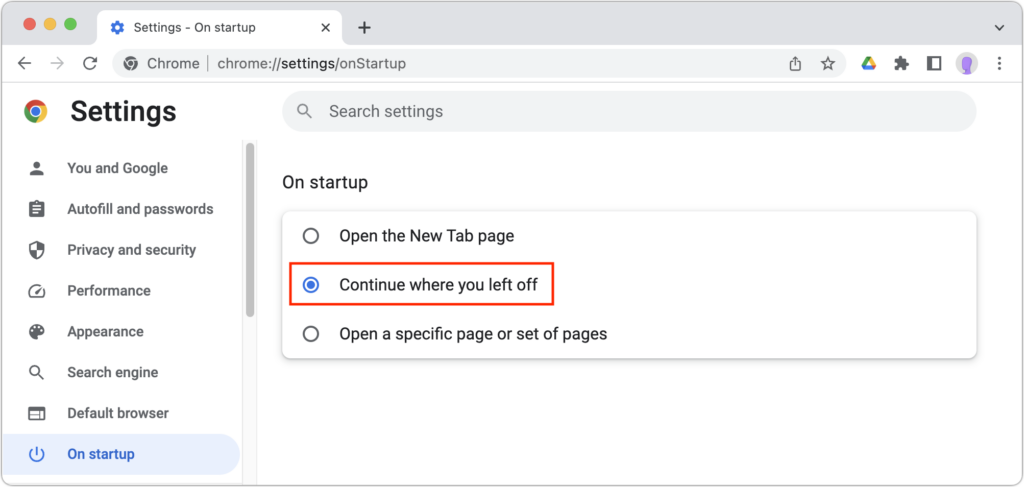
  • Google Chrome: For Google Chrome, you have additional options, but to make sure your open tabs are restored after relaunching the app, choose Chrome > Settings > On Startup, and select “Continue where you left off.”
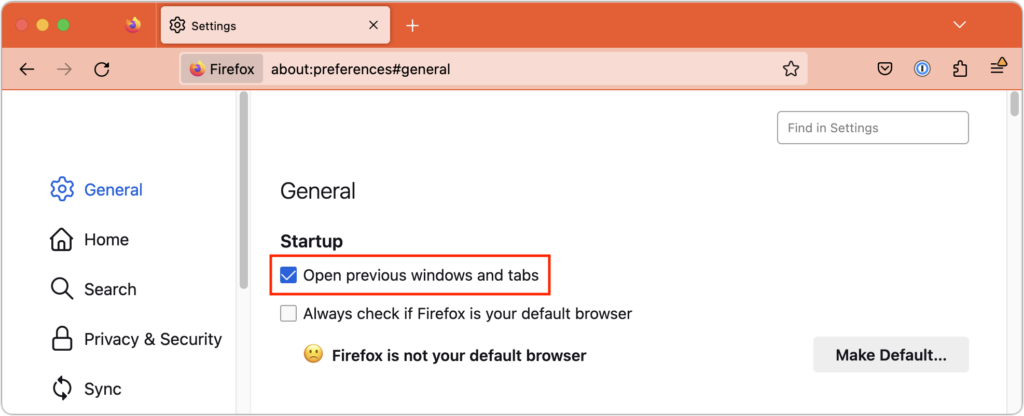
  • Firefox: Mozilla’s browser puts its session settings front and center. Choose Firefox > Settings > General and select “Open previous windows and tabs.”
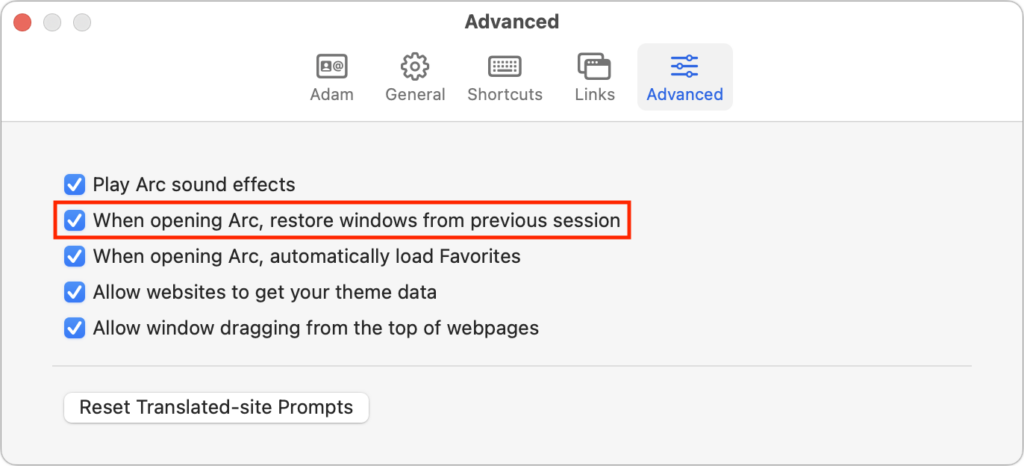
  • Arc: The new browser Arc encourages users to set up workspaces containing pinned tabs, both of which persist across sessions. However, to ensure all your windows and regular tabs load after relaunching, open Arc > Settings > Advanced and select “When opening Arc, restore windows from previous session.”
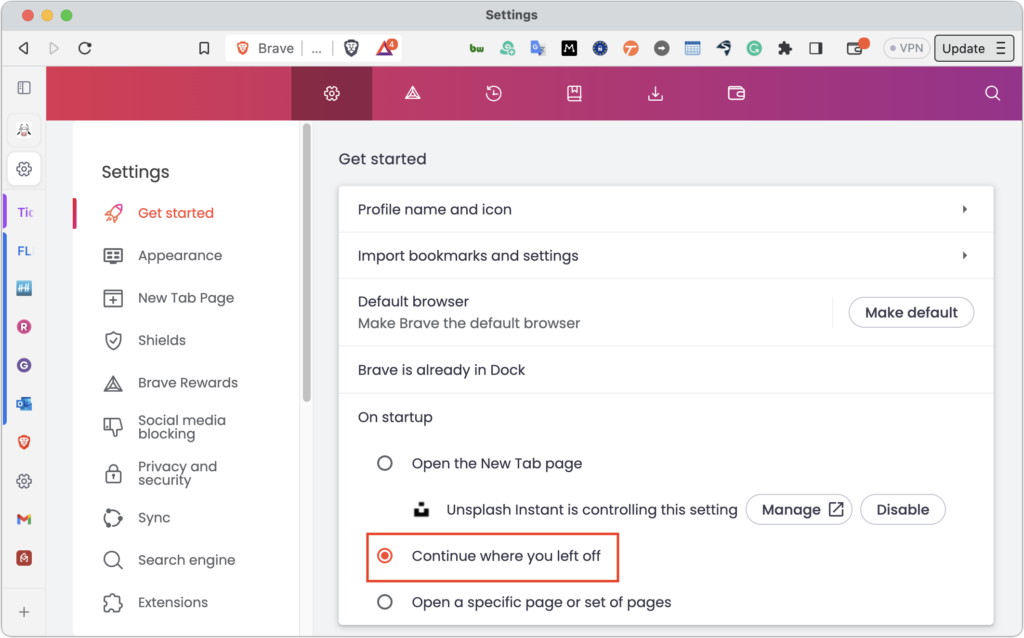
  • Brave: As a Chrome-based browser, Brave offers a setting similar to Chrome but in a different location. Find it in Brave > Settings > Get Started.
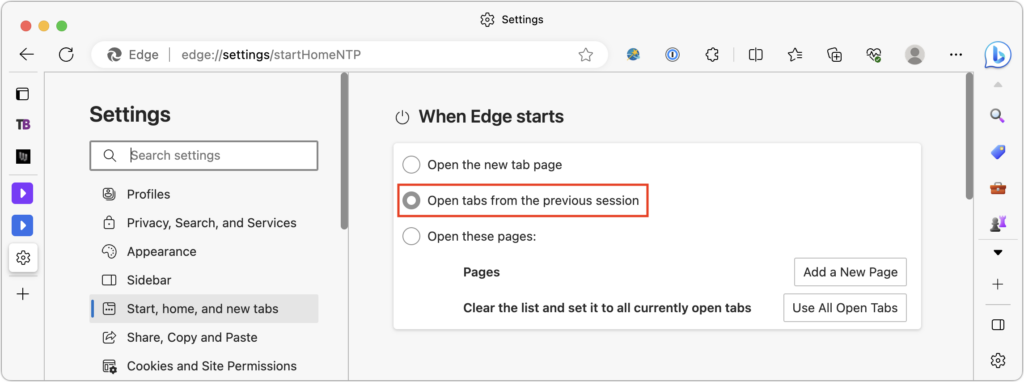
  • Microsoft Edge: Although it is also based on Chrome, Microsoft Edge stores its session setting in a different location, with a different name. Choose Microsoft Edge > Settings > Start, Home, and New Tabs, and then select “Open tabs from the previous session.”

Between these macOS and browser settings, you can ensure that a restart presents the minimum interruption possible, such that when your Mac finishes restarting, all your apps, documents, windows, and browser tabs will be the same as when you left off.

(Featured image by Adam Engst)


Social Media: Do you avoid restarting your Mac because of how long it takes to set up your apps, documents, windows, and browser tabs again? These macOS and browser settings will restore your working environment after a restart.

Similar Posts

  • Who cares about QR Codes?

    By now you’ve probably seen one of those odd-looking white squares with a bunch of smaller square dots that make up a random pattern inside–that’s a QR code. QR stands for “Quick Response,” and a QR code is a form of barcode, just like on the packaging of nearly everything you buy.

    Usually QR codes are used to store Web links–URLs–so an ad can display just the QR code instead an unwieldy and hard-to-type web address. But QR codes aren’t just for ads. They’ve appeared on business cards, in magazines and books, on coins and bills, and even on tombstones–any place it would be nice to help someone load a Web link into a smartphone but where there isn’t enough room for a URL or in situations where viewers won’t remember the URL later. And the links? They can display anything that can appear on the Web: text, photos, videos, games, and more.

    Only one built-in iPhone app can scan QR codes–the Wallet app in iOS 9–but it can scan only QR codes that are associated with Wallet passes, things like airline boarding passes, concert tickets, and iTunes gift cards. For QR codes that encode any other sort of data, Wallet shows an error. It would be nice if Apple would add general QR scanning capabilities to Wallet or the Camera app, but until that happens, you’ll need another app.
    There are numerous QR code scanning apps in the App Store, but if you need a recommendation, give TapMedia’s QR Reader for iPhone a try. It’s free with ads (remove them with a $1.99 in-app purchase), scans both QR codes and traditional barcodes on most commercial products, and displays the associated information within the app. It can even help you create your own QR codes.

    To use a QR code scanner, launch the app, allow it to access the camera when it asks, and then point it at the QR code. Good apps will scan nearly instantly, but if not, move the camera so the QR code is centered between the guides. If even that doesn’t work, move forward or back so the camera can focus on the centered code.

    Once the code has been scanned, the app will usually bring up an in-app Web browser to display whatever was encoded. For certain kinds of data, like books or grocery items, the app may go right to Amazon or a price comparison site. Good apps will also keep a record of sites you’ve scanned, so you can go back to them later, even if you can no longer scan the QR code.

    So download a QR code scanning app and keep an eye out for QR codes. Once you start looking, you’ll find them everywhere–it’s a modern-day treasure hunt!

  • A Swinging Hot Spot in Paradise

    You are visiting Key West, accompanied by your trusty iPhone and MacBook Air. Suddenly there’s an emergency at work, and you need to get online with your Mac. You can pick up a cell signal with the iPhone, but there’s no Wi-Fi that isn’t locked up. Well, my first thought might be “oh well, I’m on vacation!” but you are dedicated and need to be online.

    Don’t worry! You can use your iPhone’s cellular data plan to create a personal Wi-Fi hotspot that lets your Mac access the Internet through your iPhone. Also called “tethering,” it’s fast, easy, and can be a life-saver when you just have to get online with a Mac or your Wi-Fi-only iPad. It supports up to 5 users, too, which means you can get your team online, too!

    Before we explain how to do set up a personal hotspot, note that most but not all cellular carriers allow tethering on existing plans. For some, you might have to pay more for tethering. Keep in mind that any data consumed by your Mac while tethered will count against your data allowance and may generate overage fees. Carriers with “unlimited” data, like T-Mobile and Sprint, generally throttle your bandwidth to slower speeds if you use too much data.

    Along those lines, if you use a file sharing service like Dropbox or Google Drive, or an Internet backup service like CrashPlan or Backblaze, turn them off before connecting. Particularly if they haven’t connected in a while, those services can transfer a lot of data quickly, which could result in a hefty overage charge or awkward data throttling for the rest of the month.

    With those warnings out of the way, follow these steps in iOS 9 to turn on Personal Hotspot:

    1. On your iPhone, if you’ve never enabled the feature before, go to Settings > Cellular > Personal Hotspot. Once you’ve turned Personal Hotspot on once, it moves up a level, so you can access it from Settings > Personal Hotspot.
    1. Tap on Wi-Fi Password and enter a password that’s at least 8 characters long and easy to type. It doesn’t need to be super secure because you can keep Personal Hotspot turned off unless you’re using it. But you do want a password so random people nearby can’t connect and use your data.
    1. Once you’ve entered a password, slide the Personal Hotspot switch.

    That’s it! The Personal Hotspot screen provides basic instructions for connecting to the iPhone via Wi-Fi, Bluetooth, and USB. Stick with Wi-Fi, since it’s the easiest and most reliable in most cases.

    • To connect to your new Personal Hot Spot on your Mac, click the Wi-Fi icon in the menu bar and choose your iPhone’s name.
    • On your iPad, go to Settings > Wi-Fi and choose your iPhone.
    • Enter your password when prompted, making sure to select Remember This Network. That way, you won’t even have to enter your password the next time.
    • The Mac or iPad then connects to your iPhone, showing a hotspot icon instead of the usual wave icon for the Wi-Fi menu.

    Could it get any simpler? When you’re done, the safest thing to do, to ensure you don’t accidentally end up using too much of your data allowance, is to turn off the Personal Hotspot switch in Settings > Personal Hotspot. Your Mac or iPad will automatically disconnect.

    Actually, it CAN be simpler! Your Mac can automatically use the personal hotspot on your iPhone to connect to the Internet when they’re within range of each other.

    Use Instant Hotspot on your iPhone (with iOS 8 or later) to provide internet access to your Mac computers and other iOS devices (with OS X Yosemite or iOS 8) that are in range and signed into iCloud using the same Apple ID. Instant Hotspot uses your iPhone — you don’t have to enter a password or even turn on Personal Hotspot.

    Make sure your iOS device and your Mac are signed into iCloud with the same Apple ID.

    On your Mac, click the Wi-Fi status icon in the menu bar, then choose your iPhone or iPad.

    After you connect to the iPhone or iPad Personal Hotspot, you can check the cellular signal strength and the battery status of the iPhone or iPad in the Wi-Fi status menu.

    When you’re not using using the hotspot, your devices automatically disconnect to save battery life.

    One more big advantage of Personal Hot Spots. When you are shopping for that new iPad, perhaps you don’t need the cellular model if you nearly always have your iPhone handy. That’s what I do. If I need internet access on my Wi-Fi iPad, I simply connect to my Hot Spot! Saves me the added cost of a cellular-enabled iPad and the monthly fees from the cell carrier!