Audit Your Trusted Device Lists for Greater Security

One of the ways companies protect critical account information is by remembering the devices you use to log in as “trusted devices” or “authorized devices.” Those logins will usually have been protected by two-factor authentication or another mechanism that guarantees the device is being used by you, its owner. Subsequent logins from those devices may be more convenient for you due to requiring only a username and password, and trusted devices may automatically receive two-factor authentication codes. That’s how Apple ensures you are who you say you are when you log in to your Apple ID on a previously unseen device.

Although trusted devices can help increase your security, they can also reduce it. If an attacker were to gain access to one of your trusted devices, they would have a better chance of breaking into your accounts or masquerading as you when setting up new accounts. As a result, it’s important to audit your trusted devices occasionally and make sure you still control all of them. The first time you do this, you may be shocked to see that a Mac you last used years ago could still be receiving Apple ID verification codes. Removing unused trusted devices from an account makes it more secure with no downside.

We can’t provide a comprehensive list of services that track trusted devices, but many of you use two high-profile ones: Apple and Google. In addition, most password managers with online accounts also rely on trusted devices—we’ll look at 1Password here, but if you use another password manager, look through its settings to see if it maintains a list of trusted devices.

Remove Trusted Apple Devices

Apple gives you access to the list of all your current Apple devices in System Settings > Your Name on the Mac and in Settings > Your Name on the iPhone and iPad. (You can also log in to appleid.apple.com, click Sign-in and Security in the sidebar, and click Account Security.) Some of the devices shown may not be trusted devices—there isn’t much to worry about with a HomePod, and some old Macs may not be logged in. Click or tap any device to learn more about it—the 27-inch iMac in the screenshot below is trusted and can receive Apple ID verification codes.

Unfortunately, Apple doesn’t display the date the device was last used, which can help identify ancient devices. So look for any devices that you don’t immediately recognize as being in use—particularly Macs, iPhones, and iPads—and remove them from your account. Don’t worry about inadvertently removing a device you do use—at worst, you’ll have to log in to your Apple ID again the next time you use it.

Remove Trusted Google Devices

You can quickly load Google’s list of trusted devices by logging in to your Google account at myaccount.google.com/device-activity. To navigate there manually, go to your Google Account at myaccount.google.com, click Security in the sidebar, scroll down to find the Your Devices tile, and click Manage All Devices. Google says it keeps track of sessions (whenever you sign in) on trusted devices for only 28 days, but the sessions shown on “unknown device(s)” below are far older than that. Google helps by displaying the location and date of most sessions.

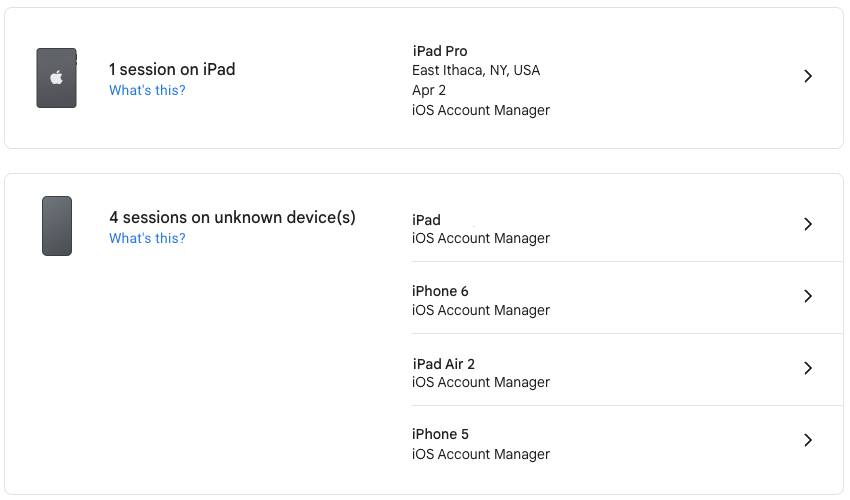
Click a session to learn more about it, including the date you first signed in on that device. For devices you no longer use, click Sign Out to remove access to your Google Account.

Remove Trusted 1Password Devices

To remove old trusted devices from 1Password, start by logging in to 1Password.com, clicking your name at the top right, and choosing My Profile—you can also navigate directly to my.1password.com/profile. As you can see, 1Password provides information about each trusted device and browser, showing its IP address, location, operating system version, and last access time.

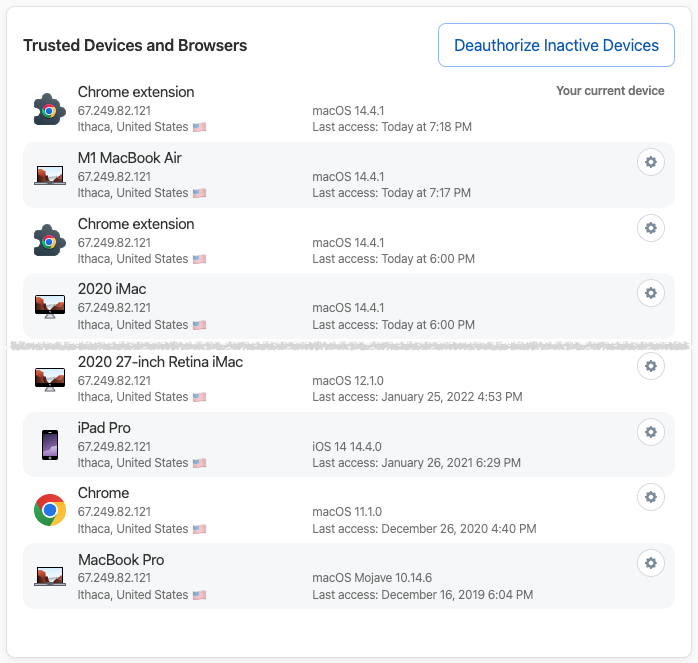
It’s easiest to click Deauthorize Inactive Devices, at which point 1Password will ask if you want to deauthorize all devices that haven’t been used in the last 60 days. If you prefer a more targeted approach, click the gear next to a device or browser you want to remove and click Deauthorize Device in the dialog that appears.

Again, the only harm that could come from deauthorizing a device you still use is that you will have to log in to 1Password again.

After you’ve audited your Apple, Google, and password-manager trusted devices—and any other accounts you may have that maintain such lists—there’s no need to check again right away. Once a month or once a quarter would be sufficient for most people.

That said, if you ever notice any unusual account activity, look at your trusted device lists to ensure you recognize everything. If there’s a device you don’t recognize or one that was used at an unfamiliar place or at a time when you were otherwise occupied, immediately remove it and change that service’s password.

(Featured image by iStock.com/Ildo Frazao)


Social Media: We all accumulate “trusted devices” in our Apple, Google, and password manager accounts, but it’s important to remove devices you no longer use because they could be security risks.

Similar Posts

  • New Features in iOS 26.1

    The first feature update to iOS 26 is now available—go to Settings > General > Software Update to install iOS 26.1. It doesn’t…

  • Sonos and Apple Music

    A little over a week ago things became official: Apple Music is now available to those who use “**Sonos.**”:http://www.smalldog.com/category/?mmfg%5B0%5D=Sonos For some of us this wasn’t a huge announcement. I have been using the beta version now for several months and have been enjoying my Apple Music playlists as well as my own personal play lists on my iPhone. I have been a huge fan of Sonos for about two years and not being able to listen to Apple Music was my one complaint about the system, but not anymore!

    Apple Music isn’t the only great thing about Sonos either, did you know that you can also control your Sonos system from your computer? I admit, I didn’t realize this at first. With a huge focus on how easy the system is to set up and control from your iPad or iPhone, this is one feature that’s often overlooked. With a simple “App download”:http://www.sonos.com/controller-app on your computer, you can open up your entire (in most cases) music library for listening through your Sonos system. Another great feature of the Sonos App is the ability to set a sleep timer. If your someone who enjoys falling asleep to music, but prefers it doesn’t stay on all night this is a huge feature even if it is a bit hidden. The more info icon within the Sonos App hides a lot of features, including the sleep timer.

  • A Swinging Hot Spot in Paradise

    You are visiting Key West, accompanied by your trusty iPhone and MacBook Air. Suddenly there’s an emergency at work, and you need to get online with your Mac. You can pick up a cell signal with the iPhone, but there’s no Wi-Fi that isn’t locked up. Well, my first thought might be “oh well, I’m on vacation!” but you are dedicated and need to be online.

    Don’t worry! You can use your iPhone’s cellular data plan to create a personal Wi-Fi hotspot that lets your Mac access the Internet through your iPhone. Also called “tethering,” it’s fast, easy, and can be a life-saver when you just have to get online with a Mac or your Wi-Fi-only iPad. It supports up to 5 users, too, which means you can get your team online, too!

    Before we explain how to do set up a personal hotspot, note that most but not all cellular carriers allow tethering on existing plans. For some, you might have to pay more for tethering. Keep in mind that any data consumed by your Mac while tethered will count against your data allowance and may generate overage fees. Carriers with “unlimited” data, like T-Mobile and Sprint, generally throttle your bandwidth to slower speeds if you use too much data.

    Along those lines, if you use a file sharing service like Dropbox or Google Drive, or an Internet backup service like CrashPlan or Backblaze, turn them off before connecting. Particularly if they haven’t connected in a while, those services can transfer a lot of data quickly, which could result in a hefty overage charge or awkward data throttling for the rest of the month.

    With those warnings out of the way, follow these steps in iOS 9 to turn on Personal Hotspot:

    1. On your iPhone, if you’ve never enabled the feature before, go to Settings > Cellular > Personal Hotspot. Once you’ve turned Personal Hotspot on once, it moves up a level, so you can access it from Settings > Personal Hotspot.
    1. Tap on Wi-Fi Password and enter a password that’s at least 8 characters long and easy to type. It doesn’t need to be super secure because you can keep Personal Hotspot turned off unless you’re using it. But you do want a password so random people nearby can’t connect and use your data.
    1. Once you’ve entered a password, slide the Personal Hotspot switch.

    That’s it! The Personal Hotspot screen provides basic instructions for connecting to the iPhone via Wi-Fi, Bluetooth, and USB. Stick with Wi-Fi, since it’s the easiest and most reliable in most cases.

    • To connect to your new Personal Hot Spot on your Mac, click the Wi-Fi icon in the menu bar and choose your iPhone’s name.
    • On your iPad, go to Settings > Wi-Fi and choose your iPhone.
    • Enter your password when prompted, making sure to select Remember This Network. That way, you won’t even have to enter your password the next time.
    • The Mac or iPad then connects to your iPhone, showing a hotspot icon instead of the usual wave icon for the Wi-Fi menu.

    Could it get any simpler? When you’re done, the safest thing to do, to ensure you don’t accidentally end up using too much of your data allowance, is to turn off the Personal Hotspot switch in Settings > Personal Hotspot. Your Mac or iPad will automatically disconnect.

    Actually, it CAN be simpler! Your Mac can automatically use the personal hotspot on your iPhone to connect to the Internet when they’re within range of each other.

    Use Instant Hotspot on your iPhone (with iOS 8 or later) to provide internet access to your Mac computers and other iOS devices (with OS X Yosemite or iOS 8) that are in range and signed into iCloud using the same Apple ID. Instant Hotspot uses your iPhone — you don’t have to enter a password or even turn on Personal Hotspot.

    Make sure your iOS device and your Mac are signed into iCloud with the same Apple ID.

    On your Mac, click the Wi-Fi status icon in the menu bar, then choose your iPhone or iPad.

    After you connect to the iPhone or iPad Personal Hotspot, you can check the cellular signal strength and the battery status of the iPhone or iPad in the Wi-Fi status menu.

    When you’re not using using the hotspot, your devices automatically disconnect to save battery life.

    One more big advantage of Personal Hot Spots. When you are shopping for that new iPad, perhaps you don’t need the cellular model if you nearly always have your iPhone handy. That’s what I do. If I need internet access on my Wi-Fi iPad, I simply connect to my Hot Spot! Saves me the added cost of a cellular-enabled iPad and the monthly fees from the cell carrier!