With iOS 18.2 and Later, You Can Share the Location of Lost Items in Find My

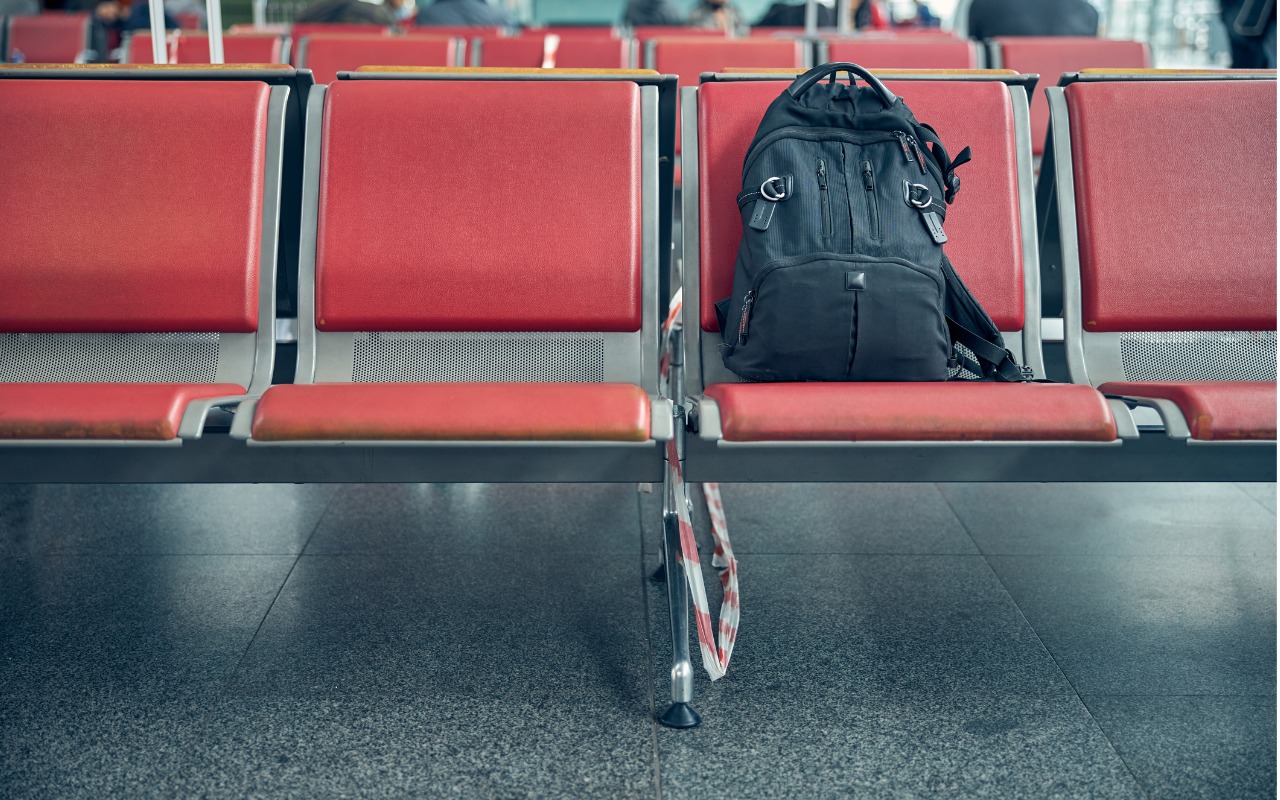
In iOS 18.2, Apple enhanced the Find My app, enabling you to create a temporary Web page that shares the location of a lost AirTag or other Find My-tracked item. You don’t need to know the person’s email address or share any other information, and the link automatically expires after a week. It’s a great way to enlist others in the search for a lost item, but the big win is sharing with an airline to help them track the location of misdirected luggage. It’s easy: open the Find My app, tap Items, select the desired AirTag or other item, tap Share Item Location, and then share the provided link via text message, email, or any other method. The item’s location automatically stops being shared if it’s reunited with you, or you can end sharing manually.

(Featured image by iStock.com/yacobchuk)


Social Media: The new Share Item Location feature in Find My enables you to share the location of a lost AirTag or another item tracked by Find My with anyone, including airline reps who can use it to locate lost luggage for you.

Similar Posts

  • Keyboard Shortcuts

    I got my start in using computers with CPM operating system and keyboard shortcuts were present there. I used them all the time so they come as second nature to me. But as I go out and talk with customers and help them with their Macs, I am surprised by the number of people that do not know that most of the things you can do with your mouse by clicking on a menu item can be done faster with keyboard shortcuts.

    The first thing to learn about shortcuts are the symbols that are used to show these keys.

    Command ⌘
    Shift ⇧
    Option ⌥
    Control ⌃
    Caps Lock ⇪
    Fn

    These work for your Mac Keyboard but if you are using a keyboard made for a Windows machine you need to substitute the Windows logo for the Command key and the Alt key for the option key. When you look at a menu in almost any application you will find the common commands for all these symbols next to them to indicate the keyboard shortcut. Here are some common ones:

    Command-X **Cut** Remove the selected item
    Command-C **Copy** the selected item
    Command-V **Paste** the contents
    Command-Z **Undo** the previous command
    Command-A **Select all** items
    Command-F **Find** open a Find window
    Command-G **Find Again** Find the next occurrence of the item previously found
    Command-H **Hide** the windows of the front app.
    Command-M **Minimize** the front window to the dock
    Command-M **New** Open a new document or window
    Command-P **Print** the current document

    Command-Space bar **Spotlight** show or hide the spotlight search field
    Command-Tab **Switch apps** switch to the next most recently used app
    Command-shift-3 **Screenshot** take a screenshot of the entire screen

    As you can see, there are endless keyboard shortcuts to use, and these are only a small fraction of what you can do with “**keyboard shortcuts.**”:https://support.apple.com/en-us/HT201236 So the next time you find yourself wondering what you can do if your mouse suddenly stops working or if your just looking for a more efficient way to do something, keyboard shortcuts might just be what your looking for!

  • Do you use iCloud for Safari?

    With all the news surrounding the government’s attempt to force Apple to write software that doesn’t exist to crack an iPhone, iCloud has been in the news, too! Do you use iCloud? Apple has some huge server farms to support this amazing technology and I thought it would be good to do a brief review of some of the features as they relate to Safari.

    iCloud has sort of settled to the back of my mind because it just does its thing in the background and serves up features that I take for granted. But this week, I ran into a dilemma that puzzled me for some time. I noticed that I had accidentally deleted one of my folders in my Safari favorites bar. These were important bookmarks and I needed them back. Well, like a good boy, I have a Time Machine backup and quickly went back in time and restored my Safari bookmarks from a time before I had deleted them. Good stuff, but when I went to look the next morning, the folder was gone again. This happened a few times with me going back in time to get the .plist file. Then I figured it out – I had Safari active in iCloud so my bookmarks were being synced in the cloud. So, every time I restored it, it would eventually be overwritten by iCloud. The solution? Really sort of simple, I turned off Safari in iCloud preferences and turned it back on, problem solved.

    Activating Safari in iCloud gives you some great tools. You can start browsing on your iPad and pick up seamlessly from your Mac or you iPhone. It syncs your bookmarks and tabs and if you also use iCloud Keychain it will remember all those passwords for the websites you visit. If you use the reading list function of Safari it will also keep those current across your devices.

    As with the other features of iCloud, the features only work if you are signed on with the same Apple ID on all of your devices. It won’t know that you are signed onto one AppleID with your Mac and another with your iPhone. Most common issues with iCloud come down to this simple issue. Apple has not made it easy to merge Apple IDs so at least for iCloud you should be consistently using the same Apple ID. Open the iCloud System Preference on your Mac and choose Safari to activate iCloud on your Mac or go to the iCloud Setting on your iPhone or iPad to activate.

    You can also access the Safari tabs that you have open on your Mac on your iPhone or iPad. It is a bit different looking on the iPhone or iPad. Open Safari on your iPhone or iPad and then tap the tabs icon. You will see all of your open Safari windows but if you scroll down at the bottom will be all the tabs open on your Mac and you can click on any of those to make it active.

  • Errata

    Last week a typo slipped by our proofers. Command+M is not open a new document but that command is Command+N. Sorry about that. To make up for it here are a couple more keyboard combinations you might find handy:

    **Command-Option-Esc** – If an app stops responding, you might need to force it to quit. You can do that with a right click on the app icon in the dock, but it’s even easier if you hit this keyboard shortcut. This will bring up the Force Quit dialog, which you can then use to make that non-responsive app quit. You might need to Command-Tab you way out of an active frozen app first, though, or use **Command+Shift+Option+Esc** to quit the currently active app.

    **Command-Option-P and R** – Here’s one that might challenge your fingers dexterity. Fortunately, you will hardly ever have to use it but it is used to reset your non-volatile random access memory (NVRAM). Information stored in NVRAM can include speaker volume, screen resolution, start-up disk selection and recent kernel panic information. If you are asked to reset your P-Ram or NVRAM here’s how you do it.

    1) Shut down your Mac
    2) Turn on your Mac
    3) Immediately after you hear the start up sound, hold down the command, option, P and R keys
    4) Hold those keys down until you hear the start up sound again and then release them.