Tips for Setting Up a Comfortable and Effective Home Work Space

Vast numbers of people who previously reported for work at an office every day are now working from home due to the COVID-19 pandemic. That’s sensible, and if you’re included in that group, there was probably even a little thrill of “I get to work from home!” at first. But as those who have telecommuted for years know, it’s not as simple as settling down on the couch with your laptop. Here are a few tips.

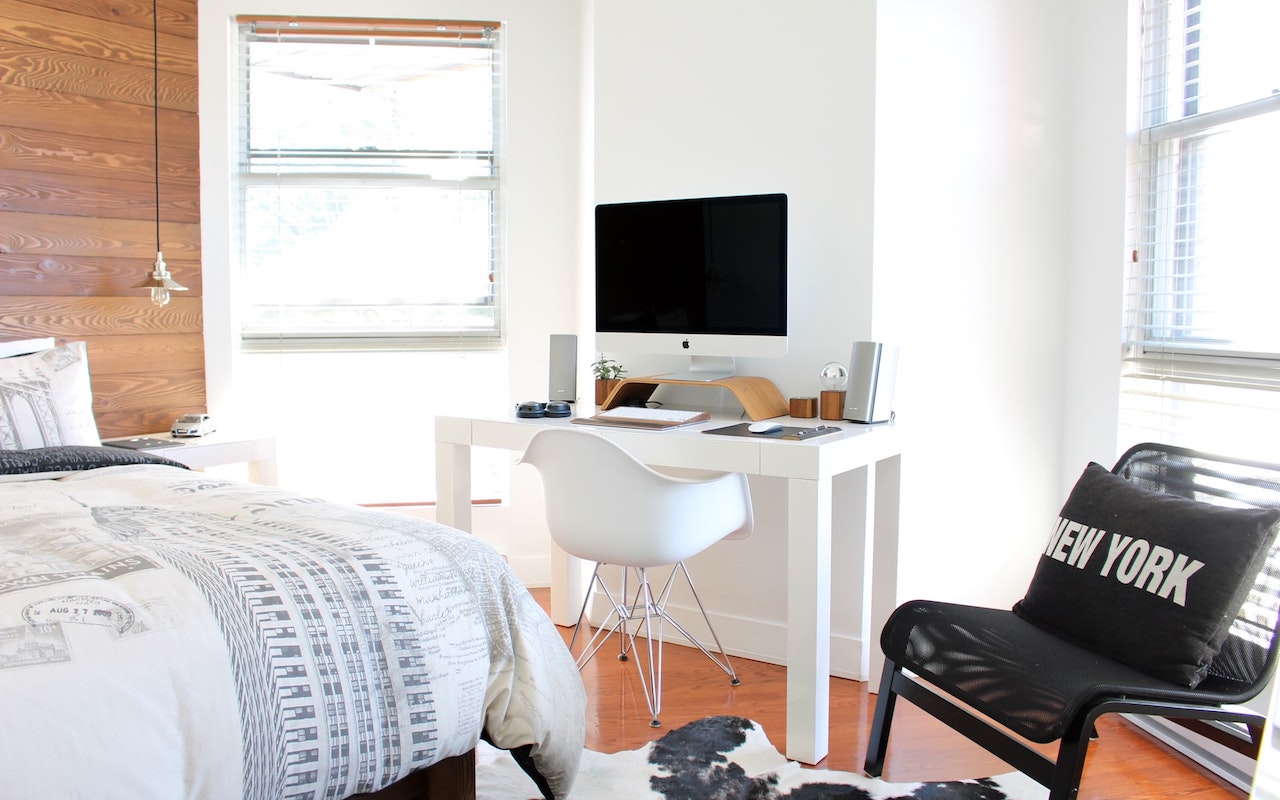
Make a Dedicated Work Space, If Possible

Particularly if you’re not home alone, you’ll want to create a space that’s dedicated to working. Otherwise, it’s difficult to focus on work instead of what’s happening in your home. A spare bedroom with a door is ideal, of course, because it lets you avoid the fridge, the TV, and your family, who may also be trying to work or do schoolwork at home.

But if you don’t have an extra room, or if you need to share it with your spouse and kids, think about ways you can create individual spaces, perhaps with bookcases or makeshift curtains.

Either way, your goal is to avoid seeing and hearing others. Your partner’s activities can be distracting, and listening to your kids discussing a school project will make focusing on your work all the harder. Sound isolation can be difficult to achieve in an open room, but that’s what earbuds are for. Those with noise-canceling capabilities, like the AirPods Pro, would be best.

Pay attention to lighting as well. Putting your monitor against a window probably won’t work well during the day, and overhead lighting can cause glare.

Set Up an Ergonomic Working Environment

It’s unlikely that your home office furniture is equivalent to what you have at work, but if you’re going to be putting in full workdays at home, you need to pay attention to ergonomics.

Many tables are slightly too high to sit at comfortably with your feet flat, your hips at a 90-degree angle, and your hands floating comfortably above the keyboard, with your elbows at a 90-degree angle. Do what you can to achieve that position; if necessary, raise the chair and add a footstool.

Good, inexpensive chairs with height adjustments can be hard to find, though the IKEA Flintan is well-reviewed and only about $80. A small pillow can provide lumbar support if necessary. Try to make sure the arms, if present, are low—you should use them only when not typing.

It’s difficult to achieve good ergonomics while working on a laptop, or, even worse, an iPad because you’re almost always looking down too far. With a MacBook, you can achieve the ideal sightline either by attaching a large monitor that you can position at the right height or by raising the MacBook and using a separate keyboard and mouse or trackpad at the proper typing height.

Potentially Upgrade Your Internet Connection

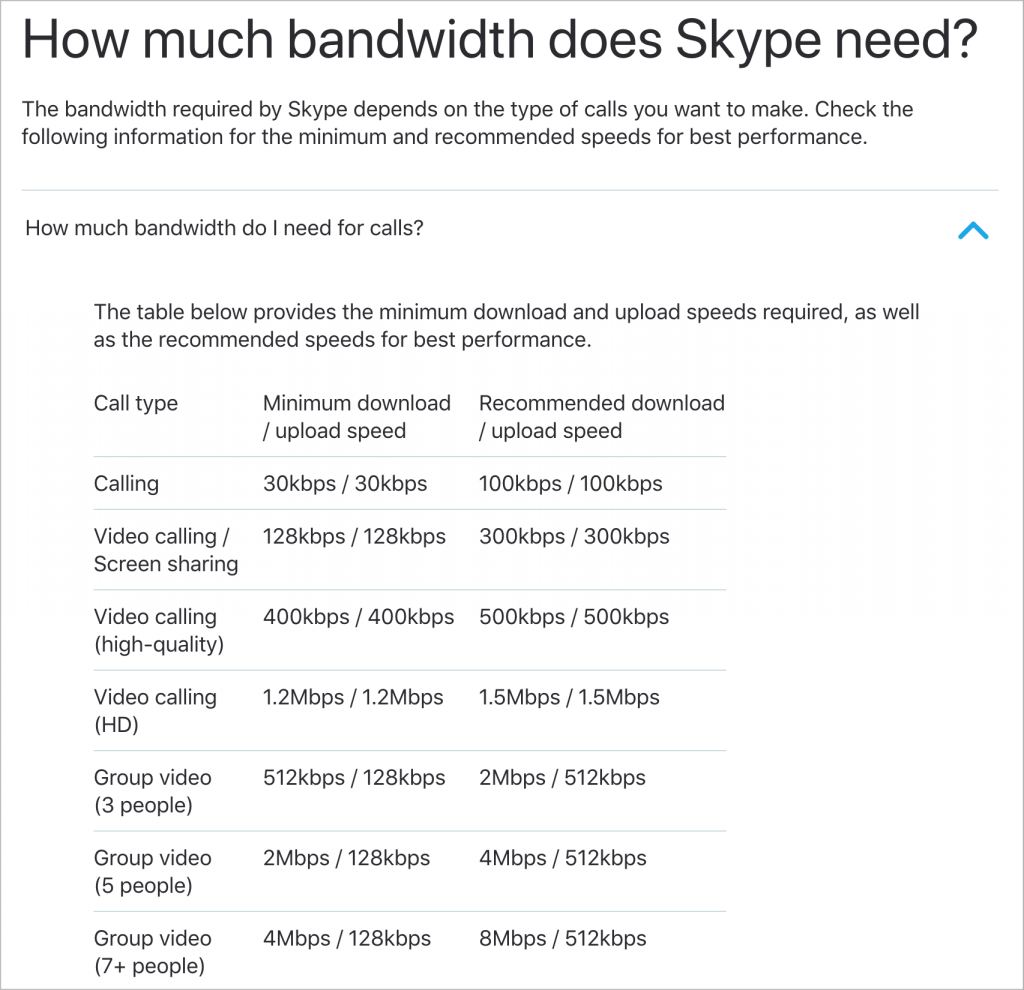
Even beyond whatever apps you need to do your work, it’s likely that you’ll end up doing a fair amount of videoconferencing. You may need to increase the throughput of your Internet connection, and it’s important to remember that upload and download speeds are separate. You usually have much higher download speeds, so focus on the upload speed when evaluating your plan.

Apps vary in their bandwidth requirements, but you can consider a 1 megabit per second (Mbps) upload speed a safe minimum, with 3 Mbps being sufficient for nearly any video calls you’ll need to make. The download speed should be at least equivalent to the upload speed, but that will almost always be true.

If your current connection isn’t fast enough, contact your Internet service provider. More throughput will usually cost more, but ideally, your ISP can just change some settings to upgrade you. In some cases, a new cable modem or similar network hardware may be necessary, and in the worst case, you may need a new cable from the street. Whatever you do, try to avoid any plan that comes with a bandwidth cap!

Don’t be afraid to compare prices if you have multiple providers, and even if you have sufficient bandwidth now, it may be worth calling to see if plan prices have dropped since you subscribed.

Upgrade Wi-Fi Hardware

Finally, if the only place in your home that you can work isn’t well served by your current Wi-Fi router, it might be time to upgrade. That’s particularly true if you’re working on old AirPort base stations from Apple.

For creating a Wi-Fi network that has the most coverage, look into mesh networking gear like Velop. The beauty of mesh networking is that you can add another router or beacon to extend the network without complicated setup.

That said, contact us before ripping your network apart, because on-site visits to fix problems may be difficult or impossible for a while.

(Featured image by Gabriel Beaudry on Unsplash)


Social Media: Working from home like the rest of us? Here’s our advice on setting up a comfortable and effective workspace.

Similar Posts

  • A Swinging Hot Spot in Paradise

    You are visiting Key West, accompanied by your trusty iPhone and MacBook Air. Suddenly there’s an emergency at work, and you need to get online with your Mac. You can pick up a cell signal with the iPhone, but there’s no Wi-Fi that isn’t locked up. Well, my first thought might be “oh well, I’m on vacation!” but you are dedicated and need to be online.

    Don’t worry! You can use your iPhone’s cellular data plan to create a personal Wi-Fi hotspot that lets your Mac access the Internet through your iPhone. Also called “tethering,” it’s fast, easy, and can be a life-saver when you just have to get online with a Mac or your Wi-Fi-only iPad. It supports up to 5 users, too, which means you can get your team online, too!

    Before we explain how to do set up a personal hotspot, note that most but not all cellular carriers allow tethering on existing plans. For some, you might have to pay more for tethering. Keep in mind that any data consumed by your Mac while tethered will count against your data allowance and may generate overage fees. Carriers with “unlimited” data, like T-Mobile and Sprint, generally throttle your bandwidth to slower speeds if you use too much data.

    Along those lines, if you use a file sharing service like Dropbox or Google Drive, or an Internet backup service like CrashPlan or Backblaze, turn them off before connecting. Particularly if they haven’t connected in a while, those services can transfer a lot of data quickly, which could result in a hefty overage charge or awkward data throttling for the rest of the month.

    With those warnings out of the way, follow these steps in iOS 9 to turn on Personal Hotspot:

    1. On your iPhone, if you’ve never enabled the feature before, go to Settings > Cellular > Personal Hotspot. Once you’ve turned Personal Hotspot on once, it moves up a level, so you can access it from Settings > Personal Hotspot.
    1. Tap on Wi-Fi Password and enter a password that’s at least 8 characters long and easy to type. It doesn’t need to be super secure because you can keep Personal Hotspot turned off unless you’re using it. But you do want a password so random people nearby can’t connect and use your data.
    1. Once you’ve entered a password, slide the Personal Hotspot switch.

    That’s it! The Personal Hotspot screen provides basic instructions for connecting to the iPhone via Wi-Fi, Bluetooth, and USB. Stick with Wi-Fi, since it’s the easiest and most reliable in most cases.

    • To connect to your new Personal Hot Spot on your Mac, click the Wi-Fi icon in the menu bar and choose your iPhone’s name.
    • On your iPad, go to Settings > Wi-Fi and choose your iPhone.
    • Enter your password when prompted, making sure to select Remember This Network. That way, you won’t even have to enter your password the next time.
    • The Mac or iPad then connects to your iPhone, showing a hotspot icon instead of the usual wave icon for the Wi-Fi menu.

    Could it get any simpler? When you’re done, the safest thing to do, to ensure you don’t accidentally end up using too much of your data allowance, is to turn off the Personal Hotspot switch in Settings > Personal Hotspot. Your Mac or iPad will automatically disconnect.

    Actually, it CAN be simpler! Your Mac can automatically use the personal hotspot on your iPhone to connect to the Internet when they’re within range of each other.

    Use Instant Hotspot on your iPhone (with iOS 8 or later) to provide internet access to your Mac computers and other iOS devices (with OS X Yosemite or iOS 8) that are in range and signed into iCloud using the same Apple ID. Instant Hotspot uses your iPhone — you don’t have to enter a password or even turn on Personal Hotspot.

    Make sure your iOS device and your Mac are signed into iCloud with the same Apple ID.

    On your Mac, click the Wi-Fi status icon in the menu bar, then choose your iPhone or iPad.

    After you connect to the iPhone or iPad Personal Hotspot, you can check the cellular signal strength and the battery status of the iPhone or iPad in the Wi-Fi status menu.

    When you’re not using using the hotspot, your devices automatically disconnect to save battery life.

    One more big advantage of Personal Hot Spots. When you are shopping for that new iPad, perhaps you don’t need the cellular model if you nearly always have your iPhone handy. That’s what I do. If I need internet access on my Wi-Fi iPad, I simply connect to my Hot Spot! Saves me the added cost of a cellular-enabled iPad and the monthly fees from the cell carrier!

  • _Dear Friends_,

    I am in Las Vegas at the Consumer Electronics Show and it is bigger than ever. My Apple watch is happy with all the walking I am doing but my feet are not feeling the love. The show is a great way to see what is on the horizon and of course, I had meetings interspersed with walking the show floor. Naturally, the meetings were far apart so I spent a lot of time walking or on buses or cabs.

    This show is pretty different from previous years but still is window to future products. See my short report below and I will follow up next week in Kibbles with a more in-depth look. This week’s kibbles exclusive special is a “refurbished 13-inch MacBook Air with a 512GB hard drive bundled with Applecare and a 2TB Time Capsule for $1759.99”:http://www.smalldog.com/wag900002113/special-save-150-on-refurbished-mac-bundle-and-keep-it-safe The MacBook Air is one of my most favorite laptops and this refurbished bundle is a great way to upgrade your mac and ensure your data is secure for the new year!

  • CES Random Thoughts

    I talked a bit about the big Consumer Electronics Show last week and it is rapidly fading in the rearview mirror. I have gone to this show every year for the past decade or more. We actually exhibited our Chill Pill speakers and Hammerhead products at one CES but mostly I have come as a “buyer” to look for new products and trends.

    The Las Vegas convention center is a gigantic venue and the CES show spills out into the parking lot in front but also into some of the surrounding hotels and resorts. The Sands convention center was the second largest and housed some of the more interesting booths. This was the location for 3D printing, health care, fitness, home automation, robots and drones. There were sophisticated baby monitors, constant reporting thermometers, implanted blood glucose monitors and even a company that sold wireless sensors that monitor your soil’s nutrients and moisture. Home automation was huge with several competing standards vying to challenge Apple’s HomeKit. This year more companies were showing HomeKit compatible products so I think that Apple’s vision of your interconnected home is not far off.

    There are lots of ways to move from the Sands over to the LVCC but the best way is the free buses offered by CES. Cabs and the monorail are possible but the buses seem to be the fastest and they are free and comfortable. For me it was a great way to rest my weary feet for a few minutes before going to the other venue to continue walking through the crowds. At the convention center there are three main halls and the international pavilion over at the Westgate (formerly, Hilton). The Center hall is dominated by the big guys with gigantic booths for Samsung, Intel, LG and others. Those booths are usually mobbed so I quickly walked through to check out the TVs and moved on. The North Hall is where the iLounge was born and products for iPad and iPhone dominate that section. The biggest part of the North Hall, however, was the Auto section with concept cars being shown my several manufacturers including Ford, Audi, Mercedes and new electric car upstart Faraday.

    In the past several years the iLounge area and the international area were dominated by all sorts of cases for iPhones and iPads. This year there were a few in each section but cases were definitely not the dominate category. Over at the international pavilion there were lots of hover boards but unlike previous years, demos of the scooters were restricted to the booth area. Nevertheless, all sorts of scooters were being shown. I searched for interesting USB-C products and found some hubs that were not quite ready for prime time and a bunch of cables. I did see the USB-C displays that incorporate a hub and that could be the real solution for the office set-up for the USB-C equipped MacBook.

    I never seem to be able to coordinate my meetings by hall. It seems that I’ll have one meeting in the North Hall, the next in the South Hall and then another back at the hotel. I rode the buses a lot and got to see the whole show floor that way.

    I did find some interesting products that we may add to our offerings, and had some great meetings so it was worthwhile to visit this show that is a window on future technology.