Six Reasons Why You Should Restart Your Mac Periodically

Long ago, before macOS was as stable as it is today, Mac users restarted their Macs regularly. Back then, Macs couldn’t sleep, either, so it was common for users to shut down at the end of the day and start up the next morning, effectively restarting daily.

With modern Macs using the barest trickle of power in sleep and both apps and macOS almost never crashing, many Mac users have gone to the opposite extreme, letting their Macs run for months between restarts. However, such an approach brings with it new problems, and as with so many things, there’s a happy medium.

Why are we banging this particular drum? As an off-the-cuff estimate, about a quarter of the problems reported to us can be solved by a restart. Really! Just click the Apple menu and choose Restart. As long as you save your work first or when prompted, nothing bad will happen.

Here are our top six reasons you should restart periodically:

  • Improved security: Restarting itself doesn’t generally improve security (although it could theoretically clear malicious code running in memory). However, installing macOS updates requires a restart, and we strongly recommend installing security-focused updates shortly after they’re released. If you resist installing updates because of the need to restart, you’re increasing your risk significantly.
  • Resolve problems: Modern Macs may be more stable than ever, but things can still get funky. If apps are crashing, peripherals aren’t connecting, you’re seeing visual glitches, or anything else seems wrong, the first troubleshooting step is a restart.
  • Better performance: We all have a feel for how long different tasks on our Macs take. If icons for launching apps bounce longer than usual, windows draw slowly, or you see the spinning pinwheel repeatedly, restart. Performance problems are often caused by a poorly coded app or out-of-control process causing your Mac to run out of physical memory and switch to slower virtual memory. Restarting clears such issues.
  • Recover drive space: Another memory-related bonus of restarting is that it can free up drive space. When macOS starts to rely on virtual memory, it creates swap files that can consume gigabytes of space. Restart, and all that space is returned, at least until your app usage requires it again.
  • Get updates: Most apps notify you of updates at launch, and some automatically download their updates but install them only when you quit. Either way, a restart results in all your apps quitting and relaunching, which ensures they either install or at least notify you of important updates.
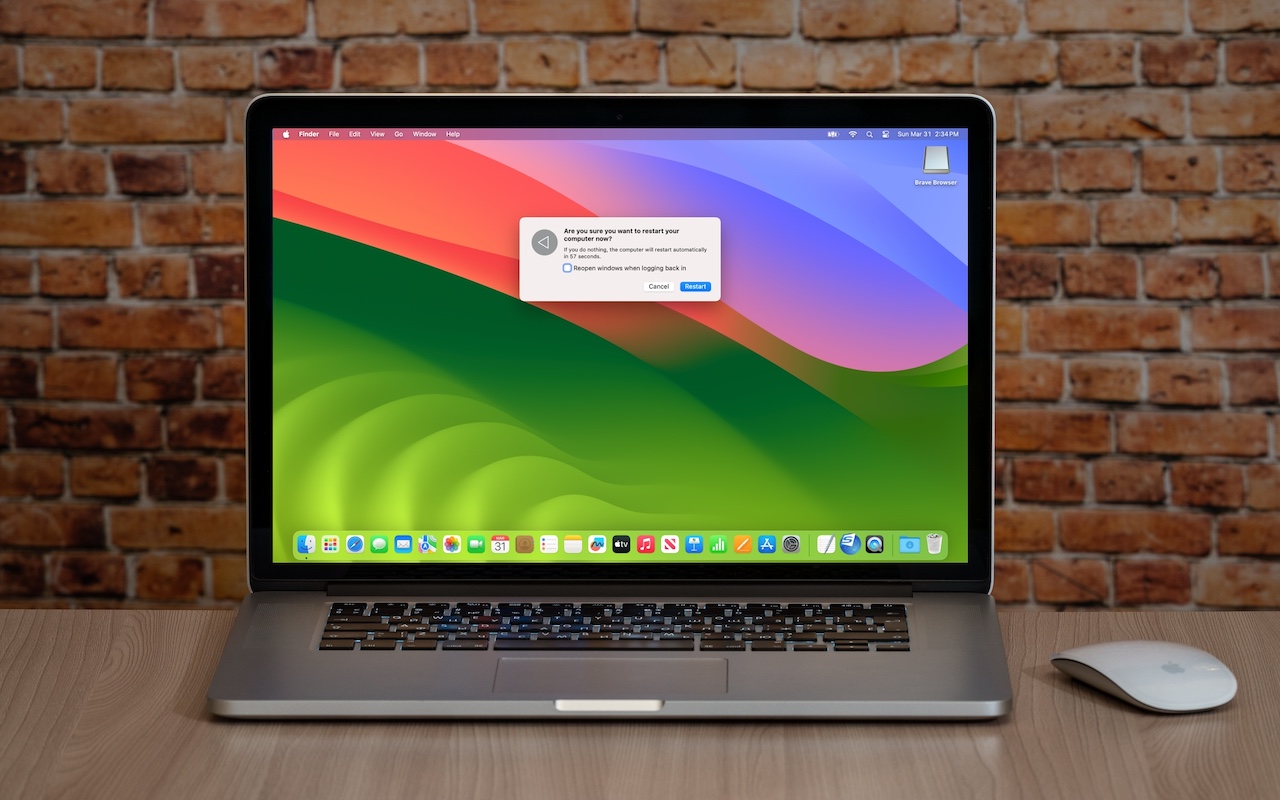
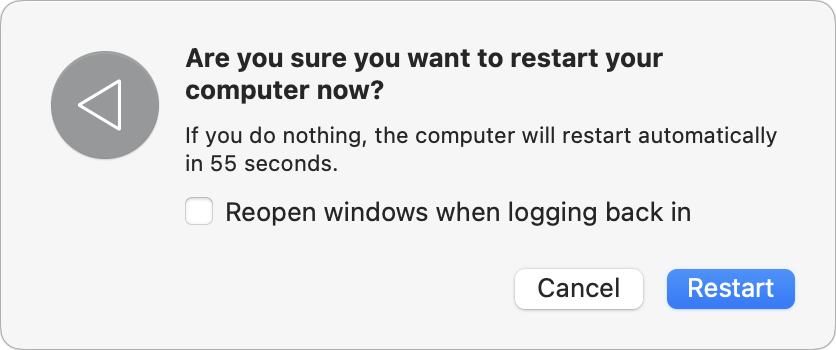
  • Start fresh: Even if having 20 or more apps open isn’t affecting your Mac’s performance, a clean slate can help you focus on your work better. A simple restart quits everything and lets you start over with just those apps set to launch at login. For a completely fresh start, make sure to deselect “Reopen windows when logging back in” in the restart dialog. Of course, if you have a lot of documents open and need to return to them, leave that checkbox selected to pick up exactly where you left off.

There’s no set schedule on which you should restart, but if you use a Mac at work and like routines, it wouldn’t be problematic to restart on Friday evening as you wind down to leave for the weekend. That way, you’d return to a clean slate on Monday morning. It’s also totally fine to restart whenever it might be helpful.

Just don’t fear the restart—modern Macs, especially those with Apple silicon, restart quickly, and the benefits far outweigh the few minutes of downtime.

(Featured image based on an original by iStock.com/Armastas)


Social Media: You can go for weeks or months without restarting your Mac, but it’s a good idea to restart more frequently to increase security, avoid or resolve problems, get updates, and generally clear your Mac’s decks.

Similar Posts

  • A Swinging Hot Spot in Paradise

    You are visiting Key West, accompanied by your trusty iPhone and MacBook Air. Suddenly there’s an emergency at work, and you need to get online with your Mac. You can pick up a cell signal with the iPhone, but there’s no Wi-Fi that isn’t locked up. Well, my first thought might be “oh well, I’m on vacation!” but you are dedicated and need to be online.

    Don’t worry! You can use your iPhone’s cellular data plan to create a personal Wi-Fi hotspot that lets your Mac access the Internet through your iPhone. Also called “tethering,” it’s fast, easy, and can be a life-saver when you just have to get online with a Mac or your Wi-Fi-only iPad. It supports up to 5 users, too, which means you can get your team online, too!

    Before we explain how to do set up a personal hotspot, note that most but not all cellular carriers allow tethering on existing plans. For some, you might have to pay more for tethering. Keep in mind that any data consumed by your Mac while tethered will count against your data allowance and may generate overage fees. Carriers with “unlimited” data, like T-Mobile and Sprint, generally throttle your bandwidth to slower speeds if you use too much data.

    Along those lines, if you use a file sharing service like Dropbox or Google Drive, or an Internet backup service like CrashPlan or Backblaze, turn them off before connecting. Particularly if they haven’t connected in a while, those services can transfer a lot of data quickly, which could result in a hefty overage charge or awkward data throttling for the rest of the month.

    With those warnings out of the way, follow these steps in iOS 9 to turn on Personal Hotspot:

    1. On your iPhone, if you’ve never enabled the feature before, go to Settings > Cellular > Personal Hotspot. Once you’ve turned Personal Hotspot on once, it moves up a level, so you can access it from Settings > Personal Hotspot.
    1. Tap on Wi-Fi Password and enter a password that’s at least 8 characters long and easy to type. It doesn’t need to be super secure because you can keep Personal Hotspot turned off unless you’re using it. But you do want a password so random people nearby can’t connect and use your data.
    1. Once you’ve entered a password, slide the Personal Hotspot switch.

    That’s it! The Personal Hotspot screen provides basic instructions for connecting to the iPhone via Wi-Fi, Bluetooth, and USB. Stick with Wi-Fi, since it’s the easiest and most reliable in most cases.

    • To connect to your new Personal Hot Spot on your Mac, click the Wi-Fi icon in the menu bar and choose your iPhone’s name.
    • On your iPad, go to Settings > Wi-Fi and choose your iPhone.
    • Enter your password when prompted, making sure to select Remember This Network. That way, you won’t even have to enter your password the next time.
    • The Mac or iPad then connects to your iPhone, showing a hotspot icon instead of the usual wave icon for the Wi-Fi menu.

    Could it get any simpler? When you’re done, the safest thing to do, to ensure you don’t accidentally end up using too much of your data allowance, is to turn off the Personal Hotspot switch in Settings > Personal Hotspot. Your Mac or iPad will automatically disconnect.

    Actually, it CAN be simpler! Your Mac can automatically use the personal hotspot on your iPhone to connect to the Internet when they’re within range of each other.

    Use Instant Hotspot on your iPhone (with iOS 8 or later) to provide internet access to your Mac computers and other iOS devices (with OS X Yosemite or iOS 8) that are in range and signed into iCloud using the same Apple ID. Instant Hotspot uses your iPhone — you don’t have to enter a password or even turn on Personal Hotspot.

    Make sure your iOS device and your Mac are signed into iCloud with the same Apple ID.

    On your Mac, click the Wi-Fi status icon in the menu bar, then choose your iPhone or iPad.

    After you connect to the iPhone or iPad Personal Hotspot, you can check the cellular signal strength and the battery status of the iPhone or iPad in the Wi-Fi status menu.

    When you’re not using using the hotspot, your devices automatically disconnect to save battery life.

    One more big advantage of Personal Hot Spots. When you are shopping for that new iPad, perhaps you don’t need the cellular model if you nearly always have your iPhone handy. That’s what I do. If I need internet access on my Wi-Fi iPad, I simply connect to my Hot Spot! Saves me the added cost of a cellular-enabled iPad and the monthly fees from the cell carrier!