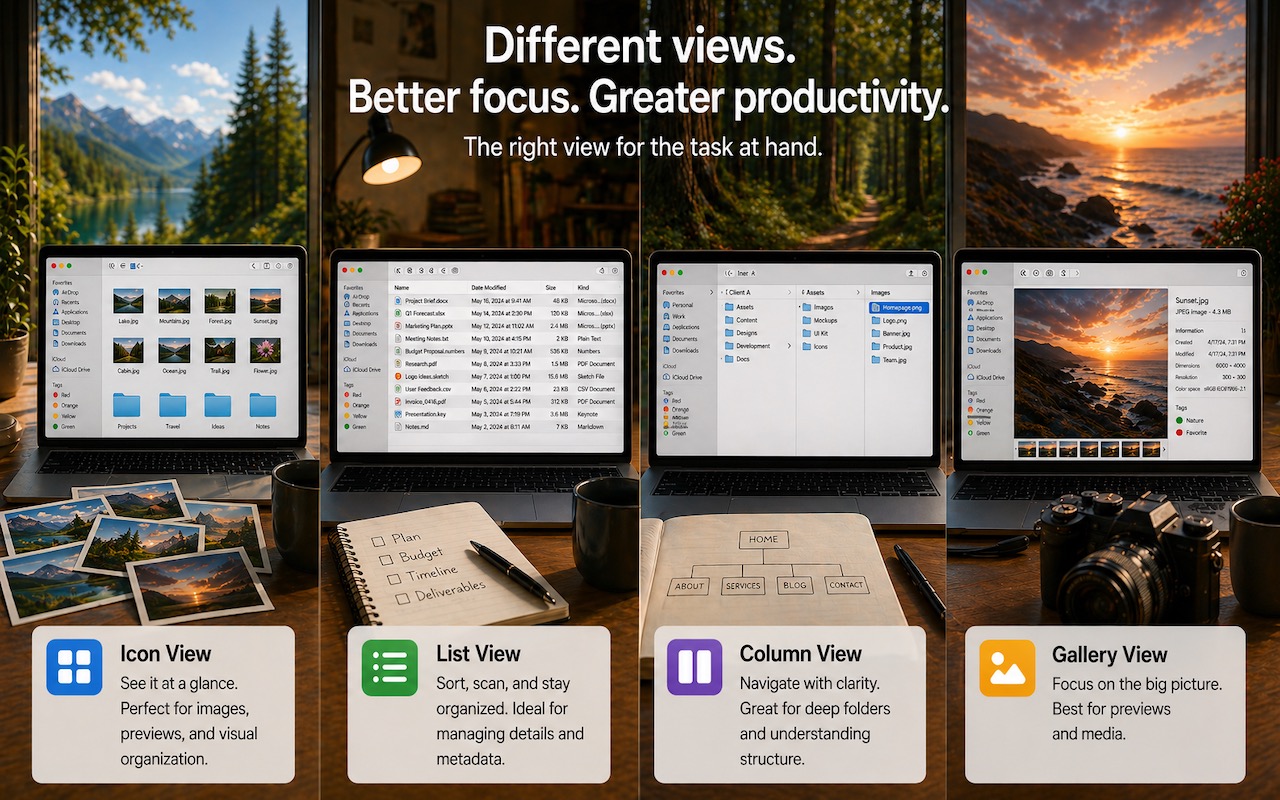
Get to Your Files Faster by Choosing the Best Finder View

If you can work comfortably with the Mac’s four Finder views, you’ll enjoy an easier experience when you try to get to your folders and files. Each view has its pros and cons, so using the best view for the job at hand will make you more productive. Here’s a look at the Icon, List, Column, and Gallery views, plus tips on quickly switching views and setting up default views.

You switch between views in the active window by choosing View > as Icons, as List, as Columns, or as Gallery. Alternatively, click one of the view icons in a window’s toolbar. It’s worth memorizing the keyboard shortcuts for List (Command-2) and Column (Command-3) views so you can switch to them quickly if a particular window isn’t in your preferred view.

Icon View

Viewing files and folders as thumbnails is the most visual approach and works best for people who think spatially—this icon is below that other one. Such people often prefer to arrange icons manually to create memorable groupings, but the Finder can also automatically arrange them in a grid, sorted by different criteria. Icon view works well for:

  • The Desktop: The desktop can only display its contents in Icon view, though you can open the Desktop folder in a window and use any view in that window.
  • Folders with few items: When a window shows only a handful of items, icons make selection easy. That’s why most software distribution disk images use Icon view to display the app and an icon in the Applications folder.
  • Photos or other images: Because icons for images can show a preview of the image (rather than just the document type thumbnail), Icon view with a relatively large icon size provides a useful visual preview.

To customize Icon view, choose View > Show View Options. You can adjust icon size, grid spacing, text size, label position, and background color—or even a background photo. Group By organizes icons into categories, while Sort By keeps them organized by name, date, or other metadata. For folders containing images, increasing the icon size creates a more useful visual preview.

The main limitation of Icon view is that it shows minimal metadata—just the filename and, optionally, item info such as image dimensions. It also becomes unwieldy with more than a few files, since scrolling through numerous icons is inefficient.

List View

When a folder contains more than a few items, List view is usually the most efficient way to work with it. It displays files in rows with sortable columns showing metadata such as date modified, size, kind, and more. List view is ideal for users who think about files in terms of attributes—when something was created, how large it is, or what type it is—rather than visual appearance. Use it for:

  • Folders containing many items: Once a folder has more items than fit without scrolling, List view makes it easier to view and select items.
  • Sorting folders by date or size: Whenever you want to see the most recent files at the top, or quickly identify which consume the most disk space, you can click the Date Modified or Size column header to sort by that criterion.
  • Work with nested folders: Disclosure triangles let you view the contents of multiple nested folders without opening a new window, making it easier to see and move items between them.

Customize the visible columns by choosing View > Show View Options or by Control-clicking any column header. You can add columns for tags, version, comments, and other metadata. Drag column headers to rearrange their order, and drag the dividers between headers to adjust column widths. Sort columns by clicking a column header; click it again to reverse the sort.

Column View

Column view shows your folder hierarchy as a series of columns, with each column representing one level of the hierarchy. Selecting a folder reveals its contents in the next column to the right, while selecting a file displays a preview and metadata in the rightmost column. Column view is popular with power users who frequently navigate between folders and appreciate seeing the path to the current location. It’s perfect for:

  • Navigating deep folder structures: Move through nested folders quickly without opening multiple windows.
  • Understanding file locations: The column layout shows exactly where a file sits in your folder hierarchy.
  • Quick previews: Select any file to see a preview without opening it or using Quick Look.
  • Drag-and-drop organization: Easily drag files between folders visible in different columns.

One useful option in View > Show View Options is “Resize columns to fit filenames,” added in macOS 26.1, which automatically adjusts column widths to accommodate the longest visible filename. Alternatively, you can manually resize all columns at once by Option-double-clicking any column divider. You can also set a default column width and choose whether to show icons and the preview column.

Gallery View

Gallery view dedicates most of the window to a large preview of the selected file, with a row of thumbnails along the bottom and a metadata sidebar on the right. Those who work primarily with images find it useful. It’s designed for:

  • Reviewing photos and videos: The large preview makes it easy to evaluate images without opening them.
  • Previewing documents: PDFs, presentations, and other documents display their first page, which can help with identifying similarly named files.
  • Quick Actions: The sidebar includes Quick Action buttons for common tasks such as rotating images, using markup tools, creating PDFs, and trimming video.
  • Checking metadata: The sidebar can show detailed information, including EXIF data for photos.

Gallery view becomes less useful for folders containing mostly text documents or applications, where the large preview adds little value. Honestly, we seldom use it.

Setting Default Views

The Finder remembers your view preferences for each folder individually, so once set, they should stick. However, if you’re in Column or List view and open a folder set to appear in Gallery view by selecting it or clicking its disclosure triangle, you’ll stay in the previous view. To open the folder in its assigned view, double-click its icon.

When you create a new Finder window with File > New Finder Window, it opens the folder specified in Finder > Settings > General. Set that folder to your preferred view so new windows open as you like.

To ensure a specific folder always opens in a particular view, select it, choose View > Show View Options, and select the Always Open In checkbox. To have its subfolders open in that view too, also select Browse In, if available.

You can also apply view settings to other folders. In View Options, configure the settings exactly as you want—icon size, text size, visible columns, and so on—then click Use as Defaults. This makes those settings the default for any folder displayed in that same view type (Icon, List, or Gallery) that doesn’t have its own custom settings. You must set defaults separately for each view type; Column view lacks this option entirely. To revert to system defaults, hold the Option key and the button changes to Restore Defaults.

There’s no need to commit to one view. Switch freely based on what you’re doing—List view for finding recent files or cleaning up, Column view for navigating a folder hierarchy, or Gallery or Icon view for reviewing images. The best view is whichever helps you accomplish your current task most efficiently.

(Featured image generated by Adam Engst with ChatGPT)


Social Media: Icon, List, Column, or Gallery? Each Finder view has its strengths. Match the right view to your task and spend less time wrestling with your files.

Similar Posts

  • New Urbanears Active Headphones

    So by now, it might be clear that I am a bit of a headphone junkie. I’ve come to the conclusion that I can collect and use headphones like I do bags and purses! In my world I can never have enough, so I jumped on the opportunity this week to test our the new “**Hellas**”:http://www.smalldog.com/wag900002177 and “**Reimers**”:http://www.smalldog.com/wag900002181 from Urbanears.

    The Hellas are an over the ear bluetooth headphone. It took a few minutes to get them paired with my computer. My only complaint about these headphones is that I found the touch-less buttons to be a bit clunky to use. The sleek design means you can’t physically see the buttons, so it take some practice and time to learn where the buttons are. However, there are a ton of other features with these headphones that make them extremely appealing. They are incredibly lightweight, comfortable to wear and they have good sound to them. I think my favorite feature about these is that the fabric on the headband and the earpieces are machine washable. You can actually wash the fabric and return your headphones to new condition. As I just started to use these the other day I have not actually tried to wash the fabric, but as more and more people are working out with over the ear headphones this is a huge selling point. Another hidden feature is that there is a built in microphone, so if you are using these with your iPhone, you can take calls without having to remove your headphones.

    Also part of the active line are the Reimers. They deliver on fit and comfort while providing some great sound! I am impressed with how far ear buds have come over the years. What’s interesting about these headphones is that while they are in the active category, they are actually a wired set of headphones. However, Urbanears added several great features to ensure these headphones can stand up to the intensity of any workout. They have two clips for securing them to your clothing and they feature reflective cabling to light up during early morning or late evening runs. They use a new earlock technology that ensures they stay in during your workout, so no more fears of them falling out during sit-ups, push-ups and the like. I admit I am just a runner, so some of the more intense workouts I’ve not tried these, but judging by how well they stayed in for runs I am confident in saying they will stay put! Last but not least, they feature standard iOS controls we have all grown to expect out of headphones.

  • Keyboard Shortcuts

    I got my start in using computers with CPM operating system and keyboard shortcuts were present there. I used them all the time so they come as second nature to me. But as I go out and talk with customers and help them with their Macs, I am surprised by the number of people that do not know that most of the things you can do with your mouse by clicking on a menu item can be done faster with keyboard shortcuts.

    The first thing to learn about shortcuts are the symbols that are used to show these keys.

    Command ⌘
    Shift ⇧
    Option ⌥
    Control ⌃
    Caps Lock ⇪
    Fn

    These work for your Mac Keyboard but if you are using a keyboard made for a Windows machine you need to substitute the Windows logo for the Command key and the Alt key for the option key. When you look at a menu in almost any application you will find the common commands for all these symbols next to them to indicate the keyboard shortcut. Here are some common ones:

    Command-X **Cut** Remove the selected item
    Command-C **Copy** the selected item
    Command-V **Paste** the contents
    Command-Z **Undo** the previous command
    Command-A **Select all** items
    Command-F **Find** open a Find window
    Command-G **Find Again** Find the next occurrence of the item previously found
    Command-H **Hide** the windows of the front app.
    Command-M **Minimize** the front window to the dock
    Command-M **New** Open a new document or window
    Command-P **Print** the current document

    Command-Space bar **Spotlight** show or hide the spotlight search field
    Command-Tab **Switch apps** switch to the next most recently used app
    Command-shift-3 **Screenshot** take a screenshot of the entire screen

    As you can see, there are endless keyboard shortcuts to use, and these are only a small fraction of what you can do with “**keyboard shortcuts.**”:https://support.apple.com/en-us/HT201236 So the next time you find yourself wondering what you can do if your mouse suddenly stops working or if your just looking for a more efficient way to do something, keyboard shortcuts might just be what your looking for!

  • Sonos and Apple Music

    A little over a week ago things became official: Apple Music is now available to those who use “**Sonos.**”:http://www.smalldog.com/category/?mmfg%5B0%5D=Sonos For some of us this wasn’t a huge announcement. I have been using the beta version now for several months and have been enjoying my Apple Music playlists as well as my own personal play lists on my iPhone. I have been a huge fan of Sonos for about two years and not being able to listen to Apple Music was my one complaint about the system, but not anymore!

    Apple Music isn’t the only great thing about Sonos either, did you know that you can also control your Sonos system from your computer? I admit, I didn’t realize this at first. With a huge focus on how easy the system is to set up and control from your iPad or iPhone, this is one feature that’s often overlooked. With a simple “App download”:http://www.sonos.com/controller-app on your computer, you can open up your entire (in most cases) music library for listening through your Sonos system. Another great feature of the Sonos App is the ability to set a sleep timer. If your someone who enjoys falling asleep to music, but prefers it doesn’t stay on all night this is a huge feature even if it is a bit hidden. The more info icon within the Sonos App hides a lot of features, including the sleep timer.

  • A Swinging Hot Spot in Paradise

    You are visiting Key West, accompanied by your trusty iPhone and MacBook Air. Suddenly there’s an emergency at work, and you need to get online with your Mac. You can pick up a cell signal with the iPhone, but there’s no Wi-Fi that isn’t locked up. Well, my first thought might be “oh well, I’m on vacation!” but you are dedicated and need to be online.

    Don’t worry! You can use your iPhone’s cellular data plan to create a personal Wi-Fi hotspot that lets your Mac access the Internet through your iPhone. Also called “tethering,” it’s fast, easy, and can be a life-saver when you just have to get online with a Mac or your Wi-Fi-only iPad. It supports up to 5 users, too, which means you can get your team online, too!

    Before we explain how to do set up a personal hotspot, note that most but not all cellular carriers allow tethering on existing plans. For some, you might have to pay more for tethering. Keep in mind that any data consumed by your Mac while tethered will count against your data allowance and may generate overage fees. Carriers with “unlimited” data, like T-Mobile and Sprint, generally throttle your bandwidth to slower speeds if you use too much data.

    Along those lines, if you use a file sharing service like Dropbox or Google Drive, or an Internet backup service like CrashPlan or Backblaze, turn them off before connecting. Particularly if they haven’t connected in a while, those services can transfer a lot of data quickly, which could result in a hefty overage charge or awkward data throttling for the rest of the month.

    With those warnings out of the way, follow these steps in iOS 9 to turn on Personal Hotspot:

    1. On your iPhone, if you’ve never enabled the feature before, go to Settings > Cellular > Personal Hotspot. Once you’ve turned Personal Hotspot on once, it moves up a level, so you can access it from Settings > Personal Hotspot.
    1. Tap on Wi-Fi Password and enter a password that’s at least 8 characters long and easy to type. It doesn’t need to be super secure because you can keep Personal Hotspot turned off unless you’re using it. But you do want a password so random people nearby can’t connect and use your data.
    1. Once you’ve entered a password, slide the Personal Hotspot switch.

    That’s it! The Personal Hotspot screen provides basic instructions for connecting to the iPhone via Wi-Fi, Bluetooth, and USB. Stick with Wi-Fi, since it’s the easiest and most reliable in most cases.

    • To connect to your new Personal Hot Spot on your Mac, click the Wi-Fi icon in the menu bar and choose your iPhone’s name.
    • On your iPad, go to Settings > Wi-Fi and choose your iPhone.
    • Enter your password when prompted, making sure to select Remember This Network. That way, you won’t even have to enter your password the next time.
    • The Mac or iPad then connects to your iPhone, showing a hotspot icon instead of the usual wave icon for the Wi-Fi menu.

    Could it get any simpler? When you’re done, the safest thing to do, to ensure you don’t accidentally end up using too much of your data allowance, is to turn off the Personal Hotspot switch in Settings > Personal Hotspot. Your Mac or iPad will automatically disconnect.

    Actually, it CAN be simpler! Your Mac can automatically use the personal hotspot on your iPhone to connect to the Internet when they’re within range of each other.

    Use Instant Hotspot on your iPhone (with iOS 8 or later) to provide internet access to your Mac computers and other iOS devices (with OS X Yosemite or iOS 8) that are in range and signed into iCloud using the same Apple ID. Instant Hotspot uses your iPhone — you don’t have to enter a password or even turn on Personal Hotspot.

    Make sure your iOS device and your Mac are signed into iCloud with the same Apple ID.

    On your Mac, click the Wi-Fi status icon in the menu bar, then choose your iPhone or iPad.

    After you connect to the iPhone or iPad Personal Hotspot, you can check the cellular signal strength and the battery status of the iPhone or iPad in the Wi-Fi status menu.

    When you’re not using using the hotspot, your devices automatically disconnect to save battery life.

    One more big advantage of Personal Hot Spots. When you are shopping for that new iPad, perhaps you don’t need the cellular model if you nearly always have your iPhone handy. That’s what I do. If I need internet access on my Wi-Fi iPad, I simply connect to my Hot Spot! Saves me the added cost of a cellular-enabled iPad and the monthly fees from the cell carrier!