Audit Your Trusted Device Lists for Greater Security

One of the ways companies protect critical account information is by remembering the devices you use to log in as “trusted devices” or “authorized devices.” Those logins will usually have been protected by two-factor authentication or another mechanism that guarantees the device is being used by you, its owner. Subsequent logins from those devices may be more convenient for you due to requiring only a username and password, and trusted devices may automatically receive two-factor authentication codes. That’s how Apple ensures you are who you say you are when you log in to your Apple ID on a previously unseen device.

Although trusted devices can help increase your security, they can also reduce it. If an attacker were to gain access to one of your trusted devices, they would have a better chance of breaking into your accounts or masquerading as you when setting up new accounts. As a result, it’s important to audit your trusted devices occasionally and make sure you still control all of them. The first time you do this, you may be shocked to see that a Mac you last used years ago could still be receiving Apple ID verification codes. Removing unused trusted devices from an account makes it more secure with no downside.

We can’t provide a comprehensive list of services that track trusted devices, but many of you use two high-profile ones: Apple and Google. In addition, most password managers with online accounts also rely on trusted devices—we’ll look at 1Password here, but if you use another password manager, look through its settings to see if it maintains a list of trusted devices.

Remove Trusted Apple Devices

Apple gives you access to the list of all your current Apple devices in System Settings > Your Name on the Mac and in Settings > Your Name on the iPhone and iPad. (You can also log in to appleid.apple.com, click Sign-in and Security in the sidebar, and click Account Security.) Some of the devices shown may not be trusted devices—there isn’t much to worry about with a HomePod, and some old Macs may not be logged in. Click or tap any device to learn more about it—the 27-inch iMac in the screenshot below is trusted and can receive Apple ID verification codes.

Unfortunately, Apple doesn’t display the date the device was last used, which can help identify ancient devices. So look for any devices that you don’t immediately recognize as being in use—particularly Macs, iPhones, and iPads—and remove them from your account. Don’t worry about inadvertently removing a device you do use—at worst, you’ll have to log in to your Apple ID again the next time you use it.

Remove Trusted Google Devices

You can quickly load Google’s list of trusted devices by logging in to your Google account at myaccount.google.com/device-activity. To navigate there manually, go to your Google Account at myaccount.google.com, click Security in the sidebar, scroll down to find the Your Devices tile, and click Manage All Devices. Google says it keeps track of sessions (whenever you sign in) on trusted devices for only 28 days, but the sessions shown on “unknown device(s)” below are far older than that. Google helps by displaying the location and date of most sessions.
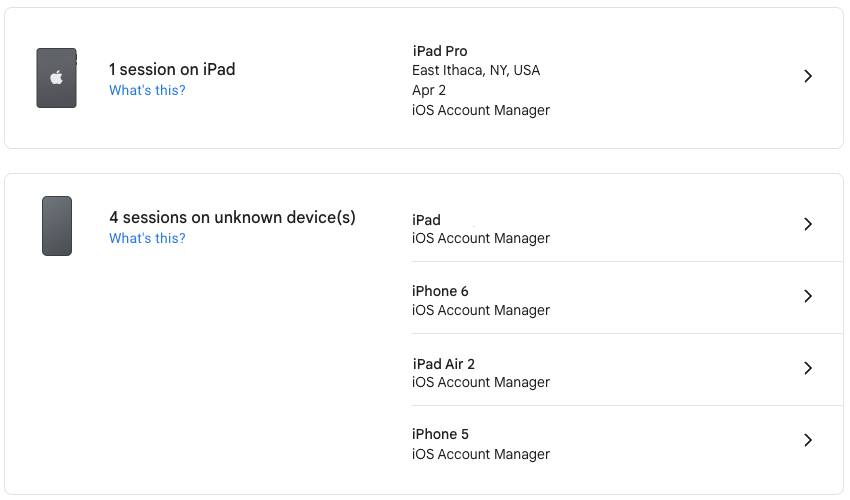
Click a session to learn more about it, including the date you first signed in on that device. For devices you no longer use, click Sign Out to remove access to your Google Account.

Remove Trusted 1Password Devices

To remove old trusted devices from 1Password, start by logging in to 1Password.com, clicking your name at the top right, and choosing My Profile—you can also navigate directly to my.1password.com/profile. As you can see, 1Password provides information about each trusted device and browser, showing its IP address, location, operating system version, and last access time.
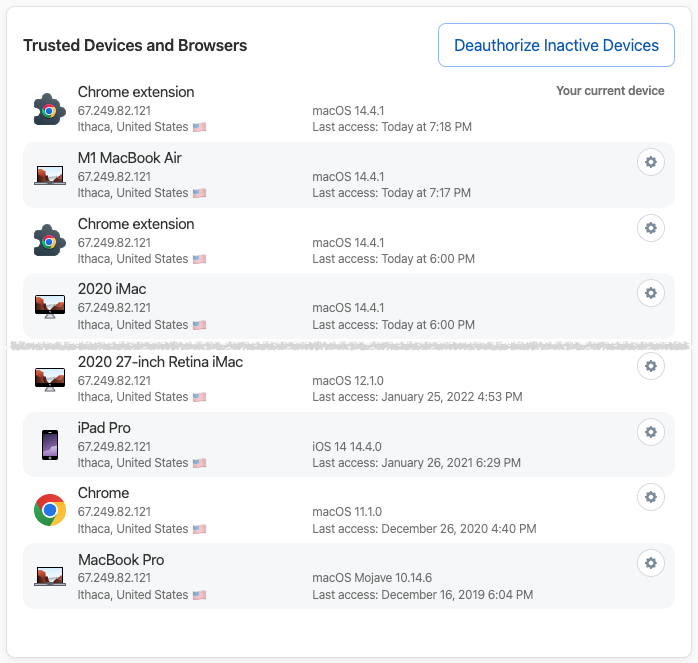
It’s easiest to click Deauthorize Inactive Devices, at which point 1Password will ask if you want to deauthorize all devices that haven’t been used in the last 60 days. If you prefer a more targeted approach, click the gear next to a device or browser you want to remove and click Deauthorize Device in the dialog that appears.

Again, the only harm that could come from deauthorizing a device you still use is that you will have to log in to 1Password again.

After you’ve audited your Apple, Google, and password-manager trusted devices—and any other accounts you may have that maintain such lists—there’s no need to check again right away. Once a month or once a quarter would be sufficient for most people.

That said, if you ever notice any unusual account activity, look at your trusted device lists to ensure you recognize everything. If there’s a device you don’t recognize or one that was used at an unfamiliar place or at a time when you were otherwise occupied, immediately remove it and change that service’s password.

(Featured image by iStock.com/Ildo Frazao)


Social Media: We all accumulate “trusted devices” in our Apple, Google, and password manager accounts, but it’s important to remove devices you no longer use because they could be security risks.

Similar Posts

  • Hey Dora…

    So we have Siri and I’ve been playing around with Alexa (don’t tell Grace!) but now I have Dora, too. Dora is the computer from Robert Heinlein’s Time Enough for Love, The Number of the Beast, The Cat Who Walks Through Walls which were some of my favorite Sci-Fi as a kid.

    I was helping a customer that has pretty bad arthritis and struggled to use the keyboard. I was straightening out her email and getting her off of AOL (something we do often!) and noticed how difficult it was to type a simple email. So, I showed her dictation on the Mac and wow, it was like a light just got switched on. Dictation has come a long way and if your are on Mavericks, Yosemite or El Capitan, Apple’s enhanced dictation works wonderfully.

    Dictation will not be a satisfying experience for you if you have a lot of noise in the room, i.e. other people talking, music, etc, but if you are working alone in a relatively quiet environment it can be a great tool not only for dictating that email but you can also use spoken commands to direct your Mac to take action.

    Setting up Enhanced Dictation

    * Open System Preferences, then click on Dictation & Speech. Turn on Dictation and set up your options.

    * Click *Use Enhanced Dictation*. This will download a 1.2GB file so that you can dictate without internet connection.

    * Choose your language and dialect. Some languages, such as English, have multiple dialects.

    * Choose the keyboard shortcut you will use to signal that you’re ready to start dictating. The default is pressing the function Fn key twice, which I find convenient but you can customize it.

    * Choose your preferred microphone from the pop-up menu below the microphone icon. Normally, you use the internal microphone but if you are using a headset or external microphone you can choose that.

    Using Dictation

    * Go to a document or other text field and place the insertion point where you want your dictated text to appear.

    * Press the keyboard shortcut for starting dictation. The default shortcut is Fn Fn (press the Fn key twice). Or choose Edit > Start Dictation. When your Mac is listening, it displays a microphone with an input meter that rises and falls as you speak.

    * Speak the words that you want your Mac to type. Use dictation commands to add punctuation, formatting, and more.

    * To stop dictating, click Done below the microphone icon, or press Fn, or switch to another window.

    The more you use Dictation, the better it understands you. Dictation learns the characteristics of your voice and adapts to your accent.

    I will go into some of the more enhanced features like Dictation Commands in next week’s Kibbles & Bytes but I can tell Dora to Open an App, select text, move up or down and much more. I think you will like dictation on the Mac, give it a try!

  • _Dear Friends,_

    I have become super aware of mosquitos with all the news about the Zika virus. For some reason biting insects just love me whether they are super tiny no-see-ums here in the Keys or slightly larger ones in Vermont they seem to be attracted to me. The first thing that I noticed about the mosquitos down here is that they are tiny compared to the ones that come out every year in Vermont. Seriously though, this Zika virus seems like a very serious health epidemic with the World Health Organization calling it a crisis. They have a pretty serious mosquito control program down here with guys that go door to door to look for standing water and spraying year around.

    Apple announced their holiday quarter financials and they beat the estimates on the street and posted the most revenue and profit ever for Apple and in a truly remarkable factoid, the most profit generated in a quarter by any public corporation, EVER. I will talk about the financial results below but let’s just say if Apple has reached a plateau it sure is a lofty one! Just to contrast that a bit against the other guys, Samsung reported a 40% decline in profits. They posted about a $15.8 billion profit for the entire year which Apple crushed in a single three month period!

    This week’s Kibbles & Bytes exclusive features the “**Apple Certified Reconditioned 21 inch iMac**.”:http://www.smalldog.com/wag900002135/special-apple-certified-reconditioned-21-5in-imac-2-7ghz-w-applecare-for-1099 This iMac is configured with a 2.7GHZ i5 processor 8GB of ram and a 1 TB hard drive. This model has the latest 802.11ac wireless protocol and comes with the same 1 year warranty as new iMacs. We are bundling it with Applecare so instead of a 1 year warranty you get 3 years and instead of 90 day days of free Apple technical support you get 3 years too. Kibbles & Bytes readers can purchase this special bundle for “**$1099!**”:http://www.smalldog.com/wag900002135/special-apple-certified-reconditioned-21-5in-imac-2-7ghz-w-applecare-for-1099 That’s the lowest price ever for a warrantied iMac with Applecare!

  • Apple Podcasts Adds Transcripts

    In iOS 17.4, iPadOS 17.4, and macOS 14.4 Sonoma, Apple enhanced its Podcasts app to include transcripts of all podcasts in the Apple…

  • Setting Up and Managing iCloud+ Storage

    Apple’s online iCloud storage underpins many of the company’s services, including iCloud Photos, iCloud Drive, iCloud Backup (for iPhones and iPads), iCloud Mail,…