Speed Up Your Fingers with Text Expansion
With all the advances in computing and communications, it’s amazing that–after nearly 150 years!–we still use the keyboard layout from the world’s first practical typewriter for entering text into our Macs, iPhones, and iPads. Sure there are some improving dictation solutions out there but typing is by far how we input text. But we have not gotten that much better as typists, nor do we enjoy typing more–if anything, we increasingly abbreviate to avoid typing, hence “LOL, BRB, etc.” Text messaging aside, wouldn’t it be nice to be able to type less without compromising meaning or making your text look like it was composed by a trained monkey? Thanks to text expansion features built into OS X and iOS, and extended with third-party utilities, you can.
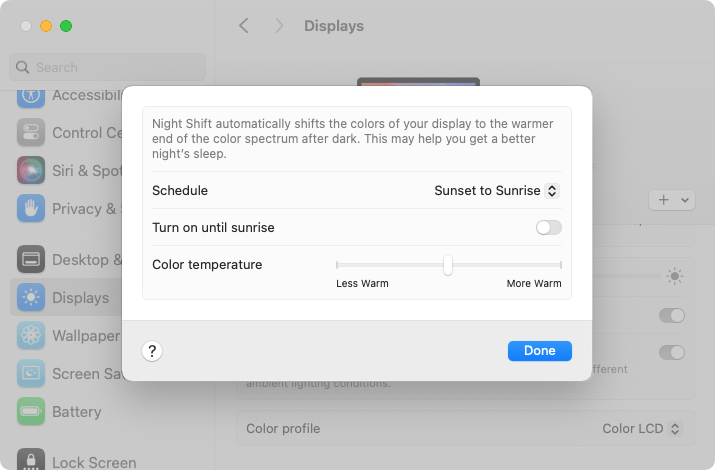
For basic text expansion capabilities in OS X, look in System Preferences > Keyboard > Text, and in iOS 9, go to Settings > General > Keyboard > Text Replacement. For both, you can enter a phrase, and a shortcut that expands into that phrase when typed and followed by a space or punctuation character. (Tip: If text expansion doesn’t work in a Mac app like Mail or Safari, make sure Edit > Substitutions > Text Replacement is selected.)
If you’re signed into the same iCloud account on both your Mac and your iPhone, for instance, the text expansions sync between them automatically. So, you can type “smh” and tap the Space bar to get “Shaking my head!” typed out for you, regardless of what device you’re using. (Another tip: don’t create abbreviations that you will also want to type normally. It might seem like a good idea to use “np” for “No Problem,” but that will get in the way of talking about Nurse Practitioners.)
With such a useful feature built into OS X and iOS, why would you want to spend money on a third-party utility, like “**TextExpander**”:https://smilesoftware.com/textexpander (Mac and iOS), “**Typinator**”:http://www.ergonis.com/products/typinator/ (Mac), or “**TypeIt4Me**”:http://www.ettoresoftware.com/products/typeit4me/. Unfortunately, OS X’s text expansion feature doesn’t work in all apps (it likely won’t work if the app lacks the Edit > Substitutions > Text Replacement menu command). The interface for creating new substitutions is cramped and hard to work with, you can’t configure the trigger characters that cause abbreviations to expand, and you can’t include text with styles, variable text like the date, or even graphics.
That’s where text expansion utilities shine. They can include styled text and graphics in expansions, insert the current date and time, respect case when expanding abbreviations, include the contents of the clipboard in expanded text, automatically fix common typos, create fill-in-the-blanks snippets that you customize on each expansion, and much more.
Here are some ideas for the kinds of things you might want to turn over to your computer for typing:
Long or complex words or phrases, such as scientific names. Aedes aegypti, anyone?
*Your address, phone number, and email address. One of my favorites is “@d” which inserts my email address. I get real tired of typing email address, phone numbers, etc. Text expansion speeds that up!
*Boilerplate text for common email replies.
*The current date and/or time.
*Special characters, so blb could expand to the British pound symbol £.
*Unix commands for Terminal, such as using ssh to log in to a remote computer.
I am sure you can come up with dozens that might work for you and speed up your typing. So think about what bit of text you might want expand automatically and give text expansion a try today!