Set Workplace Rules Before Your Apple Watch Starts Taking Notes
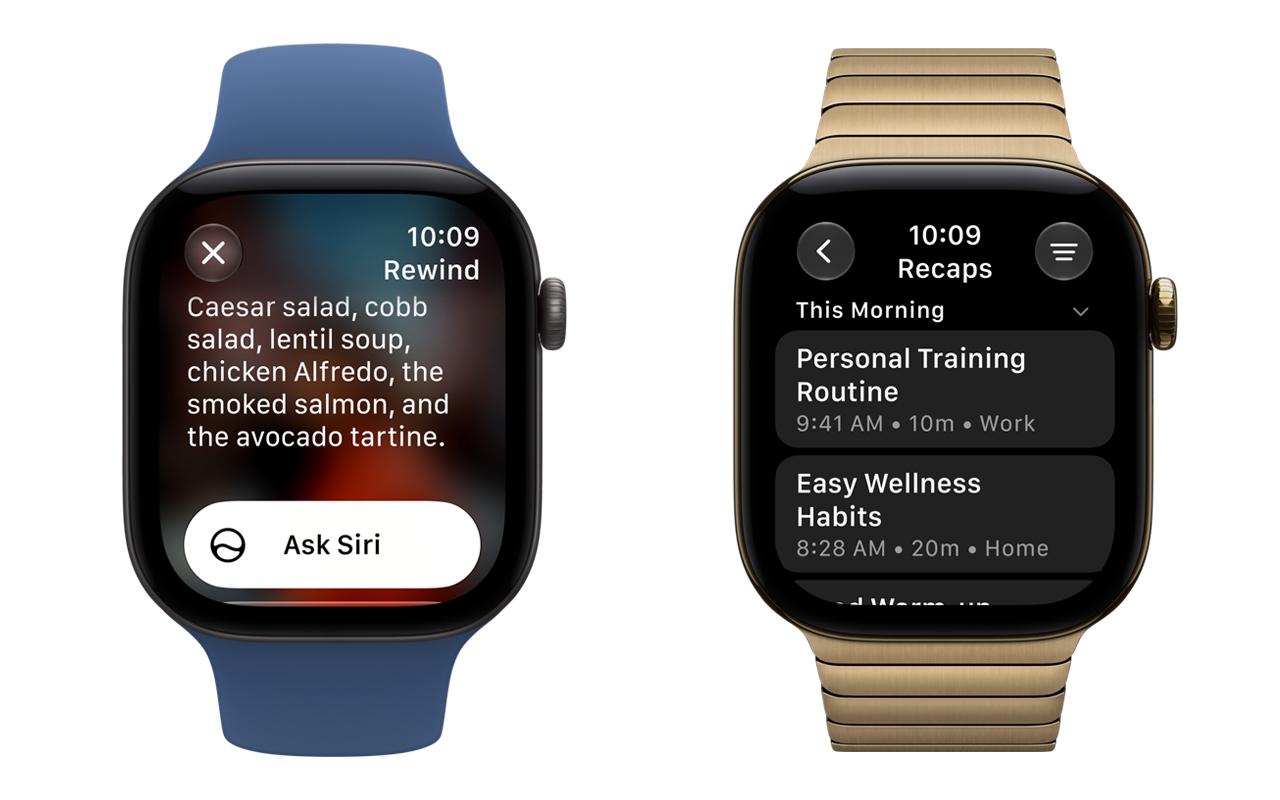
The new Live Rewind and Siri Recap features in the Apple Watch Series 12 and Apple Watch Ultra 4 sound convenient enough. Live Rewind lets you recall anything said in a conversation in the past 15 seconds, while Siri Recap takes notes throughout the day to create an Apple Intelligence summary.
That’s fine unless a meeting covers sensitive information like a personnel dispute, trade secrets, legal advice, or patient information. Before a watch turns workplace conversations into saved notes, employees need to know when that’s appropriate and where the notes may go.
Apple says it will release both features in beta later in 2026, giving businesses time to set rules and tell employees when they can use them.
Understand What the Features Will Do
Apple describes two different ways to help people remember conversations:
- Live Rewind: Double-pressing the Digital Crown will display text from the previous 15 seconds of conversation. You’ll be able to ask Siri about it or save the snippet to the Siri app.
- Siri Recap: When enabled, this feature will generate a title and key points from conversations for later review. It’s intended to provide a summary, without identifying which person said what.
Both features require opting in, and Apple says users will be able to control when and where Siri Recap runs or turn it off from Control Center. Live Rewind will play a chime even when the watch is silenced, accompanied by an on-screen animation and microphone indicator.
Apple says these features won’t create stored audio recordings: protected hardware processes the audio and then deletes it. Saved text will be end-to-end encrypted when synced through iCloud in the Siri app.
These are sensible protections, but they don’t cover every concern a business might have.
Decide Which Conversations Are Appropriate
Start with situations your employees actually encounter. A discussion about arranging the break room carries different expectations from a performance review or a client explaining an unreleased product.
We recommend a short written policy that addresses the following:
- Permitted uses: Identify the kinds of conversations for which employees may use these features. Consider starting with explicitly approved, non-sensitive meetings.
- Confidential discussions: Establish where the features must remain off, such as personnel meetings, legal consultations, and discussions involving client secrets.
- Notice and permission: Tell employees how to explain the intended use and obtain permission before a conversation begins. Give participants an easy way to decline.
- Personal devices: Apply the policy to employees’ own watches and phones as well as company equipment. Explain whom to contact about accessibility needs or exceptions.
A chime is no substitute for asking permission, and a colleague’s Apple Watch isn’t proof that note-taking is active.
Have legal counsel review how applicable privacy and consent rules affect your policy. Employees also shouldn’t assume that a missing audio file makes every use acceptable.
Plan for the Notes That Remain
According to Apple’s support documentation, unsaved Siri Recap summaries will automatically disappear after 7 days. Users will also be able to save or export summaries and Live Rewind snippets to other apps. Deleting an item in Siri will remove it from synced devices. Don’t assume that will retrieve copies already exported or shared.
Decide which accounts and apps may hold work-related notes, who may receive them, and how long they should be retained. Include a process for reporting accidental capture of confidential information, making it clear whom to notify when violations occur.
Apple warns that generated summaries and snippets may omit or misunderstand important details, and that sensitive-information filtering may not catch everything. Require employees to verify commitments, deadlines, and prices before acting on a summary or adding it to an official record.
Healthcare Businesses Need a Closer Review
A patient conversation requires more scrutiny than an ordinary staff meeting. A medical practice considering these features should involve its privacy or compliance lead and IT adviser before allowing employees to use them around patient information.
HHS guidance explains that a cloud provider maintaining electronic protected health information on behalf of a HIPAA covered entity is a business associate—even if it cannot decrypt the information—and must comply with the HIPAA requirements that apply to business associates. Appropriate business associate agreements and other HIPAA safeguards are still required.
Apple’s current iCloud terms also pose a contractual problem. Under Requirements for Use of the Service, they prohibit covered entities, business associates, and their representatives from using the service to create, receive, maintain, or transmit protected health information.
Before approving any proposed use, ask:
- Where will patient information travel? Apple says Siri Recap will use Private Cloud Compute to produce summaries. Review processing, syncing, and exports separately rather than assuming everything stays on the watch.
- Do the applicable agreements permit this use? Identify which services are involved and whether the necessary contractual protections exist for those specific services.
- Can the organization control the resulting notes? Consider access, retention, correction, employee departures, and accidental sharing from personal accounts.
- Who will verify clinical details? Don’t treat an automatically generated memory aid as an approved clinical documentation system.
Until those questions are resolved, we recommend keeping these features off for work conversations involving patient information. Address patients’ own use separately through an appropriate notice and discussion process.
Prepare Now, Test after Release
Apple currently lists Apple Watch Series 12 or Apple Watch Ultra 4, a supported paired iPhone, Apple Intelligence, and Siri AI as requirements for these features, with additional language and regional restrictions.
For now, appoint someone to update your device and confidentiality policies. Ask your IT provider to confirm which management controls will be available when these features launch, especially for personally owned devices.
If your business approves a trial, begin with a small group and non-sensitive conversations. Check how activation, saved notes, exports, and deletion behave before expanding access. Employees should have a clear answer to “May I use this here?” before their watches can offer to help.
(Featured image by Apple)
Social Media: Apple’s upcoming Live Rewind and Siri Recap features will help people remember conversations, but workplaces should prepare rules for sensitive information before the features arrive.