How to Add Important Metadata to Scanned Photos
Photos we take today with our iPhones and other digital cameras automatically have metadata associated with them, information like time and date, camera type, lens and exposure information, and even location (with iPhones and newer cameras). Other metadata, like titles and faces, we have to add manually.
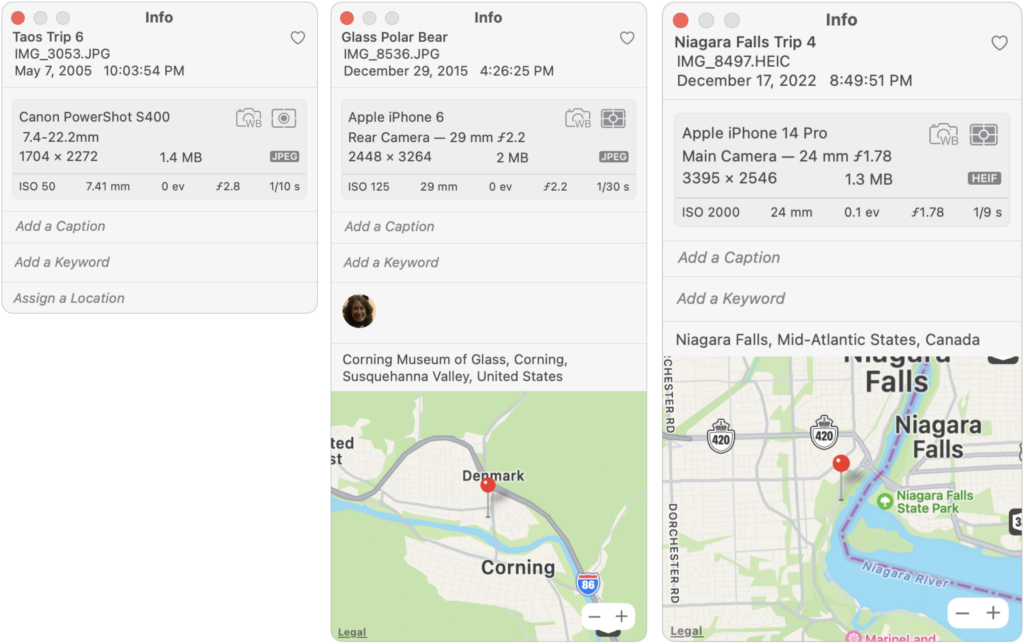
Four of these pieces of metadata are particularly useful:
- Dates ensure that photos sort correctly in Photos.
- Titles simplify searching and make it easier to group photos.
- Locations let you see photos on a map and search by location names.
- Faces collect images of individuals automatically after you identify some manually.
Problems crop up when you have old digital photos that lack full metadata and with scanned photos, which seldom have any metadata at all. The lack of metadata hits especially hard if you’ve taken advantage of a service that scans boxes of old snapshots so you have digital versions. Bulk scanning is a great way to protect the images and share them with others, but without appropriate metadata, the images can be nearly incomprehensible to anyone who doesn’t already know who’s in them and when and where they were taken.
Happily, Photos has tools for adding metadata to multiple images at once. If you have a large collection of scanned photos, follow along to learn how to give them the metadata that will make them easier to find and understand in the future.
Before we get started, make sure you know how to select multiple images at once in Photos. There are four basic approaches:
- Drag: Click in any blank area, and drag a rectangle around the pictures you want to select. If you drag to the top or bottom of the screen, Photos scrolls to bring more images into view. Dragging is easy, but you can select more than you want.
- Shift-click: Select one picture. Then hold down the Shift key and click any other picture to select both of them and all the images in between. Shift-clicking is the fastest and most accurate way to select many contiguous photos.
- Command-click: To select an arbitrary set of photos, Command-click each one to select it; another Command-click on a selected image deselects it. Command-clicking is too slow for selecting a lot of photos, but it’s great for removing photos from the selected set if you’ve accidentally added too many with another method.
- Select All: If you want to select all the photos in an album, choose Edit > Select All.
Change Dates
Photos scanned by a service will likely come back with the date they were scanned. That’s not helpful, and while it’s hard to know exactly when the photos were taken, if you can get them in at least the correct year, they’ll sort reasonably in Photos. Once you’ve selected the photos you want to adjust, follow these steps:
- Choose Image > Adjust Date & Time to bring up the Adjust dialog.
- In the Adjusted field, enter the date you want to apply to the selected photos.
- Click Adjust.
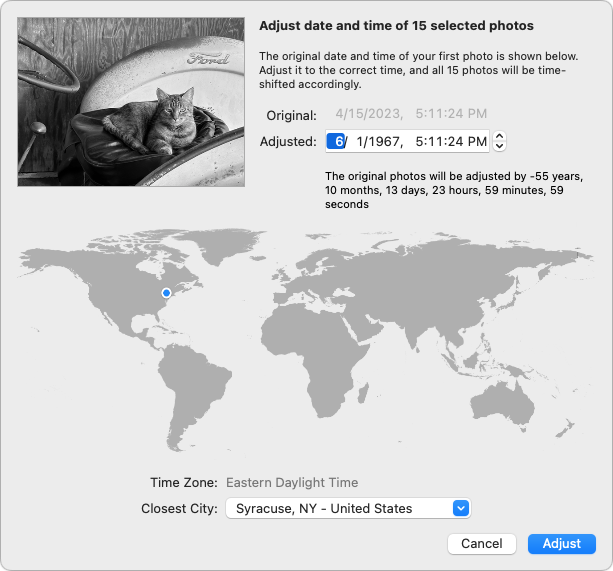
It’s important to note that this doesn’t change the date and time to what you enter exactly. Instead, it adjusts each photo’s date and time by the amount specified. In all likelihood, the selected photos have slightly different times and possibly dates, so adjusting them by the same amount means they’ll retain their basic order. In the screenshot above, you can see that each photo’s date will move more than 55 years into the past to when that tractor was newer.
Change Titles
No photos, scanned or taken with an iPhone, will automatically have useful title data assigned to them. At best, the title might be the same as the image’s filename, something unhelpful like IMG_3343.JPG. In Photos’ predecessor iPhoto, Apple provided a way of changing the titles of selected photos and appending a sequential number to each image. That way, you could have Niagara Falls Trip 1, Niagara Falls Trip 2, and so on.
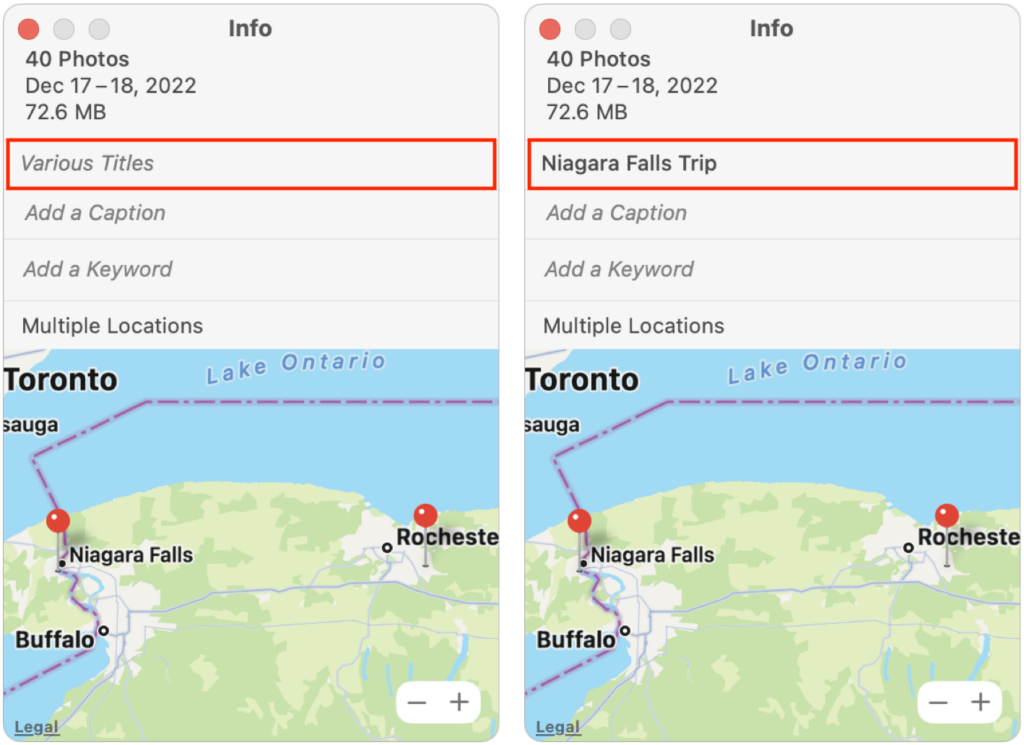
That feature is no longer available in Photos. You can still change the titles of selected photos, but all the titles will be the same, without a sequential number. Once you’ve selected the desired images, follow these steps:
- Choose Window > Info to bring up an Info window.
- In the field labeled “Various Titles,” enter the desired title.
- Press Return to apply the title.
If you desperately want sequential numbers appended to your titles, there is a way of doing it using AppleScript, as explained in this discussion forum post.
Change Locations
Scanned photos and those taken with most digital cameras won’t have location metadata showing where the photo was taken. With many photos, you may not know the precise location—who remembers where that picnic in 1980 was held?—but you can probably specify the city or state/province. The process for adding locations is similar to adding titles.
- Choose Window > Info to bring up an Info window.
- In the field labeled Assign a Location, start typing the name of the location until you see the correct location appear in the suggestion list below.
- Click the desired location to assign it to the selected photos.
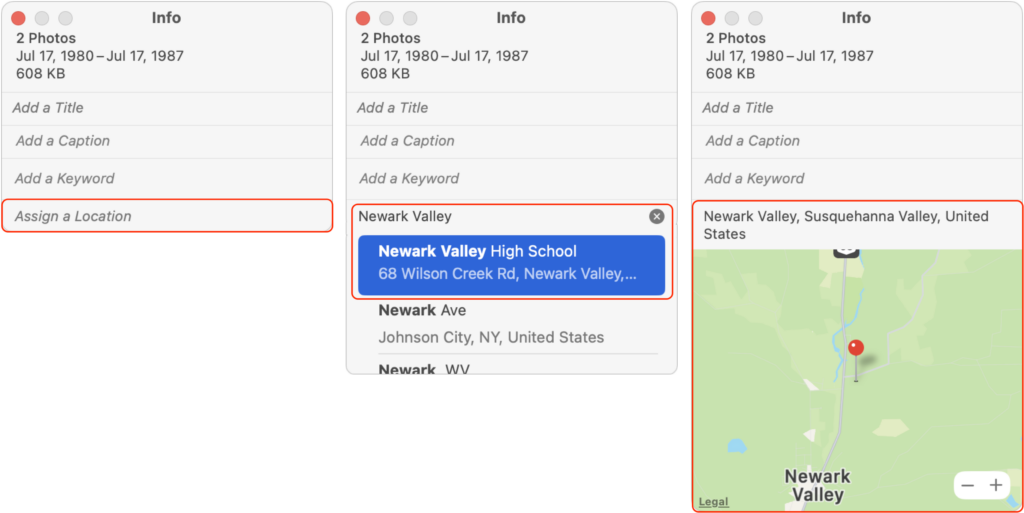
If you want to do a lot of geotagging, check out the app HoudahGeo, which provides additional tools for connecting locations with images stored in Photos. It even lets you drag images to spots on a map, which may be faster than typing in locations.
Identify Faces
Though not perfect, the facial recognition feature in Photos is a wonder of modern machine learning. Once you identify someone a few times and then confirm or reject additional suggestions, Photos automatically identifies people as they appear in new photos. It could be particularly effective when importing a large number of old family photos where you might not recognize all the people in a previous generation. For help using facial recognition, refer to Apple’s Photos documentation, but here are the basics. The first task is to identify or create a new person whose face you want Photos to recognize:
- In the Photos sidebar, click People, and look to see if the person has a thumbnail. If so, move on to the instructions for associating more photos with them.
- If they don’t have a thumbnail, find a photo of them. If there’s an “unnamed” tag under their face, type their name in the box, selecting the appropriate suggestion if they’re among your contacts.

- When there’s no tag under the person’s face, you’ll have to add one manually. Choose Window > Info to bring up the Info window, click the Add Faces button, click the image again (surprising, but necessary), drag the Click to Name circle over the face of the person to identify, and then type a name in the box.
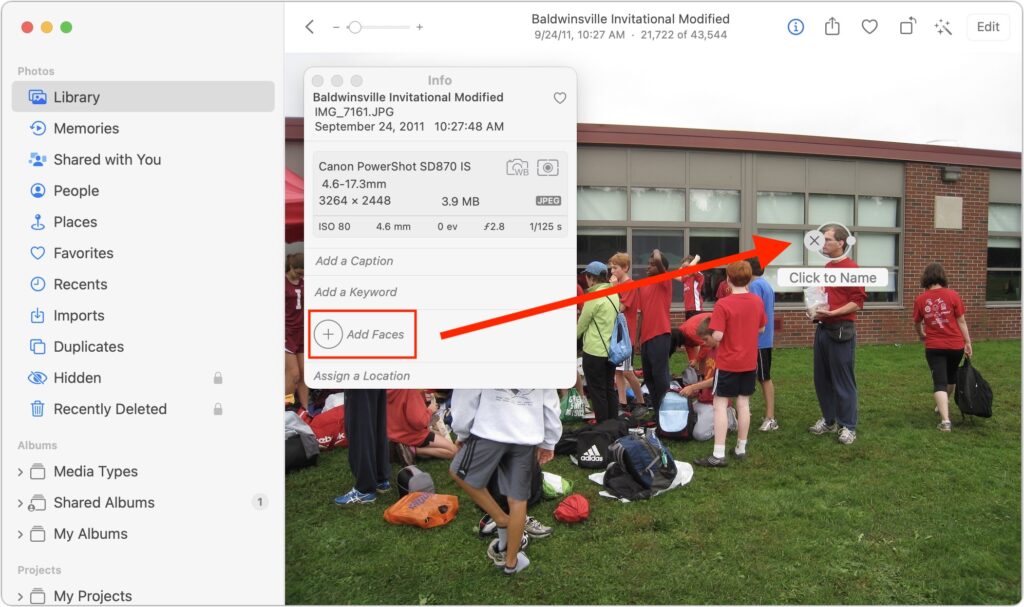
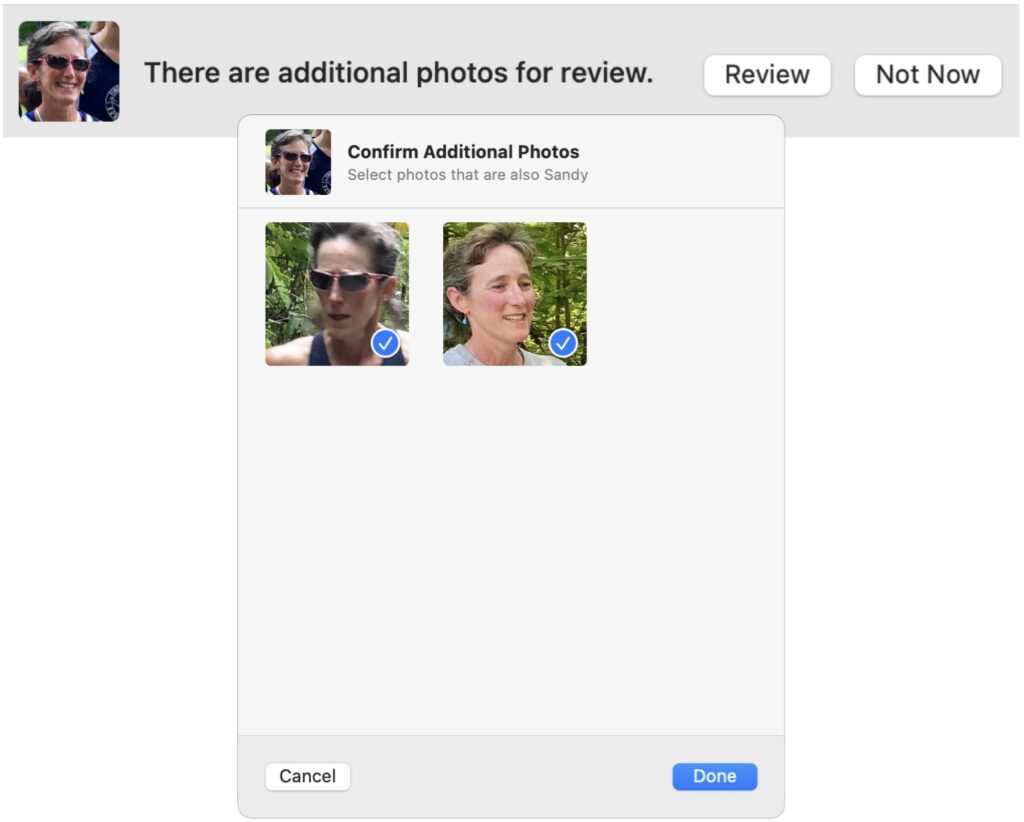
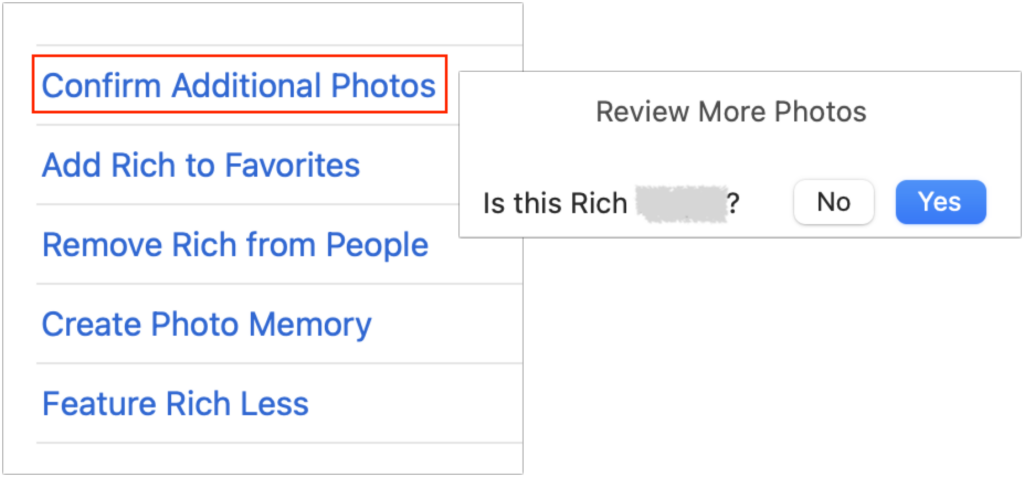
Once you have identified or created a person for someone whose face you want, there are three ways to train Photos to identify more photos of them. These aren’t exclusive—you’ll want to employ all three. The first approach is generally pretty accurate, the second sometimes grasps at straws, and the third may kickstart more recognition by the other two later on.
- In the People album, double-click a person’s face. At the top of the window, Photos may display a banner saying that there are additional photos to review. If it does, click Review, and in the dialog that appears, deselect any photos that aren’t of the person before clicking Done. The banner won’t appear when there are no more photos to check for that person.
- In the People album, double-click a person’s face. Scroll to the bottom of the window, and click Confirm Additional Photos. If it has any photos that might be of that person, Photos displays the first one and asks at the top of the screen if the photo is of the desired person. Click Yes or No as appropriate for each photo that appears. Often, identifying a particular face as being associated with the person will add more photos. When you finish, click the Done button at the top of the window.
- Scroll through a bunch of photos individually, typing names into the “unnamed” box whenever possible. Those photos will immediately be associated with the person, but then you should leave Photos running in the background for hours or days so it can use that new information to identify more possible faces, which you may have to confirm using the previous two methods.
Identifying faces can be time-consuming, but it can also be somewhat addictive if you like feeling that you know more than the computer. Note that face metadata lives only in Photos itself, so if you were ever to export or share the photos with someone else, you’d have to find a way to convey who was pictured in another way.
With the tools in Photos to change dates, titles, locations, and faces, you can bring order to that large collection of scanned or old photos.
(Featured image by iStock.com/vgabusi)
Social Media: Do you have pictures that are difficult to find or make sense of in Apple’s Photos because they lack dates, titles, locations, and faces? That happens regularly with scanned snapshots, so we explain how you can efficiently add metadata.