Lift Objects from Photos on the iPhone

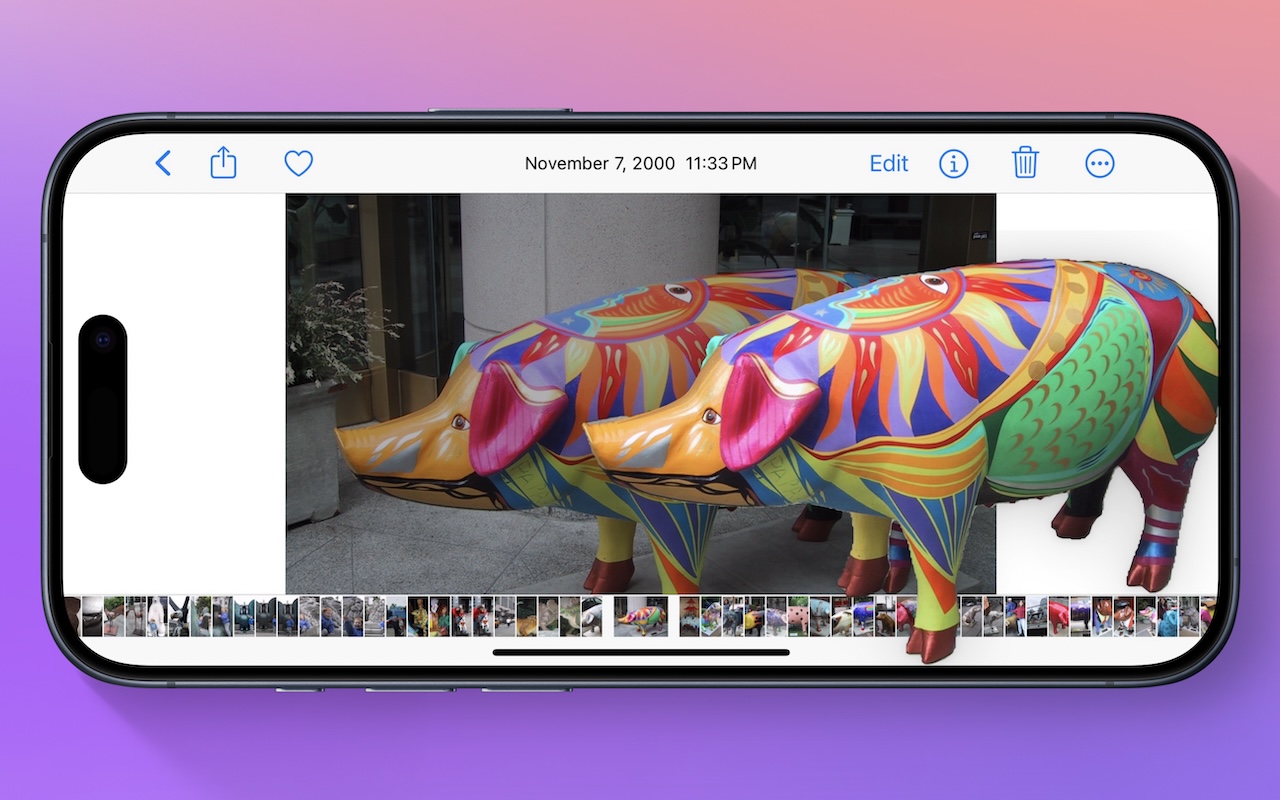
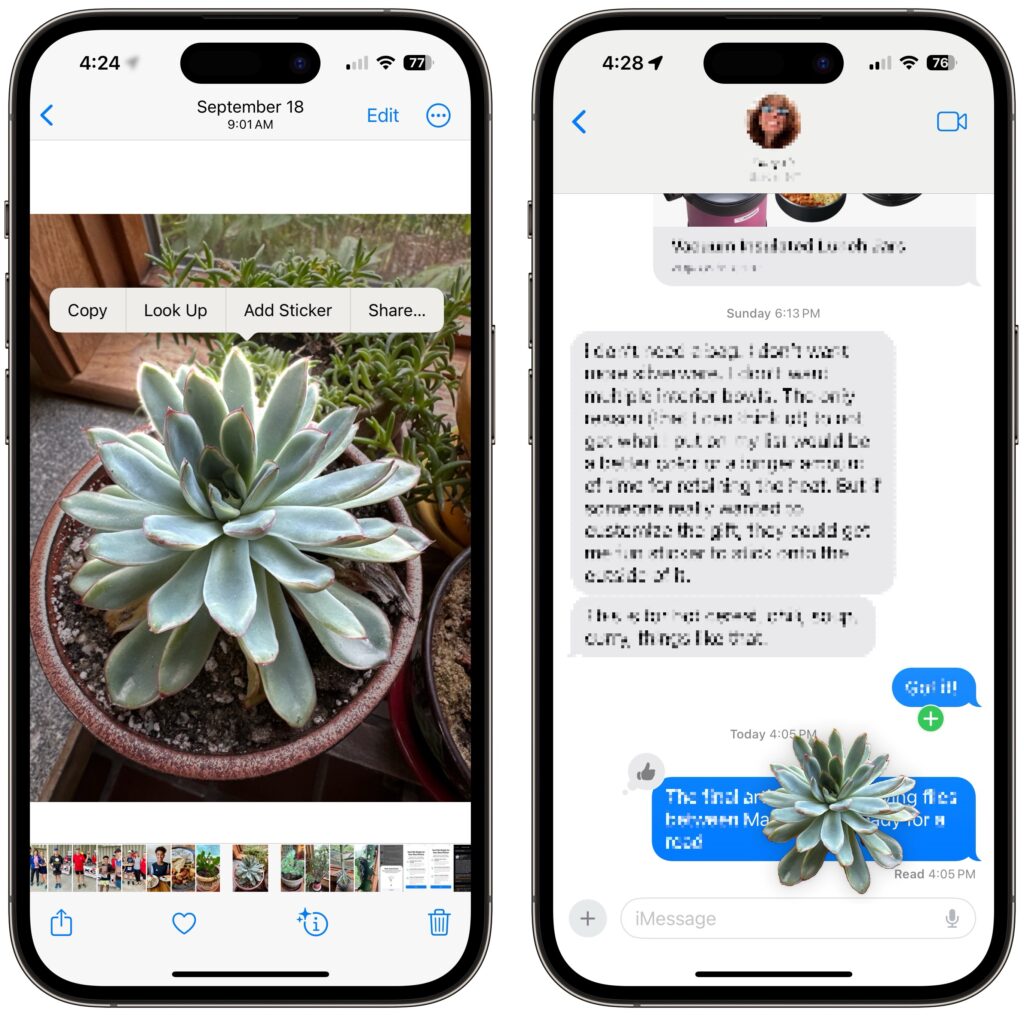
Have you ever wanted to extract an object from a photo for use in another context? Starting with iOS 16 on a relatively recent iPhone, you can do that with many photos. In the Photos app, touch and hold the object, and if Photos can extract it, you’ll see a highlight run around its edges. Raise your finger, and a popover lets you copy the object, look up information about it, turn it into a sticker (in iOS 17), or share it. Or you can start dragging the object, switch apps with your other hand, and drop it into another app, like Messages. With Universal Clipboard, you can even lift an object on an iPhone, copy it, switch to Preview on your Mac, and choose File > New from Clipboard. File this one under Arthur C. Clarke’s Third Law, which states, “Any sufficiently advanced technology is indistinguishable from magic.”

(Featured image by Adam Engst)


Social Media: Starting with iOS 16, Apple made it possible to extract objects from photos. You can drag objects to other apps, copy them, turn them into stickers, and more.

Similar Posts

  • A Swinging Hot Spot in Paradise

    You are visiting Key West, accompanied by your trusty iPhone and MacBook Air. Suddenly there’s an emergency at work, and you need to get online with your Mac. You can pick up a cell signal with the iPhone, but there’s no Wi-Fi that isn’t locked up. Well, my first thought might be “oh well, I’m on vacation!” but you are dedicated and need to be online.

    Don’t worry! You can use your iPhone’s cellular data plan to create a personal Wi-Fi hotspot that lets your Mac access the Internet through your iPhone. Also called “tethering,” it’s fast, easy, and can be a life-saver when you just have to get online with a Mac or your Wi-Fi-only iPad. It supports up to 5 users, too, which means you can get your team online, too!

    Before we explain how to do set up a personal hotspot, note that most but not all cellular carriers allow tethering on existing plans. For some, you might have to pay more for tethering. Keep in mind that any data consumed by your Mac while tethered will count against your data allowance and may generate overage fees. Carriers with “unlimited” data, like T-Mobile and Sprint, generally throttle your bandwidth to slower speeds if you use too much data.

    Along those lines, if you use a file sharing service like Dropbox or Google Drive, or an Internet backup service like CrashPlan or Backblaze, turn them off before connecting. Particularly if they haven’t connected in a while, those services can transfer a lot of data quickly, which could result in a hefty overage charge or awkward data throttling for the rest of the month.

    With those warnings out of the way, follow these steps in iOS 9 to turn on Personal Hotspot:

    1. On your iPhone, if you’ve never enabled the feature before, go to Settings > Cellular > Personal Hotspot. Once you’ve turned Personal Hotspot on once, it moves up a level, so you can access it from Settings > Personal Hotspot.
    1. Tap on Wi-Fi Password and enter a password that’s at least 8 characters long and easy to type. It doesn’t need to be super secure because you can keep Personal Hotspot turned off unless you’re using it. But you do want a password so random people nearby can’t connect and use your data.
    1. Once you’ve entered a password, slide the Personal Hotspot switch.

    That’s it! The Personal Hotspot screen provides basic instructions for connecting to the iPhone via Wi-Fi, Bluetooth, and USB. Stick with Wi-Fi, since it’s the easiest and most reliable in most cases.

    • To connect to your new Personal Hot Spot on your Mac, click the Wi-Fi icon in the menu bar and choose your iPhone’s name.
    • On your iPad, go to Settings > Wi-Fi and choose your iPhone.
    • Enter your password when prompted, making sure to select Remember This Network. That way, you won’t even have to enter your password the next time.
    • The Mac or iPad then connects to your iPhone, showing a hotspot icon instead of the usual wave icon for the Wi-Fi menu.

    Could it get any simpler? When you’re done, the safest thing to do, to ensure you don’t accidentally end up using too much of your data allowance, is to turn off the Personal Hotspot switch in Settings > Personal Hotspot. Your Mac or iPad will automatically disconnect.

    Actually, it CAN be simpler! Your Mac can automatically use the personal hotspot on your iPhone to connect to the Internet when they’re within range of each other.

    Use Instant Hotspot on your iPhone (with iOS 8 or later) to provide internet access to your Mac computers and other iOS devices (with OS X Yosemite or iOS 8) that are in range and signed into iCloud using the same Apple ID. Instant Hotspot uses your iPhone — you don’t have to enter a password or even turn on Personal Hotspot.

    Make sure your iOS device and your Mac are signed into iCloud with the same Apple ID.

    On your Mac, click the Wi-Fi status icon in the menu bar, then choose your iPhone or iPad.

    After you connect to the iPhone or iPad Personal Hotspot, you can check the cellular signal strength and the battery status of the iPhone or iPad in the Wi-Fi status menu.

    When you’re not using using the hotspot, your devices automatically disconnect to save battery life.

    One more big advantage of Personal Hot Spots. When you are shopping for that new iPad, perhaps you don’t need the cellular model if you nearly always have your iPhone handy. That’s what I do. If I need internet access on my Wi-Fi iPad, I simply connect to my Hot Spot! Saves me the added cost of a cellular-enabled iPad and the monthly fees from the cell carrier!

  • Airmail for iPhone

    As you may know, I have been using the Airmail mail client for some time and am a big fan of this alternative…

  • Droids, Drones, Scooters, Cars and USB C

    I remember only a couple years ago when drones were new and cutting edge technology. Now, there are huge sections of the show devoted to drones of all sorts: fighting drones, mini drones, paper airplane drones and dancing drones. I don’t know if it is the Star Wars influence but droids were everywhere, including “laundroids” for folding your laundry, grill cleaning droids, window washing droids and all kinds of robots.

    3D printers were new and unique and again whole sections of the show were devoted to “replicators” making everything from iPhone cases to clothing to spare body parts. Several companies were there just to show their filaments for these 3D printers.

    Scooters were everywhere. You know, the ones in the news that have the batteries that blow up. Well, literally dozens of companies were showing their versions and the original Segway had a booth, too. Some one-wheel scooters were there as well as shoes with wheels that zipped you around.

    p{text-align: center;}. !http://blog.smalldog.com/images/4638.jpg!

    Self-driving cars and technology for self driving cars dominated the North Hall and some concept cars were shown, too. My favorite was the Faraday electric car that looked like a single seat batmobile.

    USB-C made its debut at the show with hubs, cables and some USB display port displays, too. I think we will see a lot of USB-C stuff coming up!

    Less prevalent this year was the huge variety of iPhone and iPad cases. There were huge sections last time but while there were several companies showing cases it was toned way down. In their place, power banks of all sorts were being shown in every imaginable shape and size. The Apple battery case, aka the hump, was universally panned but several companies had slim battery cases for the iPhone.

    p{text-align: center;}. !http://blog.smalldog.com/images/4641.jpg!

    I did walk through the TV section but it was not as notable as in past years. The 3D fad has sort of expired and 4K displays are common. I still love the OLED displays, though.

    Other areas that were huge were health care and fitness with a lot of wearable fitness devices and health monitors or all sorts from implantable blood glucose devices to blood pressure cuffs, thermometers and scales. The home automation section was larger than previous years and there were some new HomeKit compatible devices. I liked the NoLok offering of bluetooth compatible padlocks and bike locks that work similar to the Kevo system.

    It was a quick trip out to Vegas but it was certainly worthwhile. I will follow up next week with a bit more.