How to Sync Your Text Messages across All Your Apple Devices

Although many of us think of Messages as an iPhone app, Apple’s platform integration lets you read and reply to conversations in Messages on other Apple devices, including the Mac and iPad. All your devices must have the correct settings to make this work reliably. We regularly hear from users who don’t see all their messages on all their devices. If that’s you, check these settings:

  • Same Apple ID: Your devices all know they’re yours when they’re logged in to the same Apple ID. That’s not a problem for most people, but couples who share an Apple ID, for instance, can run into trouble here. To verify this, open Settings > Your Name in iOS and iPadOS, or System Settings > Your Name in macOS. The email address under your picture at the top of each of those screens should match. If it doesn’t, scroll to the bottom, tap or click Sign Out, and sign in again with the correct Apple ID.
  • Two-factor authentication: As with so many Apple services now, your Apple ID must be set up for two-factor authentication, which causes certain logins to be queried a second time on another device. Most people have two-factor authentication set up by now, but if not, turn it on using Apple’s instructions.
  • iCloud Keychain: Your devices must have iCloud Keychain turned on to share your Messages account information. It’s probably already on, but you can enable it if not. Turn it on for an iPhone or iPad in Settings > Your Name > iCloud > Passwords and Keychain > Sync this iPhone. On a Mac, the switch is in System Settings > Your Name > iCloud > Passwords & Keychain > Sync this Mac.
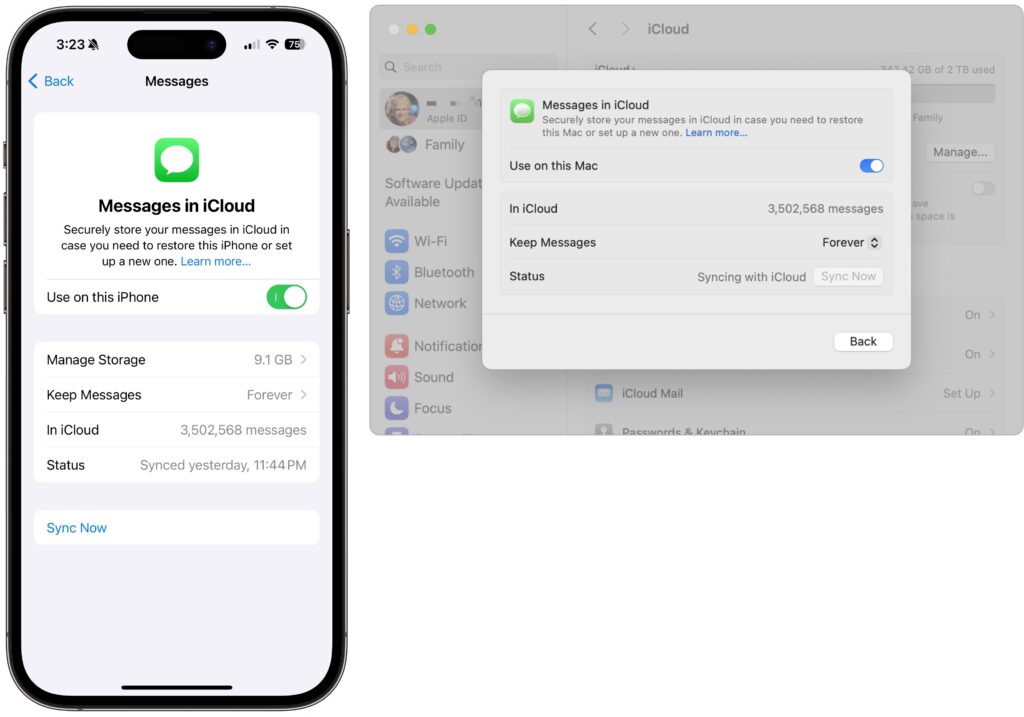
  • Messages in iCloud: This is the key setting—the previous three are just foundational requirements. Enable it for an iPhone or iPad in Settings > Your Name > iCloud > Show All > Messages in iCloud > Use on this iPhone. On the Mac, look in System Settings > Your Name > iCloud > Show More Apps > Messages in iCloud > Use on this Mac.
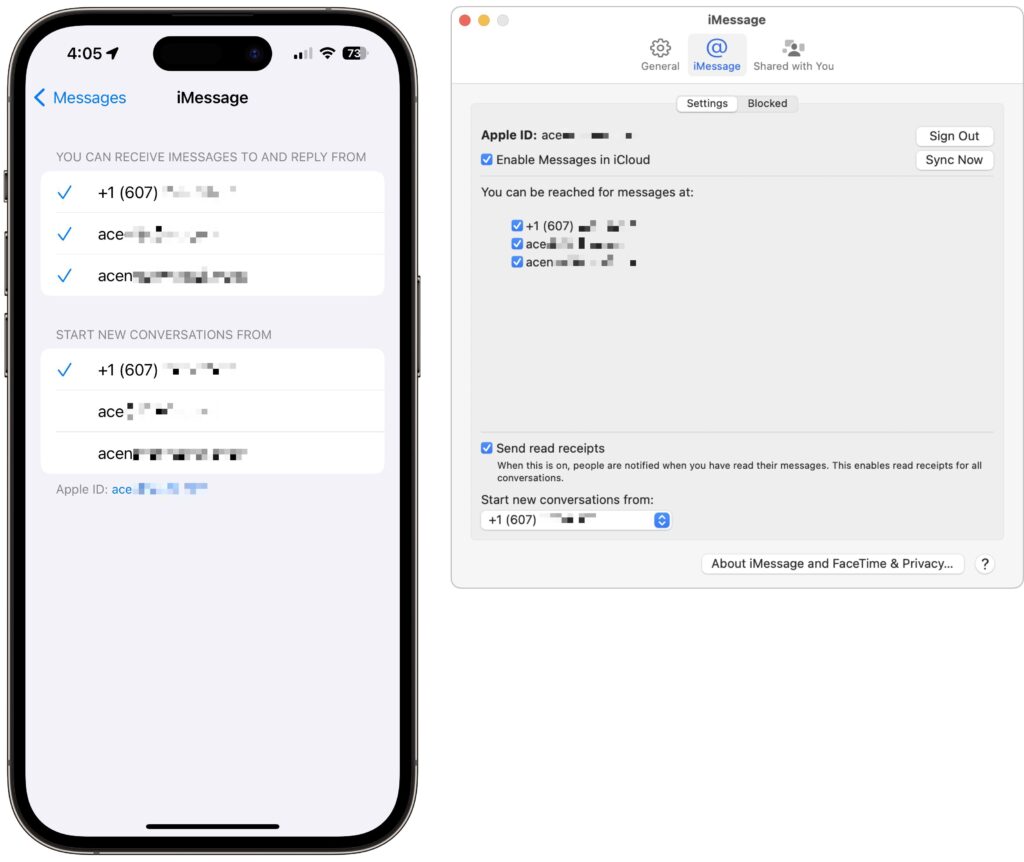
  • iMessage account: You’ve checked that you’re using the same Apple ID everywhere, but there’s a similar setting that’s also important. On your iPhone or iPad, go to Settings > Messages > Send & Receive and make sure you’re signed into iMessage with the same Apple ID—look at the bottom of the screen. Also, ensure you’re set to send and receive from your phone number and appropriate email addresses. It’s safest to send and receive from all the possibilities and start new messages from your phone number. On the Mac, verify that you have the same settings in Messages > Settings > iCloud.
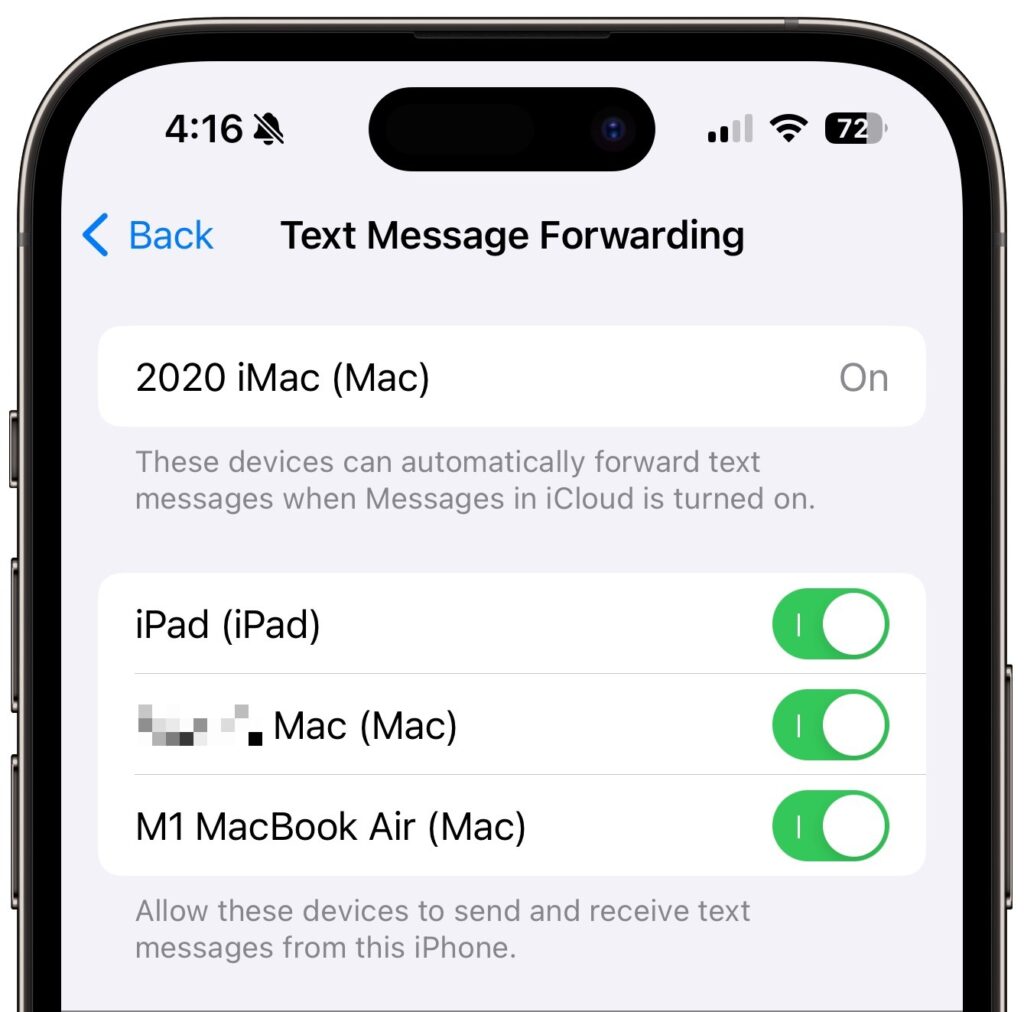
  • Text Message Forwarding: Turning on Messages in iCloud should keep message history synced across all your devices, including green bubble SMS/MMS text messages. However, it’s worth verifying that SMS/MMS messages are being sent to all your devices. On your iPhone, in Settings > Messages > Text Message Forwarding, select all the devices you want to receive text messages.
Although all the above settings may seem like a lot, most should already be set up correctly. We listed them all because when people have trouble with their messages syncing across all their devices, one or more of these are usually set wrong.

Even with everything configured correctly, there can be hiccups—nothing’s perfect. If messages fail to sync consistently, try these troubleshooting steps:

  • Use the Sync Now button in the Messages in iCloud settings on any device that hasn’t caught up. That likely won’t help instantly, but syncing should eventually catch up.
  • Restart the device—it’s always worth trying. On an iPhone or iPad, choose Settings > General > Shut Down (at the bottom), slide to power off, and then press and hold the side (iPhone) or top (iPad) button to turn the device back on. On a Mac, just choose Restart from the Apple menu.

When Messages in iCloud is working properly, though, you can carry on text message conversations using any of your devices at any time. It’s especially nice to switch to the Mac for easier typing when you’re in an involved conversation.

(Featured image by iStock.com/anyaberkut)


Social Media: One of the best parts of Apple’s tight platform integration is that you can view your text messages on all your devices. Or at least you can if you get everything set correctly.


Similar Posts

  • Who cares about QR Codes?

    By now you’ve probably seen one of those odd-looking white squares with a bunch of smaller square dots that make up a random pattern inside–that’s a QR code. QR stands for “Quick Response,” and a QR code is a form of barcode, just like on the packaging of nearly everything you buy.

    Usually QR codes are used to store Web links–URLs–so an ad can display just the QR code instead an unwieldy and hard-to-type web address. But QR codes aren’t just for ads. They’ve appeared on business cards, in magazines and books, on coins and bills, and even on tombstones–any place it would be nice to help someone load a Web link into a smartphone but where there isn’t enough room for a URL or in situations where viewers won’t remember the URL later. And the links? They can display anything that can appear on the Web: text, photos, videos, games, and more.

    Only one built-in iPhone app can scan QR codes–the Wallet app in iOS 9–but it can scan only QR codes that are associated with Wallet passes, things like airline boarding passes, concert tickets, and iTunes gift cards. For QR codes that encode any other sort of data, Wallet shows an error. It would be nice if Apple would add general QR scanning capabilities to Wallet or the Camera app, but until that happens, you’ll need another app.
    There are numerous QR code scanning apps in the App Store, but if you need a recommendation, give TapMedia’s QR Reader for iPhone a try. It’s free with ads (remove them with a $1.99 in-app purchase), scans both QR codes and traditional barcodes on most commercial products, and displays the associated information within the app. It can even help you create your own QR codes.

    To use a QR code scanner, launch the app, allow it to access the camera when it asks, and then point it at the QR code. Good apps will scan nearly instantly, but if not, move the camera so the QR code is centered between the guides. If even that doesn’t work, move forward or back so the camera can focus on the centered code.

    Once the code has been scanned, the app will usually bring up an in-app Web browser to display whatever was encoded. For certain kinds of data, like books or grocery items, the app may go right to Amazon or a price comparison site. Good apps will also keep a record of sites you’ve scanned, so you can go back to them later, even if you can no longer scan the QR code.

    So download a QR code scanning app and keep an eye out for QR codes. Once you start looking, you’ll find them everywhere–it’s a modern-day treasure hunt!

  • The Importance of Staying Updated

    Does it feel like your Apple devices are always asking you to install operating system updates? You’re not wrong—from September 2022 to January…

  • Hey Dora, Follow Orders!

    Last week we talked about how to activate and use dictation to write emails and documents but there is a lot more that you can do. I keep thinking about Scotty from Star Trek when he went back in time and was “**confronted with a Mac Plus**”:https://youtu.be/LkqiDu1BQXY?t=1m8s. He picked up the mouse as natural as can be and said “computer…”. That time is coming and Dictation Commands are already built into your operating system.

    Once you have dictation activated you can activate dictation commands by going to the Accessibility system preference.

    * Choose Accessibility from System Preferences.

    * Choose Dictation from the list on the left side of the Accessibility pane.

    * Click the Dictation Commands button. You can see a list of available commands in the Dictation Commands sheet.

    * A starting set of commands are enabled by default. Additional speakable items like “Open document” and “Click item” are available by enabling advanced commands using these next steps:

    * Select (check) the option to “Enable advanced commands” in the Dictation Commands sheet that appears.

    * Click Done.

    p{text-align: center;}. !http://blog.smalldog.com/images/4710.png!

    After you have enabled advanced commands, you can also create your own commands by clicking the Add Command (+) button. This lets you link a spoken phrase to an app, a menu item, a keyboard shortcut, or an Automator workflow.

    You have enabled Dictation Commands and now you can speak any of the items in this list to perform the related action. Press the Fn key twice, then say a command to make it happen, such as “Search Spotlight for the Cubs score” or “select sentence” or “new document”. Give it a try and pretty soon you will be just like Scotty and the Mac Plus.

    As a shortcut, you can speak the command “Show commands” to see a list of the commands you can say.