Use 1Password to Enter Your Mac Login Password

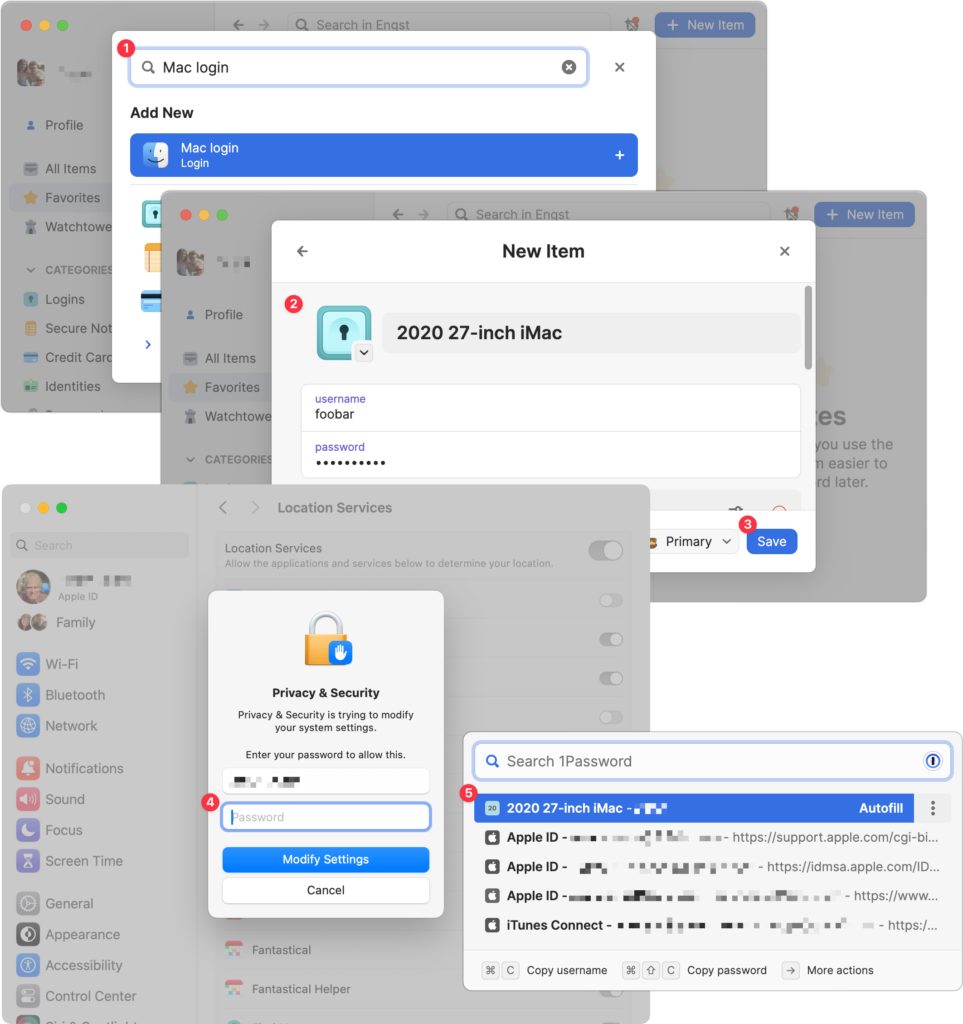
We think of 1Password as being helpful for entering passwords on websites and in iPhone and iPad apps. But its Universal Autofill feature has a hidden capability that lets 1Password enter your Mac login password when you have to provide it to change certain system settings, install apps, format drives in Disk Utility, and more. (But it won’t work to log in at startup before 1Password is running.) To turn this feature on, click the New Item button in 1Password, search for and select “Mac login” , give it a name that will sort alphabetically to the top, like “2020 27-inch iMac” , enter your password, and click Save . From then on, whenever you’re prompted for your Mac login password , press Command- (Backslash, located above the Return key), and then click the desired login or press Return to select the topmost item .

(Featured image based on an original by iStock.com/ipuwadol)


Social Media: 1Password is tremendously helpful for entering website passwords, but a little-known feature also enables it to enter your Mac login password for changing system settings, installing apps, and more.

Similar Posts

  • Motorcycling down here is sort of boring. I have my bike all tuned up but there is literally only one road and the fastest speed limit in Key West is 30mph. I think we may have to trade in Grace’s Vespa to get a real motorcycle for her so we can take some longer trips down here.

    Pitchers and catchers reported for spring training and the Cubs Kyle Schwarber is already breaking windshields in Arizona at the Cubs park. Maybe this year?

    Thank you so much for reading this issue of Kibbles & Bytes!

    Your Kibbles & Bytes Team,

    _Don, Emily, & Hadley_

  • Watch Out for Modern Tech Support Scams

    Although Apple’s products and services generally live up to Steve Jobs’s phrase “it just works,” problems do occur, opening the door to scams…

  • Reminders (Finally) Adds Time Zone Support

    Apple’s latest operating systems have eliminated a longstanding annoyance for frequent travelers: the lack of time zone support in Reminders. If you had…

  • Hey Dora, Follow Orders!

    Last week we talked about how to activate and use dictation to write emails and documents but there is a lot more that you can do. I keep thinking about Scotty from Star Trek when he went back in time and was “**confronted with a Mac Plus**”:https://youtu.be/LkqiDu1BQXY?t=1m8s. He picked up the mouse as natural as can be and said “computer…”. That time is coming and Dictation Commands are already built into your operating system.

    Once you have dictation activated you can activate dictation commands by going to the Accessibility system preference.

    * Choose Accessibility from System Preferences.

    * Choose Dictation from the list on the left side of the Accessibility pane.

    * Click the Dictation Commands button. You can see a list of available commands in the Dictation Commands sheet.

    * A starting set of commands are enabled by default. Additional speakable items like “Open document” and “Click item” are available by enabling advanced commands using these next steps:

    * Select (check) the option to “Enable advanced commands” in the Dictation Commands sheet that appears.

    * Click Done.

    p{text-align: center;}. !http://blog.smalldog.com/images/4710.png!

    After you have enabled advanced commands, you can also create your own commands by clicking the Add Command (+) button. This lets you link a spoken phrase to an app, a menu item, a keyboard shortcut, or an Automator workflow.

    You have enabled Dictation Commands and now you can speak any of the items in this list to perform the related action. Press the Fn key twice, then say a command to make it happen, such as “Search Spotlight for the Cubs score” or “select sentence” or “new document”. Give it a try and pretty soon you will be just like Scotty and the Mac Plus.

    As a shortcut, you can speak the command “Show commands” to see a list of the commands you can say.