Use AirPlay to Mirror or Extend Your Mac’s Display
Apple’s AirPlay is one of those low-level technologies that’s more capable than many people realize. In addition to allowing you to stream video and audio from an iPhone, iPad, or Mac to an Apple TV connected to a large-screen TV, AirPlay also enables you to use that TV as an external Mac display, either mirroring what’s on your Mac’s screen or extending the desktop. It even allows you to turn one Mac into a display for another.
The big win of connecting to a TV comes when you want to demo something from your Mac to a group—it’s a compelling reason to have an Apple TV-equipped screen in a conference room—or when you want to use one Mac’s display from another without the hassle of rearranging cables. In this article, we focus on these external display features, which are helpful to both individuals and businesses alike. There are three ways to use AirPlay to enable another display: mirroring the entire screen, mirroring selected apps or windows, and extending the desktop.
Set Up AirPlay to Receive Video
First, ensure that all devices have Wi-Fi turned on and are connected to the same network. If you’re using AirPlay to a Mac, note the minimum system requirements (primarily macOS 12 Monterey or later). Additionally, if you’re using your own devices, it’s best to be signed in to the same Apple Account.
Second, make sure the screen to which you want to mirror is accessible:
- On an Apple TV, the settings are likely already enabled; however, if not, navigate to Settings > AirPlay and HomeKit and turn on AirPlay. You can also set who can gain access (everyone, anyone on the same network, or only people sharing this home) and require a password. For an office environment, you can turn the Apple TV into a conference room display that provides connection instructions with the screen saver, requires a PIN, and allows you to set a custom message and background photo. Also, note the AirPlay Display Underscan option, which you can turn on to reduce the chance of the screen being cropped or turn off to eliminate black bars. Auto tries to choose for you—in our testing, cropping was sometimes unavoidable.

- On a Mac, go to System Settings > General > AirDrop & Handoff and turn on AirPlay Receiver. The “Allow AirPlay for” menu lets you specify who can access it, and you can require a password.

Mirror Your Mac’s Screen
Apple’s recommended method for mirroring your screen is to open Control Center by clicking its icon at the right side of the menu bar, click Screen Mirroring, and select the desired Apple TV or Mac from the list. Once you do that, your Mac’s screen will appear on the external display.

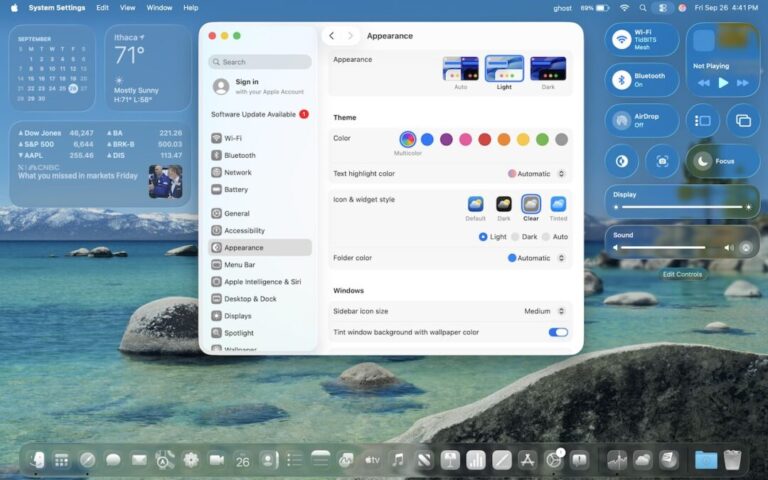
However, it may not display at a usable resolution. You control the resolution in System Settings > Displays, and you can jump there by clicking Display Settings in either of the two rightmost windows shown above. In the Displays settings screen, from the Optimize For pop-up menu, choose either your Mac or the external display. If you choose the external display, you can select from all available resolutions.

If you’re mirroring to a Mac with multiple displays, a small, dark lozenge in the upper-left corner of the destination screen provides a menu from which you can choose which display to use.
Mirror Selected Apps or Windows
Mirroring your entire desktop is often overkill when all you want to share with the group is one or two windows. As of macOS 15.2 Sequoia, that’s now possible. An added benefit is that you don’t have to worry about others seeing your messy desktop or potentially sensitive information in other windows.
To mirror one window or all the windows in an app, open Control Center, click Screen Mirroring, select the destination display, and then click Change or Choose Content. In the dialog that appears, select Window or App and click Choose Window or App.

Then select the desired window and click either Mirror This Window or Mirror All Application Windows.

You’re not limited to windows from a single app. You can add additional windows by clicking the purple Screen Mirroring menu in the menu bar, clicking Add Windows, and selecting another window. (If you want to stop mirroring one and start mirroring another, select the current window to see a Stop Mirroring This Window button.)
Extend Your Mac’s Desktop
Mirroring is useful for presentations or working with a group, but if you instead want to boost your productivity with additional screen real estate, you can opt to extend your Mac’s desktop to another Mac or TV.
To do so, open Control Center, click Screen Mirroring, select the destination display, click Change, and in the dialog that appears, select Extended Display and click Extend Display.

This option often requires additional configuration to get everything looking the way you want. Open System Settings > Displays and click the second display. First, you may want to select a different resolution to see more or less content on the second display. Clicking Show All Resolutions expands the list, but many of the additional resolutions won’t be ideal. Unfortunately, some desirable resolutions are marked with a “low resolution” tag—they’ll be fuzzier than ideal.

Once you have your desired resolution, you need to arrange the screens appropriately. It’s usually best to match the real-world positioning, so if your second display sits to the left of your Mac, move its representation there so dragging windows and other items on the extended desktop works as you expect. Click the Arrange button, drag the second display into the desired location, and click Done.

Regular Use and Stopping Mirroring
Although it’s simple to start mirroring or extending your desktop and to switch among the various modes, you’ll probably use one of the modes most of the time. The good news is that macOS remembers your previous choice, so if you mirror your entire screen or extend your desktop, clicking Screen Mirroring in Control Center will default to that option the next time you invoke it. Mirroring windows always requires that you pick the window to share.
Regardless of how you’re mirroring your screen, you can stop by clicking Stop Mirroring in the purple Screen Mirroring menu in the menu bar. Alternatively, open Control Center, click Screen Mirroring, and click Stop Mirroring. Or click the Disconnect button in Displays.
On the remote Mac, that small, dark lozenge also provides an X button that ends screen mirroring when clicked from the remote Mac. Turning off the remote Apple TV also works.
Using AirPlay to mirror or extend your Mac’s display to another Mac or TV may not be something that you use on an everyday basis, but it’s a big win when you need to share content with a group, do a presentation, or ramp up your productivity without rearranging cables.
(Featured image by iStock.com/Ratchapon Supprasert)
Social Media: Want to demo something on a big screen? AirPlay can mirror your Mac’s display—or just specific windows—to an Apple TV-equipped TV or another Mac. It’s perfect for presentations, sharing content with a group, or increasing your screen space.