Spotlight Gets Brighter in macOS 26 Tahoe

Spotlight has been a staple on macOS for decades, and at various points in its history, Apple has added new search capabilities. However, the revamp that Spotlight enjoyed in macOS 26 Tahoe is the most significant change in a long time. Here are the new features you’ll experience in Tahoe.

Filterable Interface

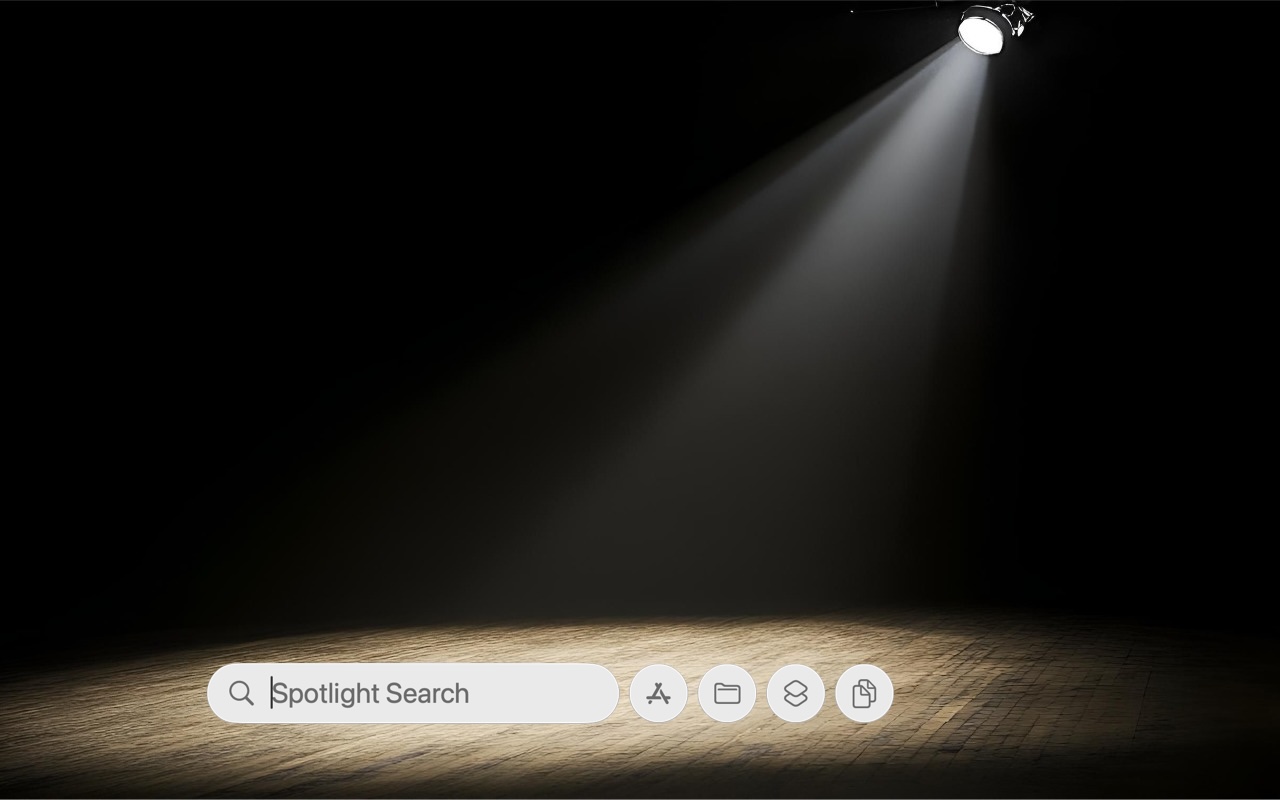
Apple has refocused the Spotlight interface to list all result types in a single view, rather than separating them by type as before. Apple claims the results are intelligently ranked, so in theory, what you’re most likely to want will appear at the top. As before, you invoke Spotlight with Command-Space, but when you start typing, it tries to auto-complete using the top hit. In the screenshot below, the user typed “Apple” and Spotlight added “Configurator” in white. Keep typing to change the autocomplete, double-click a result to open it, or use the arrow keys to select a result and press Return to open it or Tab to search inside it.

Having all the results in a single window may still be overwhelming, so Spotlight now lets you filter the results in several ways. Most notable is the horizontally scrollable line of buttons above the search results that lets you filter the results list to particular files or data types, results from specific apps, files stored in a third-party file provider like Google Drive, and even menu items. For example, clicking the Calendar button above the results shows only matching events.

Spotlight also features new dedicated browsing modes, so if you press Command-1 through Command-4 (or wiggle the pointer after invoking Spotlight to reveal browsing mode buttons), Spotlight limits the results to specific types of items:

  • Applications: Press Command-1 to display all your apps in a Launchpad-like view; type a few letters to filter the results to matching apps. The button row at the top lets you filter further by App Store category.
  • Files: Press Command-2 for a file browser. Although Spotlight provides suggestions and recent files, you’ll probably want to type words from the filename. The button row lets you limit the results to specific file types or documents from specific apps.
  • Actions: Press Command-3 to see a long list of actions you can now perform from Spotlight. Many of these are from Apple’s apps, but third-party apps can also expose actions via Spotlight. More on this new feature shortly.
  • Clipboard: Press Command-4 to see what you have copied to the clipboard recently and insert selected items with a click. More on clipboard history later, too.

Spotlight provides three additional ways to filter the results:

  • By location: To search within top-level macOS containers and third-party cloud containers, you can type the location name and press Tab before typing a search string. Filtering by location works for the Desktop, Documents, Downloads, and Applications folders, as well as iCloud Drive, Google Drive, Dropbox, and OneDrive. (You may need to select the folder from the search results manually before pressing Tab the first few times; this trains Spotlight.) Unfortunately, searching by location doesn’t work for arbitrary folders; use a Finder search instead.
  • By app: To filter the results to include only documents that a specific app can open, type its name and press Tab. Enter a search string to search within the filtered results.
  • By kind: You can filter kinds of files by typing / and then the file type, like /PDF or /text, and then pressing Return. For even more kind searches, prefix your search with kind:filetype, like kind:csv or kind:presentation.

Trigger Actions (with Quick Keys)

Perhaps the most significant new feature of Spotlight is the ability to trigger actions across a wide variety of apps using the keyboard. For example, you can invoke Spotlight and type an action name, like start timer and press Return to initiate a timer in the Clock app. Spotlight then prompts you for the number of minutes.

For actions you perform regularly, you can speed things up by defining Quick Keys, which are character sequence shortcuts that stand in for the full action name. For example, you could set it up so that typing st in Spotlight expands to start timer.

Many Apple apps expose their features as Spotlight actions, and an ever-increasing number of third-party apps do as well. The only way to see which actions are available is to open Spotlight, press Command-3, and scroll through the list.

It’s worth calling out the fact that Apple’s Shortcuts app makes all its shortcuts available as Spotlight actions, so you can now use Spotlight to trigger additional automations.

Clipboard History

The other huge addition to Spotlight is clipboard history, which until now has required using a third-party utility. Clipboard history lets you access everything you have copied to the clipboard over a period of time, making it easy to paste text and graphics more than once. You turn on clipboard history and set Spotlight to remember clipboard items from the last 30 minutes, 8 hours, or 7 days in System Settings > Spotlight.

To access your clipboard history, invoke Spotlight, press Command-4, and either double-click an entry in the list or press the Down arrow key to select the desired clipboard item and press Return to paste it into the current text field. You can also type a few characters from the clipboard item to filter the list, but unfortunately, that works only with characters at the beginning of the item, not elsewhere.

Website Searches

Spotlight Web searches are quicker than switching to your Web browser, navigating to the site, finding the search field, and entering your search. Just open Spotlight, type the website name, press Tab, and then type a search string to search directly on that site. Sites that work well include Wikipedia, YouTube, Amazon, IMDb, and eBay, but it’s worth trying any website you have already searched in Safari.

Spotlight learns its site‑specific searches from Safari; if you primarily use another browser, perform a few searches in Safari first to seed Spotlight’s knowledge.

Spotlight History

Finally, if you use the same Spotlight commands repeatedly, you might be able to avoid some unnecessary typing by invoking Spotlight and then pressing the Up arrow repeatedly to cycle back through your previous Spotlight commands. Once the one you want appears, press Return to insert it just as though you had typed it. Having access to your Spotlight history isn’t a game-changer, but it’s worth remembering for occasional use.

Going Beyond Spotlight

Spotlight in Tahoe takes a big step toward launchers like LaunchBar, Alfred, and Raycast, but those tools still lead in customization and extensibility. For many users, Spotlight now covers the basics—launching apps, opening files, triggering actions, and recalling clipboard items. If you need more—file operations beyond opening, deep in‑app data access, universal Web search, window management, or bespoke extensions—LaunchBar, Alfred, and Raycast remain the better choice.

(Featured image based on an original by iStock.com/Wirestock)


Social Media: Spotlight in macOS 26 Tahoe received a major upgrade, and you can now filter results, run app actions, search sites directly, and browse clipboard history—all starting from a quick press of Command‑Space.

Similar Posts

  • A Swinging Hot Spot in Paradise

    You are visiting Key West, accompanied by your trusty iPhone and MacBook Air. Suddenly there’s an emergency at work, and you need to get online with your Mac. You can pick up a cell signal with the iPhone, but there’s no Wi-Fi that isn’t locked up. Well, my first thought might be “oh well, I’m on vacation!” but you are dedicated and need to be online.

    Don’t worry! You can use your iPhone’s cellular data plan to create a personal Wi-Fi hotspot that lets your Mac access the Internet through your iPhone. Also called “tethering,” it’s fast, easy, and can be a life-saver when you just have to get online with a Mac or your Wi-Fi-only iPad. It supports up to 5 users, too, which means you can get your team online, too!

    Before we explain how to do set up a personal hotspot, note that most but not all cellular carriers allow tethering on existing plans. For some, you might have to pay more for tethering. Keep in mind that any data consumed by your Mac while tethered will count against your data allowance and may generate overage fees. Carriers with “unlimited” data, like T-Mobile and Sprint, generally throttle your bandwidth to slower speeds if you use too much data.

    Along those lines, if you use a file sharing service like Dropbox or Google Drive, or an Internet backup service like CrashPlan or Backblaze, turn them off before connecting. Particularly if they haven’t connected in a while, those services can transfer a lot of data quickly, which could result in a hefty overage charge or awkward data throttling for the rest of the month.

    With those warnings out of the way, follow these steps in iOS 9 to turn on Personal Hotspot:

    1. On your iPhone, if you’ve never enabled the feature before, go to Settings > Cellular > Personal Hotspot. Once you’ve turned Personal Hotspot on once, it moves up a level, so you can access it from Settings > Personal Hotspot.
    1. Tap on Wi-Fi Password and enter a password that’s at least 8 characters long and easy to type. It doesn’t need to be super secure because you can keep Personal Hotspot turned off unless you’re using it. But you do want a password so random people nearby can’t connect and use your data.
    1. Once you’ve entered a password, slide the Personal Hotspot switch.

    That’s it! The Personal Hotspot screen provides basic instructions for connecting to the iPhone via Wi-Fi, Bluetooth, and USB. Stick with Wi-Fi, since it’s the easiest and most reliable in most cases.

    • To connect to your new Personal Hot Spot on your Mac, click the Wi-Fi icon in the menu bar and choose your iPhone’s name.
    • On your iPad, go to Settings > Wi-Fi and choose your iPhone.
    • Enter your password when prompted, making sure to select Remember This Network. That way, you won’t even have to enter your password the next time.
    • The Mac or iPad then connects to your iPhone, showing a hotspot icon instead of the usual wave icon for the Wi-Fi menu.

    Could it get any simpler? When you’re done, the safest thing to do, to ensure you don’t accidentally end up using too much of your data allowance, is to turn off the Personal Hotspot switch in Settings > Personal Hotspot. Your Mac or iPad will automatically disconnect.

    Actually, it CAN be simpler! Your Mac can automatically use the personal hotspot on your iPhone to connect to the Internet when they’re within range of each other.

    Use Instant Hotspot on your iPhone (with iOS 8 or later) to provide internet access to your Mac computers and other iOS devices (with OS X Yosemite or iOS 8) that are in range and signed into iCloud using the same Apple ID. Instant Hotspot uses your iPhone — you don’t have to enter a password or even turn on Personal Hotspot.

    Make sure your iOS device and your Mac are signed into iCloud with the same Apple ID.

    On your Mac, click the Wi-Fi status icon in the menu bar, then choose your iPhone or iPad.

    After you connect to the iPhone or iPad Personal Hotspot, you can check the cellular signal strength and the battery status of the iPhone or iPad in the Wi-Fi status menu.

    When you’re not using using the hotspot, your devices automatically disconnect to save battery life.

    One more big advantage of Personal Hot Spots. When you are shopping for that new iPad, perhaps you don’t need the cellular model if you nearly always have your iPhone handy. That’s what I do. If I need internet access on my Wi-Fi iPad, I simply connect to my Hot Spot! Saves me the added cost of a cellular-enabled iPad and the monthly fees from the cell carrier!

  • _Dear Friends_,

    I am in Las Vegas at the Consumer Electronics Show and it is bigger than ever. My Apple watch is happy with all the walking I am doing but my feet are not feeling the love. The show is a great way to see what is on the horizon and of course, I had meetings interspersed with walking the show floor. Naturally, the meetings were far apart so I spent a lot of time walking or on buses or cabs.

    This show is pretty different from previous years but still is window to future products. See my short report below and I will follow up next week in Kibbles with a more in-depth look. This week’s kibbles exclusive special is a “refurbished 13-inch MacBook Air with a 512GB hard drive bundled with Applecare and a 2TB Time Capsule for $1759.99”:http://www.smalldog.com/wag900002113/special-save-150-on-refurbished-mac-bundle-and-keep-it-safe The MacBook Air is one of my most favorite laptops and this refurbished bundle is a great way to upgrade your mac and ensure your data is secure for the new year!

  • This is the craziest Presidential election cycle that I have seen. I first got involved when President Johnson was running against Barry Goldwater and that seemed pretty crazy especially after I lost faith with the President over Vietnam. But this time it would be great comedy if the stakes were not so serious. I have to tell you that seeing Donald Trump ask people to raise their hands in a pledge is one of the scariest things I have seen in a long time.

    Voting is so important and our system is messy with primaries, caucuses, super delgates and conventions but it is also the basis of our democracy. I am proud to say that the Vermont legislature passed an automatic voter registration bill unanimously this week, meaning when you get a driver’s license you are automatically registered to vote. You really do not have the right to complain about your leaders if you do not get out and vote. So, exercise your right and go to the polls when the circus comes to your state!

    Thank you so much for reading this issue of Kibbles & Bytes!

    Your Kibbles & Bytes Team,

    _Don, Emily & Hadley_

  • _Dear Friends_,

    It was a long trip up to Daytona using the “avoid highways, avoid tolls” feature of Google Maps. I was using my Blue Ant Pump Lite Bluetooth earbuds connected to my iPhone in my pocket. I not only got the turn-by-turn directions from Google Maps but also some great tunes from my playlists. I even was able to take a phone call, although I pulled over both for safety reasons and so I could hear better. We travelled through Florida’s farm belt, orange groves (hey, their trees are full of oranges!) and Lake Okeechobee before we headed towards the coast.

    It is official, Apple has sent out notices for the special “Let Us Loop You In” event on Monday. It is expected to see some new iPhones and iPads and perhaps other announcements. For those of you with a 4th Generation AppleTV there is a new app called “Apple Events” that you can download for free to watch the event which starts at 10AM Pacific time. The live stream will also be available on Macs and iOS devices through Apple’s event website. iOS 7 or OS X 10.8.5 with Safari 6.0.5 or later is required. We are excited to hear about the latest from Apple!

    I am going to talk about Time Machine and Time Capsules a bit in the article below, however, this week as a Kibbles & Bytes exclusive, I am featuring the Apple factory reconditioned 2 and 3 TB Time Capsules. You can save a bunch on these Time Capsules that have a 1-year Apple warranty. Normally, the 2 TB Time Capsule, new is $299.99 and the 3TB Time Capsule is $399.99. With $20 off for Kibbles & Bytes readers, the “**2TB Time Capsule is only $159.99**”:http://www.smalldog.com/wag900002182/save-20-on-an-apple-factory-refurbished-2tb-time-capsule and the “**3TB is $259.99!**”:http://www.smalldog.com/wag900002183/save-20-on-an-apple-factory-refurbished-3tb-time-capsule This is a great way for you to have automatic wireless backup and the superior Apple Airport Extreme wireless access point!