
What Is Safe Mode, and When Should You Use It?

Although Macs are highly reliable, unusual problems can still rear their ugly heads. Often, these issues are caused by software you’ve installed or accessories you’ve connected. If you’re experiencing Mac misbehavior that isn’t easily fixed by restarting, updating software, or unplugging a dodgy device, try safe mode. (Seriously, before checking if safe mode will help with a problem, you should always restart, ensure you’re running the latest version of macOS and any involved apps, and unplug non-essential peripherals.)

Safe mode is one of macOS’s key troubleshooting tools, though many users don’t know when or how to use it. By starting up your Mac with minimal required software and services, safe mode can help identify and resolve various system issues.

How to Enter Safe Mode

The process for entering Safe Mode varies depending on whether you have a Mac with Apple silicon or an Intel-based Mac.

For Macs with Apple silicon:

  1. Shut down your Mac.
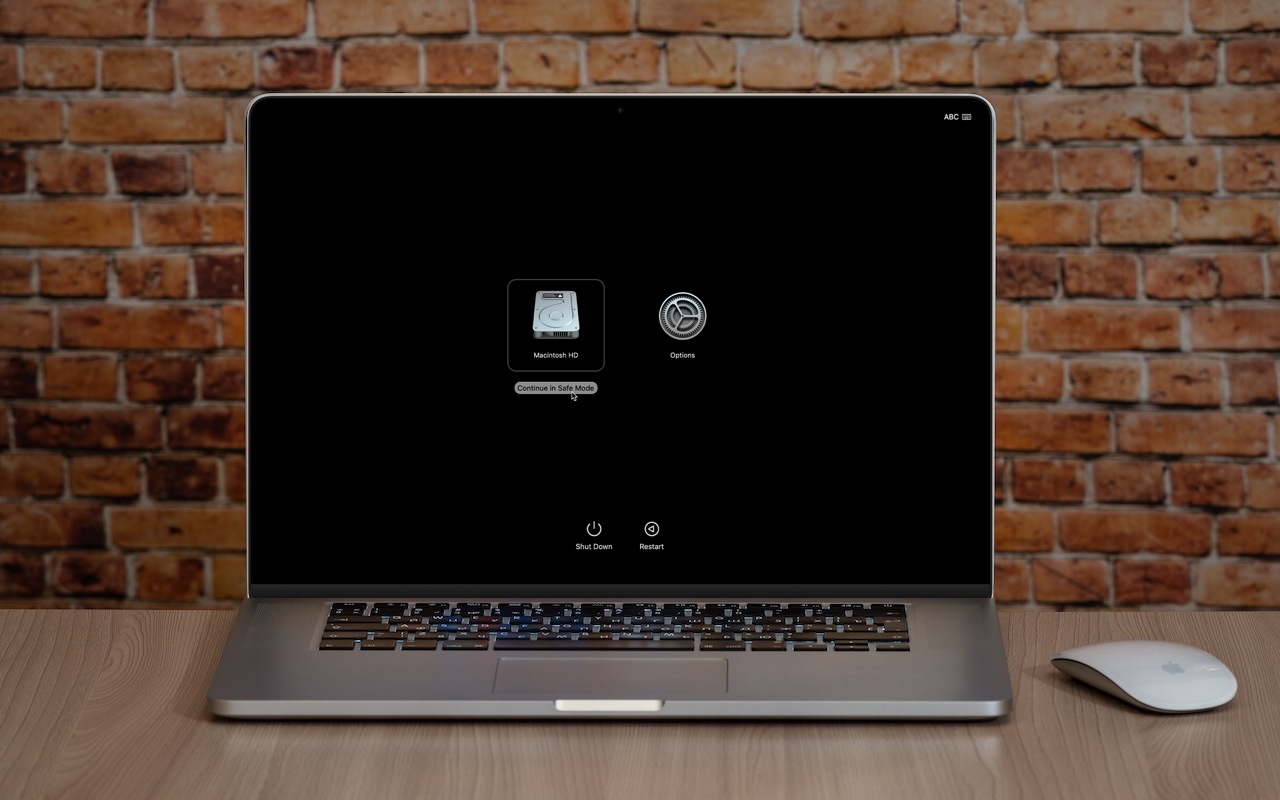
  2. Press and hold the power button until the startup options appear.
  3. Select your startup disk.
  4. Hold the Shift key and click Continue in Safe Mode.
  5. Log in (you may need to do this twice). You’ll see “Safe Boot” in red in the menu bar on the login screen.

For Intel-based Macs:

  1. Restart your Mac.
  2. Press and hold the Shift key until you see the login window.

(If you have a firmware password, you must remove it in Recovery before starting up in safe mode.)

To verify that you’re in safe mode, click the Apple menu while holding the Option key, select System Information, and look for “Boot Mode: Safe” under Software. To exit safe mode, just restart your Mac normally.

What Safe Mode Does

When your Mac boots in safe mode, it performs several important functions designed to eliminate troubleshooting variables:

  • Prevents non-essential software from loading, including third-party login items, kernel extensions, system extensions (the modern replacement for kernel extensions), and fonts not installed by macOS
  • Clears some system caches, including font caches and the kernel cache

Apple also says that safe mode performs a basic check of your startup disk, but research from the community suggests that this check is no different from the one performed during a normal boot. If you suspect disk-related problems, use the First Aid feature of Disk Utility to conduct a more comprehensive (and much slower) test.

This minimal environment helps identify whether the problems are caused by software that loads during startup or by core system components. Safe mode also prevents many customizations and modifications from taking effect, making it easier to determine if third-party software is the cause of the issues.

However, the downside of using safe mode is that some macOS features may not work. According to Apple, these include “video capture, graphics performance, file sharing, Wi-Fi, accessibility, audio devices, and devices connected via USB, Thunderbolt, or FireWire.” In practice, some of these will work fine, but the main point is that you might not be able to do everything you want while in safe mode. It’s designed for troubleshooting, not regular use.

When to Use Safe Mode

Safe Mode is beneficial in several common scenarios:

  • Identifying extension conflicts: If your Mac is misbehaving, booting in safe mode can help determine if third-party kernel or system extensions are the cause.
  • Troubleshooting startup problems: If your Mac doesn’t start normally, safe mode might help you get in and address the issue.
  • Installing updates: Although this is less necessary in recent versions of macOS, if a macOS update fails to install properly, trying again in safe mode often resolves the issue.
  • Fixing update issues: Problems that appear after a macOS update—likely caused by outdated third-party software incompatible with the new version of macOS—can often be resolved by starting in safe mode.
  • Performance problems: If your Mac is running slowly, safe mode can help identify whether login items or extensions are causing the issue.
  • General diagnostics: Safe mode is a worthwhile initial step for diagnosing issues before attempting more complex solutions.

What Comes After Safe Mode

Once you’re in safe mode, it’s up to you to reproduce the problem you experienced earlier. Then, there are two possibilities:

  • The problem persists in safe mode: While this result is not ideal, safe mode has still provided you with more troubleshooting information by eliminating third-party login items, extensions, and fonts from consideration, along with clearing certain caches. Since those aren’t the cause, try testing in a clean user account, disconnecting remaining peripherals, and reinstalling macOS.
  • The problem goes away in safe mode: Great! First, restart your Mac to see if the problem has disappeared, as would be the case if it were related to corrupt caches. If the problem returns after restarting, you can narrow down the cause to third-party login items, extensions, or fonts. Remove third-party log-in items in System Settings > General > Login Items & Extensions. (We recommend taking a screenshot with Command-Shift-5 first, so you can remember how you were set up.) You can also disable extensions in System Settings > General > Login Items & Extensions by toggling their switches. Restart and test again. If that still doesn’t fix it, try testing in a clean user account to rule out any software issues tied to your main account.

The beauty of safe mode is that it’s easy to enter and entirely non-destructive. It may not help identify all possible problems, but it’s always worth trying after the simple steps of restarting your Mac, updating associated software, and unplugging non-essential peripherals.

(Featured image based on an original by iStock.com/Armastas)


Social Media: Having Mac problems? Before trying more complex solutions, restart in safe mode—your Mac’s stripped-down troubleshooting environment. It disables non-essential software and clears system caches to help identify and resolve common issues.

Similar Posts

  • Next week I will be on the road so it will be fun to see how Emily handles the Apple quarterly results that are going to be announced on Tuesday. I guess I’d better write that up in my hotel room from the road.

    Last year, most of our plants suffered while we were gone. Between the lack of water and the chickens we had to do a lot of work to get them back. I installed a nice drip irrigation system this year but we will still have chicken invasions. For those of you that don’t know, Key West protects wild chickens and they are everywhere. That must be why Grace loves Key West so much!

    Thank you so much for reading this issue of Kibbles & Bytes!

    Your Kibbles & Bytes Team,

    _Don, Emily, Hadley & Amy_

  • Why Every Business Needs an AI Policy

    Are employees at your company surreptitiously using artificial intelligence tools like ChatGPT, Claude, Copilot, and Gemini for everyday business tasks? It’s likely. An…

  • Hey Dora…

    So we have Siri and I’ve been playing around with Alexa (don’t tell Grace!) but now I have Dora, too. Dora is the computer from Robert Heinlein’s Time Enough for Love, The Number of the Beast, The Cat Who Walks Through Walls which were some of my favorite Sci-Fi as a kid.

    I was helping a customer that has pretty bad arthritis and struggled to use the keyboard. I was straightening out her email and getting her off of AOL (something we do often!) and noticed how difficult it was to type a simple email. So, I showed her dictation on the Mac and wow, it was like a light just got switched on. Dictation has come a long way and if your are on Mavericks, Yosemite or El Capitan, Apple’s enhanced dictation works wonderfully.

    Dictation will not be a satisfying experience for you if you have a lot of noise in the room, i.e. other people talking, music, etc, but if you are working alone in a relatively quiet environment it can be a great tool not only for dictating that email but you can also use spoken commands to direct your Mac to take action.

    Setting up Enhanced Dictation

    * Open System Preferences, then click on Dictation & Speech. Turn on Dictation and set up your options.

    * Click *Use Enhanced Dictation*. This will download a 1.2GB file so that you can dictate without internet connection.

    * Choose your language and dialect. Some languages, such as English, have multiple dialects.

    * Choose the keyboard shortcut you will use to signal that you’re ready to start dictating. The default is pressing the function Fn key twice, which I find convenient but you can customize it.

    * Choose your preferred microphone from the pop-up menu below the microphone icon. Normally, you use the internal microphone but if you are using a headset or external microphone you can choose that.

    Using Dictation

    * Go to a document or other text field and place the insertion point where you want your dictated text to appear.

    * Press the keyboard shortcut for starting dictation. The default shortcut is Fn Fn (press the Fn key twice). Or choose Edit > Start Dictation. When your Mac is listening, it displays a microphone with an input meter that rises and falls as you speak.

    * Speak the words that you want your Mac to type. Use dictation commands to add punctuation, formatting, and more.

    * To stop dictating, click Done below the microphone icon, or press Fn, or switch to another window.

    The more you use Dictation, the better it understands you. Dictation learns the characteristics of your voice and adapts to your accent.

    I will go into some of the more enhanced features like Dictation Commands in next week’s Kibbles & Bytes but I can tell Dora to Open an App, select text, move up or down and much more. I think you will like dictation on the Mac, give it a try!

  • I have been hosting phone bank parties for Bernie Sanders at my house as we head into the first caucuses and primaries. It is fun talking to folks out in Iowa and now New Hampshire to see who they are supporting and to tell them about the Senator from Vermont. I like being involved and feel if you are not involved, informed and voting you do sacrifice your right to complain about the results.

    Thank you for reading this issue of Kibbles & Bytes! We know it is YOU, our loyal customers that ultimately pay our wages and appreciate the support!

    Your Kibbles & Bytes Team,

    _Don, Dean, Emily & Scott_

  • A Swinging Hot Spot in Paradise

    You are visiting Key West, accompanied by your trusty iPhone and MacBook Air. Suddenly there’s an emergency at work, and you need to get online with your Mac. You can pick up a cell signal with the iPhone, but there’s no Wi-Fi that isn’t locked up. Well, my first thought might be “oh well, I’m on vacation!” but you are dedicated and need to be online.

    Don’t worry! You can use your iPhone’s cellular data plan to create a personal Wi-Fi hotspot that lets your Mac access the Internet through your iPhone. Also called “tethering,” it’s fast, easy, and can be a life-saver when you just have to get online with a Mac or your Wi-Fi-only iPad. It supports up to 5 users, too, which means you can get your team online, too!

    Before we explain how to do set up a personal hotspot, note that most but not all cellular carriers allow tethering on existing plans. For some, you might have to pay more for tethering. Keep in mind that any data consumed by your Mac while tethered will count against your data allowance and may generate overage fees. Carriers with “unlimited” data, like T-Mobile and Sprint, generally throttle your bandwidth to slower speeds if you use too much data.

    Along those lines, if you use a file sharing service like Dropbox or Google Drive, or an Internet backup service like CrashPlan or Backblaze, turn them off before connecting. Particularly if they haven’t connected in a while, those services can transfer a lot of data quickly, which could result in a hefty overage charge or awkward data throttling for the rest of the month.

    With those warnings out of the way, follow these steps in iOS 9 to turn on Personal Hotspot:

    1. On your iPhone, if you’ve never enabled the feature before, go to Settings > Cellular > Personal Hotspot. Once you’ve turned Personal Hotspot on once, it moves up a level, so you can access it from Settings > Personal Hotspot.
    1. Tap on Wi-Fi Password and enter a password that’s at least 8 characters long and easy to type. It doesn’t need to be super secure because you can keep Personal Hotspot turned off unless you’re using it. But you do want a password so random people nearby can’t connect and use your data.
    1. Once you’ve entered a password, slide the Personal Hotspot switch.

    That’s it! The Personal Hotspot screen provides basic instructions for connecting to the iPhone via Wi-Fi, Bluetooth, and USB. Stick with Wi-Fi, since it’s the easiest and most reliable in most cases.

    • To connect to your new Personal Hot Spot on your Mac, click the Wi-Fi icon in the menu bar and choose your iPhone’s name.
    • On your iPad, go to Settings > Wi-Fi and choose your iPhone.
    • Enter your password when prompted, making sure to select Remember This Network. That way, you won’t even have to enter your password the next time.
    • The Mac or iPad then connects to your iPhone, showing a hotspot icon instead of the usual wave icon for the Wi-Fi menu.

    Could it get any simpler? When you’re done, the safest thing to do, to ensure you don’t accidentally end up using too much of your data allowance, is to turn off the Personal Hotspot switch in Settings > Personal Hotspot. Your Mac or iPad will automatically disconnect.

    Actually, it CAN be simpler! Your Mac can automatically use the personal hotspot on your iPhone to connect to the Internet when they’re within range of each other.

    Use Instant Hotspot on your iPhone (with iOS 8 or later) to provide internet access to your Mac computers and other iOS devices (with OS X Yosemite or iOS 8) that are in range and signed into iCloud using the same Apple ID. Instant Hotspot uses your iPhone — you don’t have to enter a password or even turn on Personal Hotspot.

    Make sure your iOS device and your Mac are signed into iCloud with the same Apple ID.

    On your Mac, click the Wi-Fi status icon in the menu bar, then choose your iPhone or iPad.

    After you connect to the iPhone or iPad Personal Hotspot, you can check the cellular signal strength and the battery status of the iPhone or iPad in the Wi-Fi status menu.

    When you’re not using using the hotspot, your devices automatically disconnect to save battery life.

    One more big advantage of Personal Hot Spots. When you are shopping for that new iPad, perhaps you don’t need the cellular model if you nearly always have your iPhone handy. That’s what I do. If I need internet access on my Wi-Fi iPad, I simply connect to my Hot Spot! Saves me the added cost of a cellular-enabled iPad and the monthly fees from the cell carrier!