How to Find the Snaps You Want in the Mac’s Photos App
Digital cameras have been around long enough that people have stopped making snarky comments about how hard it is to find anything in a shoebox filled with hundreds of unorganized photos – I still have those boxes of photos and slides in Vermont. But given the tens of thousands of photos many of us now have, it’s hard to be smug about the ease of finding any given image. Luckily, Apple has provided us with numerous tools in the Photos app to help. Some of these organization systems you have to set up and maintain, but others work silently for you in the background. Nevertheless, I do spend a lot of time searching for that perfect shot. But let’s start with the automatic methods.
Date
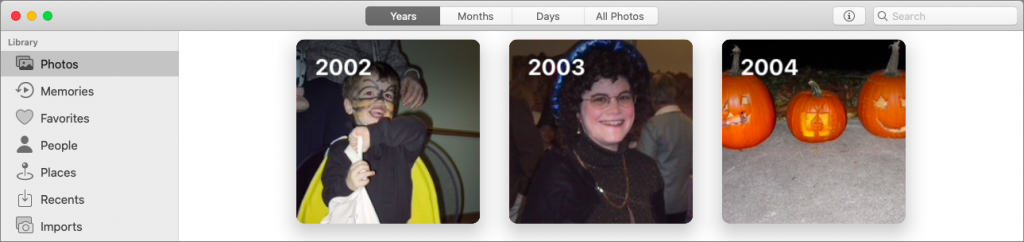
It’s impossible to miss how Photos automatically organizes your photo library by date, particularly in macOS 10.15 Catalina, where the Photos view lets you drill down by Year, Month, and Day. One tip: Day view doesn’t necessarily show you all the pictures taken on a particular day; to see them, click All Photos.
If you don’t want to browse, you can also search (choose Edit > Find) on things like “2015” or “January 2015.” The utility of such searches is that they filter the displayed images to just those taken in that year or month. You can even search on “January” to find all photos taken in January of any year.
People
With a little training of its facial recognition algorithms, Photos can automatically create and maintain collections of photos of particular people. Click People in the sidebar to see the faces that Photos has identified automatically, and if any of them currently lack names, click the Name button for a photo you want to identify, enter a name, and either press Return or select from the suggestions. Although it may not happen immediately, Photos will scan all photos for other pictures of each person and add them; if you get a banner in the toolbar asking you to review additional photos, click Review and then deselect any photos that aren’t that person in the next dialog.
![]()
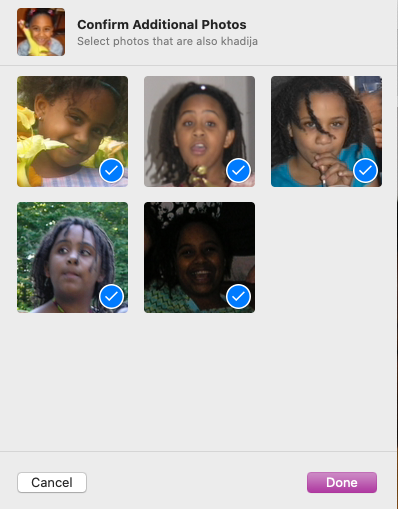
Whenever you’re looking for a photo of a particular person, the fastest way may be to focus on just those photos that contain their face. Click People in the sidebar and double-click the desired person’s box to see their photos. Make sure to click Show More to see all the matched photos, rather than just those Photos deems the best.
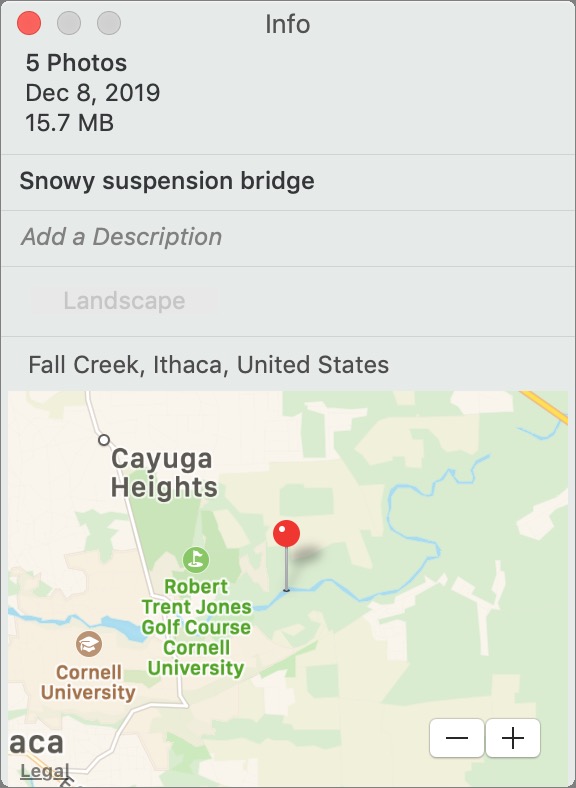
Places
By default, the Camera app tags every iPhone or iPad photo with the location where you took the picture. That enables you to search for images on a map. Click Places in the sidebar, and then pan and zoom the map to find the desired location. Click any photo thumbnail to show just the photos taken in that spot. If you know the name of the location, you can also search for it directly—Photos knows the names of all geotagged locations.

Location-based searching could be a godsend for real-estate agents, builders, and others who need to collect images by address. No need to use keywords or other metadata, since the geotagging provides all the necessary information.
AI Object Search
In the last few releases of Photos, Apple has added object searching, which finds photos based on their contents. Looking for photos of cows, or beaches, or oak trees? Just type what you want to find into the Photos search field, and Photos might find it.
Although it’s magic when this approach works, don’t put too much stock in it. Searching for “cow” also brought up images of pigs, goats, and horses for us. Close, in that they’re all four-legged farm animals, but no cigar.

Media Types
Sometimes, what you want to find is already categorized by its media type. If you want to find a selfie, for instance, or a panorama, look no further than the Media Types collection in the Photos sidebar. It includes dedicated albums that automatically update themselves to contain videos, selfies, Live Photos, Portrait-mode photos, panoramas, time-lapse movies, slo-mo movies, bursts, screenshots, and animated GIFs.
Albums and Smart Albums
With the categorization techniques so far, you don’t have to do much, if anything. With albums, however, all organization is entirely manual. Creating a new album is easy—select some photos and then choose File > New Album with Selection. After the fact, you can add more photos to the album by dragging them from the main window to the album in the sidebar. And, of course, clicking the album in the sidebar displays all the photos.
Smart albums are entirely different from albums—they are essentially saved searches. To create one, choose File > New Smart Album and then define the matching criteria. Photos provides oodles of options, making it easy to create a smart album that, for instance, holds photos of a particular person taken with one specific camera over a certain time frame.
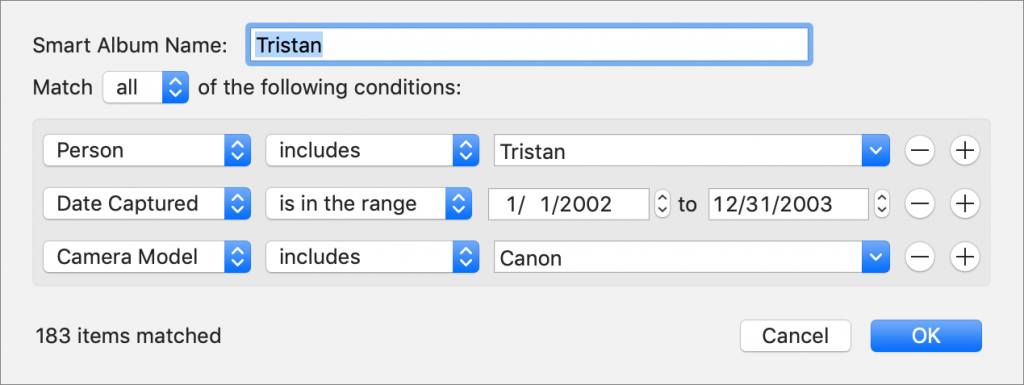
An aspect of working with albums and smart albums that can be confusing is how to delete photos. When you remove a photo from a regular album, you’re just taking it out of that album, not deleting it from your library. (To actually delete a photo from your library, click Photos in the sidebar before selecting the photo and pressing the Delete key.) The only way to remove a photo from a smart album is to ensure that it no longer matches the smart album’s criteria, either by changing the conditions or by modifying the photo’s metadata, which isn’t always possible.
Keywords
If you want to tag individual images in a way that makes them easy to find later, keywords are an excellent option. Choose Window > Keyword Manager to display the floating Keywords window, and click Edit Keywords to open the editing view where you can click + to add a keyword (complete with a one-letter shortcut, which also puts it at the top of the Keywords window). Click – to remove a keyword (from the list and from any photos to which it’s assigned). Click OK to switch back to the main keyword view.

To assign a keyword, select a set of photos or just focus on the current one. Either click the keyword in the Keywords window or press its associated letter shortcut. Clicking or pressing the shortcut again removes the keyword.

You can see what keywords are attached to an image by making sure View > Metadata > Keywords is chosen and then clicking the badge that Photos adds to keyworded images. To find everything with a particular keyword, though, you’ll have to do a search and, if necessary, look at the Keywords collection at the bottom of the search results.
Titles and Descriptions
 Another way to find photos manually is to give them titles or descriptions and then search for words in those bits of metadata. Applying consistent titles and descriptions manually would be onerous, but you can do multiple selected images as easily as one. Select some pictures, choose Window > Info, and in the Info window, enter a title or description. Close the Info window to save.
To see (and edit) the title under each image, make sure View > Metadata > Titles is chosen. To find included words, you need to do a search, just like with keywords.
Choosing the Best Approach for Your Needs
So many choices! Here’s our advice about which should you use:
- When possible, stick with the approaches (date, People, Places, object search, media types) that require little or no additional tagging work. People and Places are particularly useful that way.
- If you can construct a smart album that finds all the images you want, do it. However, it may not be useful (or possible) unless you’re looking for a subset of photos that already are in an album, have a keyword, or are attached to a person.
- Use albums for quick, ad-hoc collections or for collections of related photos. They’re easy to make and use, and to delete if you no longer need them. An album would be good for collecting all the photos from your summer vacation.
- Use keywords to identify general aspects of images throughout your entire photo library that you’re happy to access only by searching or via a smart album. Keywords would be useful for tagging all the photos you take of lecture slides, or that relate to your hobby.
- Avoid relying on titles and descriptions if you can. It’s too easy to make mistakes such that later you can’t find items you’ve titled or described. Albums and keywords are better for organization. Leave the titles and descriptions for actually titling and describing individual images.
Next time you think, “I wish I could find all my photos that…,” take a minute and think through these options to decide which will best serve your needs.
(Featured image by Simon Steinberger from Pixabay)