Tired of Nonstop Cookie Popups? Dismiss Them Automatically with These Extensions
The European Union has for many years required that websites—at least those serving European users—gain informed consent before storing the personal data of those users. That data includes cookies, which are bits of information stored in Web browsers that websites can read and write. Cookies are widely used for remembering login information, saving user account information, maintaining a shopping cart, and other legitimate purposes. However, they’re also used to target advertising at you by tracking your behavior across websites, which many people consider to be an abuse of user privacy. Hence the EU’s ePrivacy Directive, which resulted in the proliferation of cookie consent popups like this one.
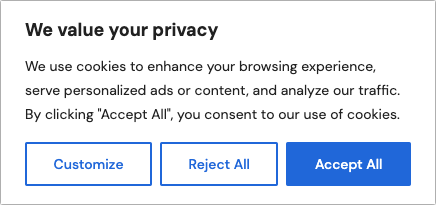
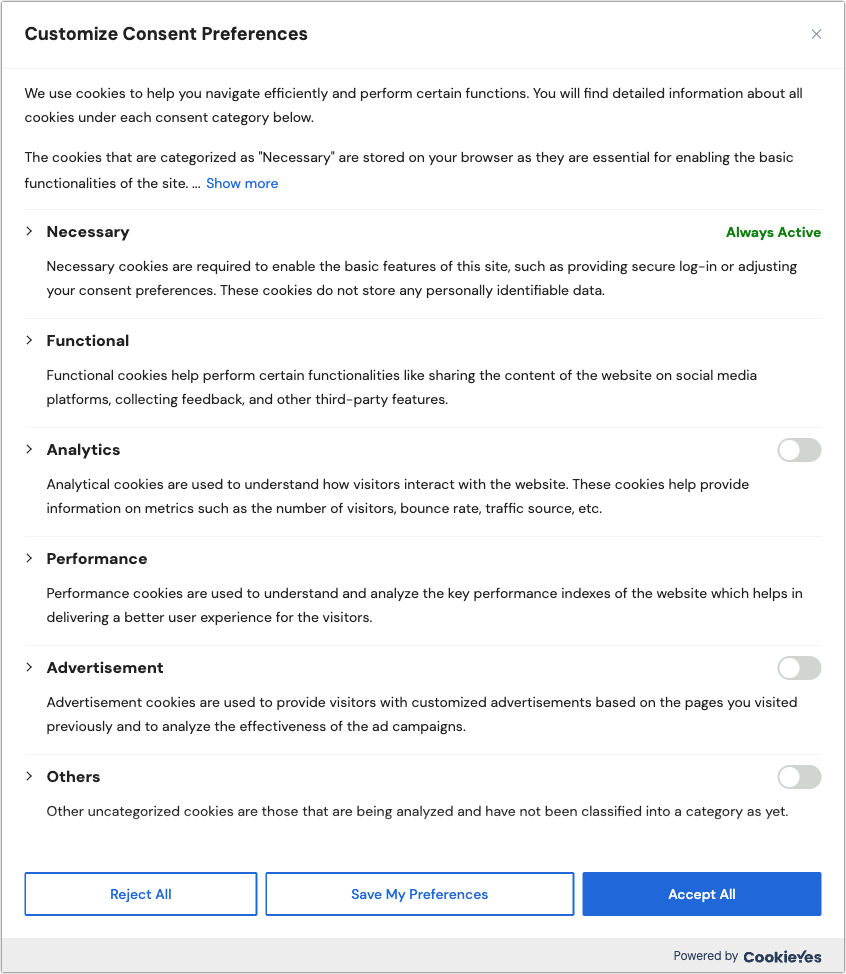
Websites that rely on advertising or user tracking prefer that everyone click Accept All, but because of the EU requirement for informed consent, they have to tell you more about the cookies they use, explain why they want to use them, and allow you to reject types of cookies. Clicking Customize in the cookie consent popup above presents this expanded view. So many details!
On the one hand, thanks to the EU for working to safeguard user privacy. Without laws like the ePrivacy Directive and the overarching General Data Protection Regulation (GDPR), the Web would be even more of a sausage factory that grinds up and sells our personal data.
On the other hand, could cookie consent popups on nearly every website be any more annoying?!? While it’s a nice idea that we provide informed consent for cookies, few people have the time and inclination to read all this and make an informed decision. If you’re like us, you’re probably mashing Reject All as fast as you can. And even that is more effort than you’d prefer to expend.
Happily, there are Web browser extensions that can simplify your life, responding to cookie consent popups automatically using preferences you set once. Why can’t Web browsers do this themselves? They could, and the privacy-focused Brave does, but the W3C’s Platform for Privacy Preferences working group’s recommendations for standardizing behavior around privacy were ignored by browser makers and dropped back in 2006.
Two browser extensions we’ve tested successfully in multiple Mac browsers are Consent-O-Matic and Super Agent. They work by learning how to interact with the common consent popups (many of which come from Consent Management Platforms like Osano and CookieYes) and automatically clicking the switches to match your preferences. More specifically, the Hush extension blocks cookie consent popups in Safari on the iPhone, iPad, and Mac.
Consent-O-Matic
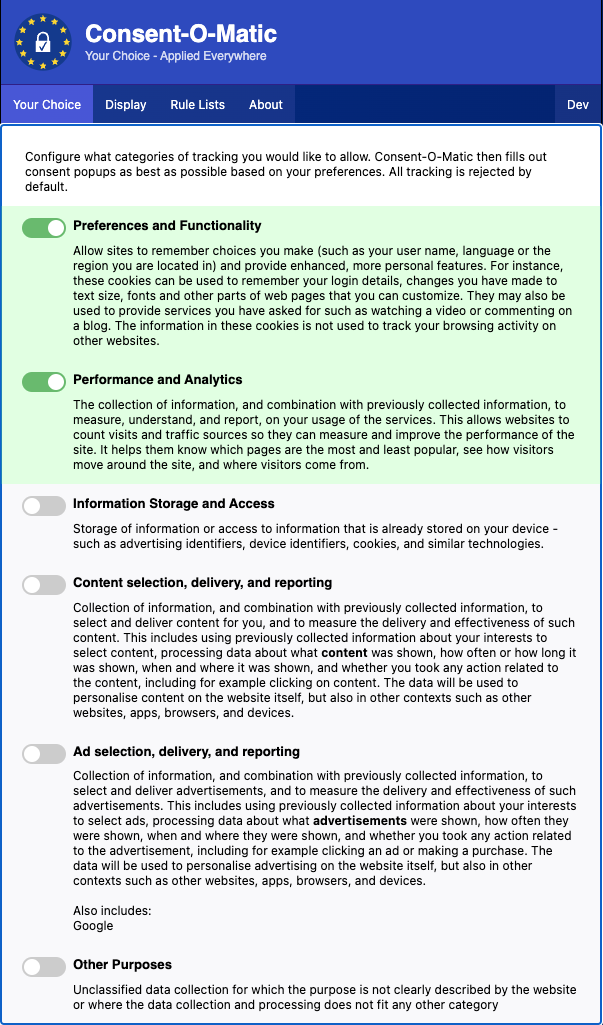
The open-source Consent-O-Matic is free from privacy researchers at Aarhus University. It comes as a Chrome extension that works with Google Chrome (and other Chromium browsers like Arc, Brave, and Edge, shown below), as an add-on for Firefox, and as an extension for Safari on the Mac and Safari in iOS and iPadOS. Consent-O-Matic works reasonably well on the Mac; in testing, it wasn’t effective enough in Safari on the iPhone and iPad to be worth installing. Installation and interface vary by browser—the Chrome extension is shown below.
By default, Consent-O-Matic allows no cookies, though we recommend enabling the Preferences and Functionality option and, if you’re feeling generous toward websites, the Performance and Analytics option. The first option improves your experience on any site where it’s helpful for it to remember information about you, and the second allows the website admins to collect metrics on how the site is being used. If a site doesn’t work correctly with Consent-O-Matic enabled, you can turn off the extension for just that site. In the Display preferences, you can choose whether Consent-O-Matic minimizes consent popups or hides them entirely, and on the About screen, you’ll see how many clicks it has saved you.
Super Agent
Super Agent seems to focus its paid plans on its version for the iPhone and iPad, but we didn’t find it effective enough there to install. On the Mac, however, Super Agent is free and works well, perhaps a bit more so than Consent-O-Matic. It’s available as a Chrome extension for Google Chrome and other Chromium browsers, as a Firefox add-on, and as a Safari extension. Installation and interface vary by browser—the Chrome extension is shown below.
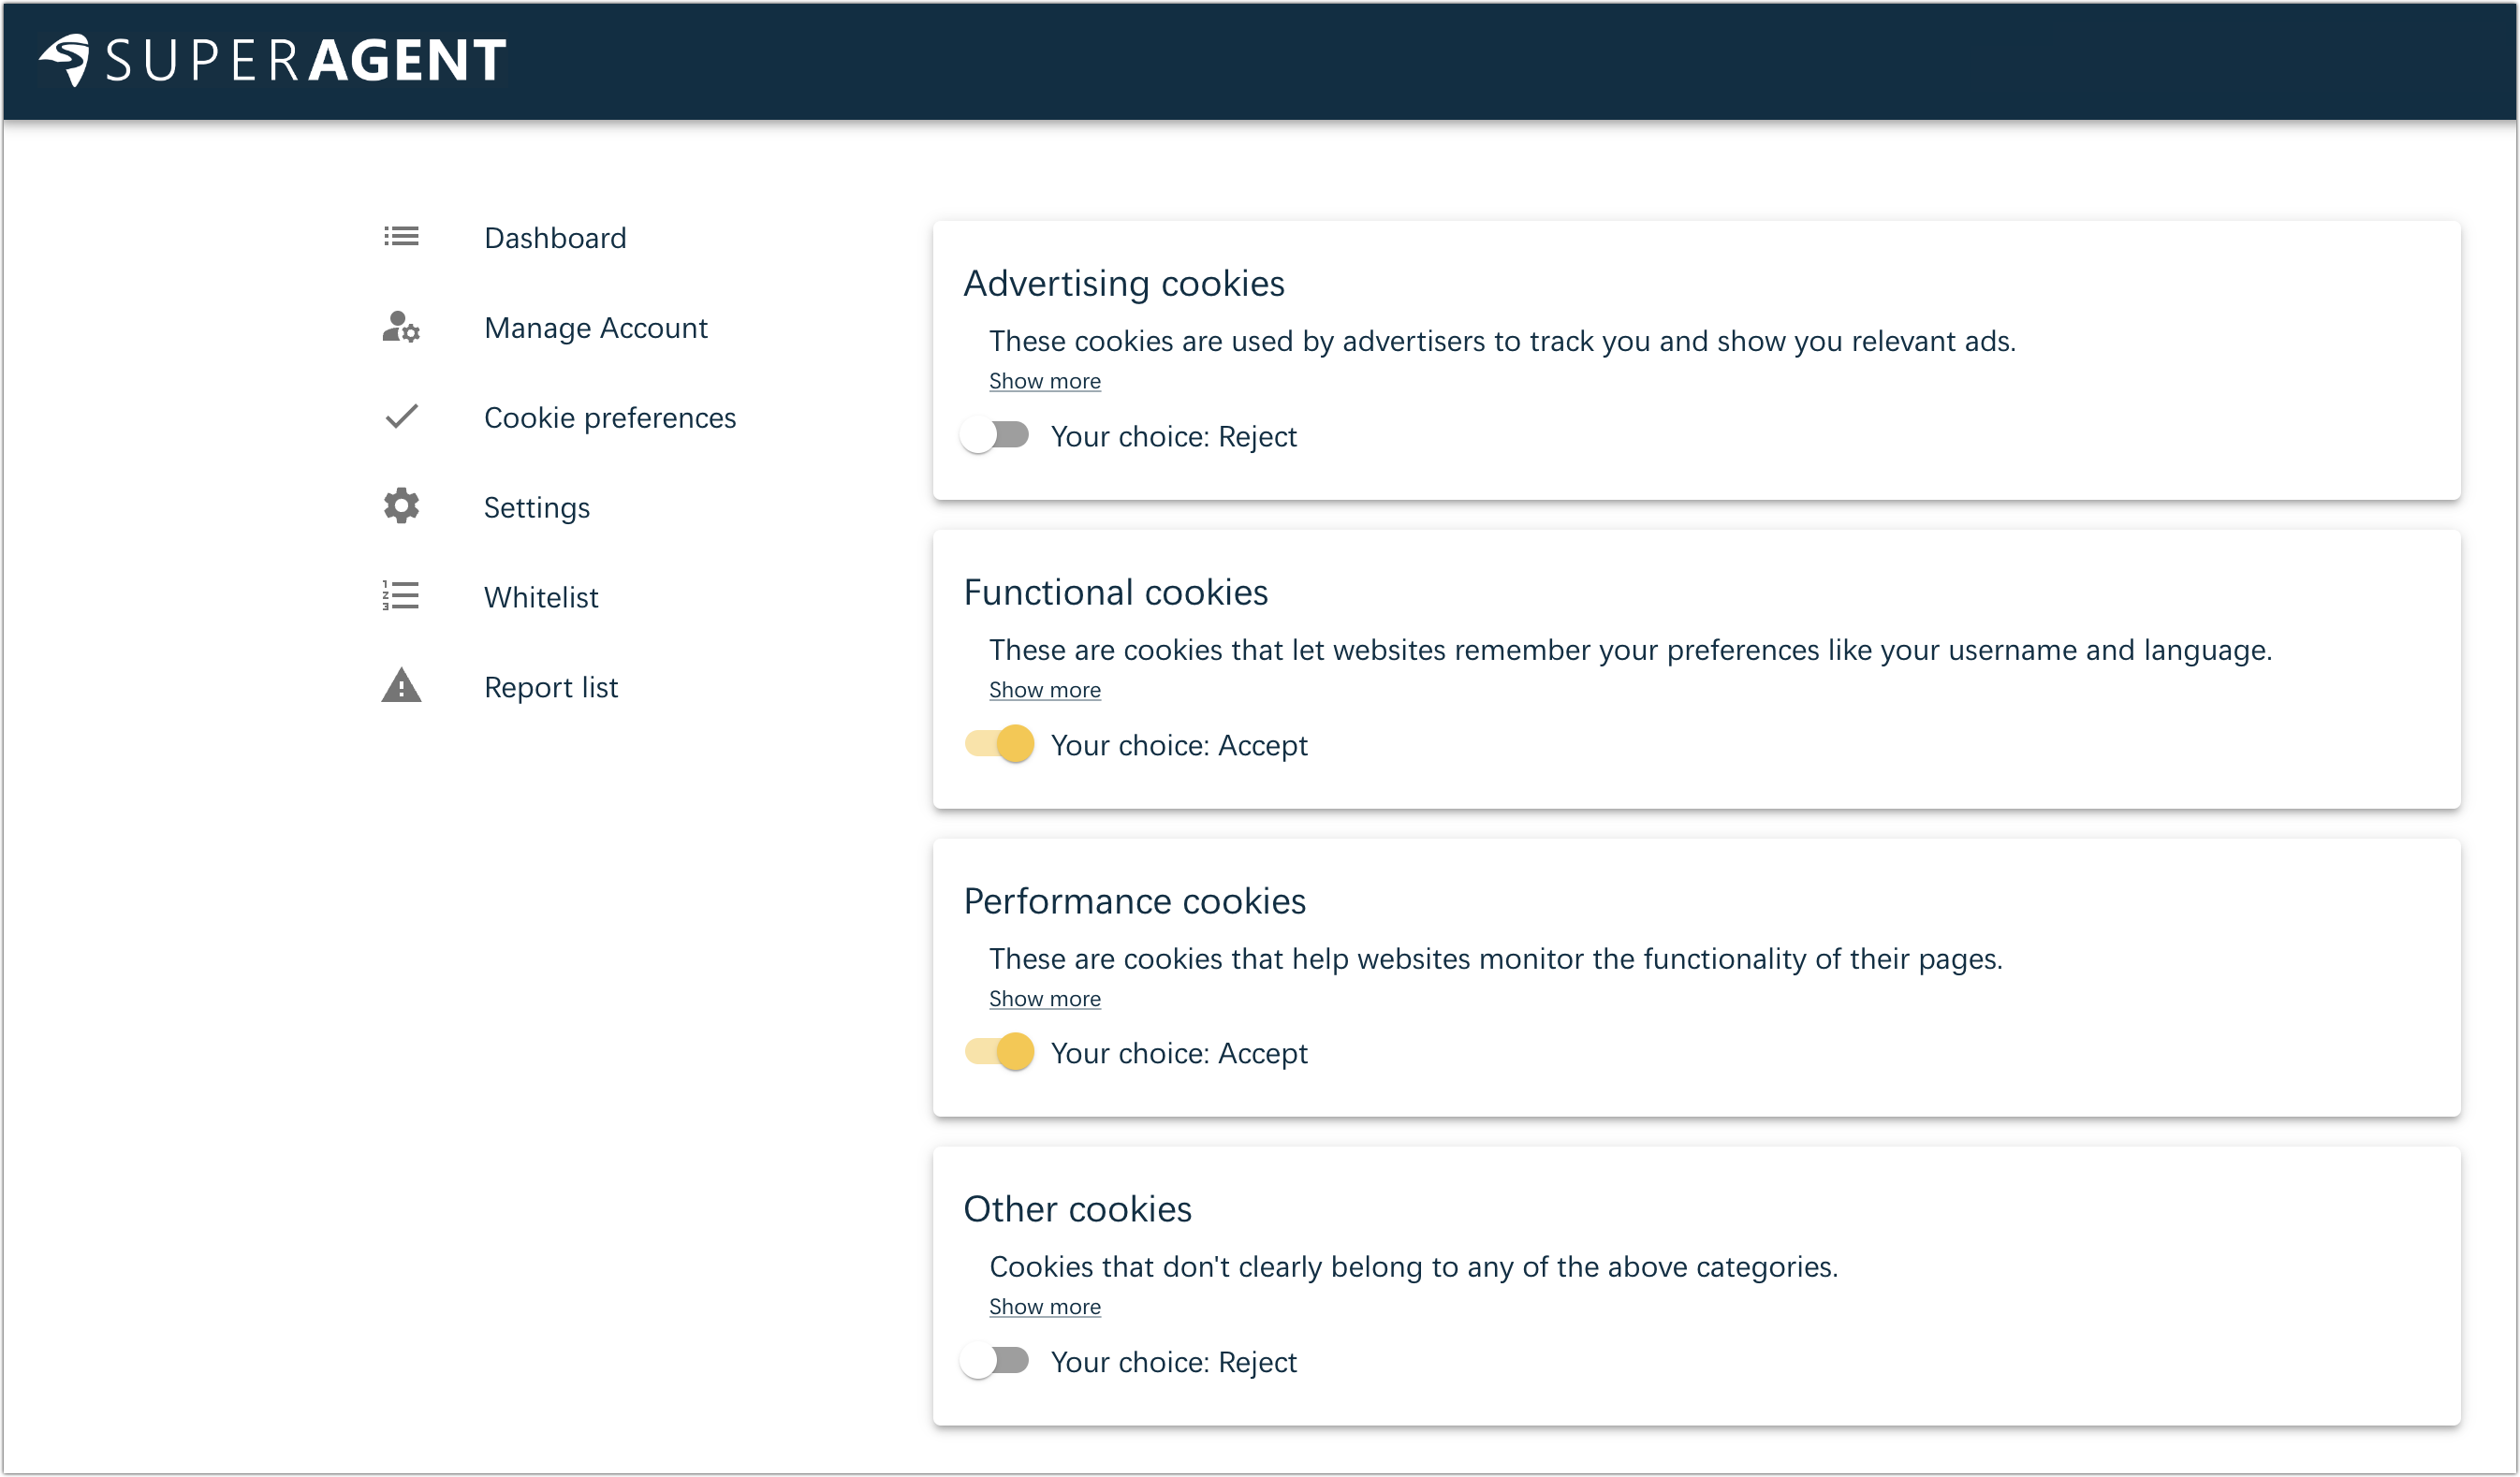
Your first task in Super Agent is to set your preferences for cookies to accept. Again, we recommend enabling Functional cookies; turn on Performance cookies if you wish. Leave Advertising and Other cookies off.
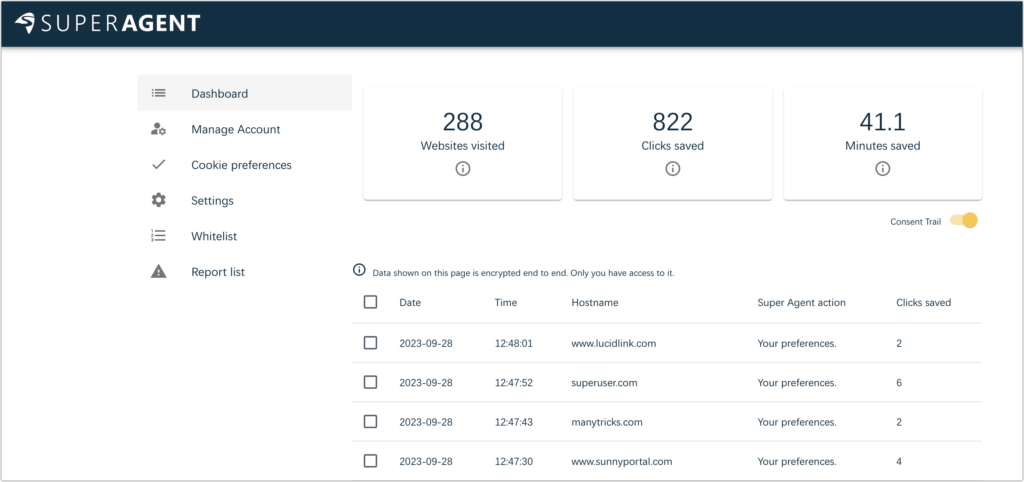
Although it’s not required, you can create a Super Agent account and enable the Consent Trail switch to see a list of the sites whose cookie consent popups Super Agent filled out for you. It’s end-to-end encrypted so that only you can see the data, but if you’re particularly concerned about privacy, don’t turn it on.
Hush
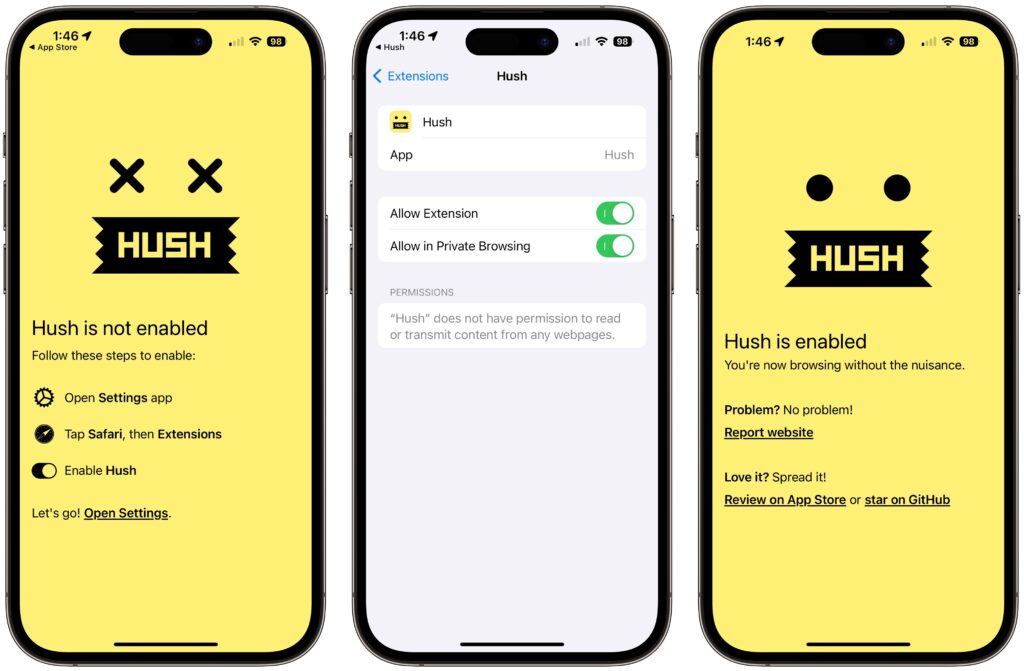
What about the iPhone and iPad, or those who care only about Safari on the Mac? We recommend Joel Arvidsson’s Hush, which bills itself as a nag blocker. It’s a free download from the App Store, and once it’s on your device, you enable it in Settings > Safari > Extensions > Hush (iOS/iPadOS) or Safari > Settings > Extensions (Mac).
That’s it. From then on, it silently blocks cookie consent popups—it doesn’t attempt to register your preferences like Consent-O-Matic and Super Agent. As a result, it might cause problems if a site requires that you accept some cookies for it to function correctly. We haven’t encountered such a site yet, but it’s not impossible. If that happens on an iPhone or iPad, tap the AA button in the Safari address bar and then Turn On Content Blockers; on the Mac, choose View > Reload Without Content Blockers.
The Web is an ever-evolving place, so there’s no guarantee that these extensions will respond to or block every cookie consent popup. But you can report missed sites to the Content-O-Matic and Super Agent developers, and Joel Arvidsson releases regular updates to block more nags and fix partially broken websites.
If you use only Safari for Web browsing, Hush could be all you need on all your Apple devices. Those who rely on other Web browsers on the Mac can pick either Consent-O-Matic or Super Agent to supplement Hush on the iPhone and iPad.
(Featured image by iStock.com/Pla2na)
Social Media: If you’re as annoyed as we are by constant cookie consent popups on seemingly every website these days, check out our recommendations for browser extensions that can banish them for good.