Display an Album of Photos on Your iPhone or iPad Lock Screen

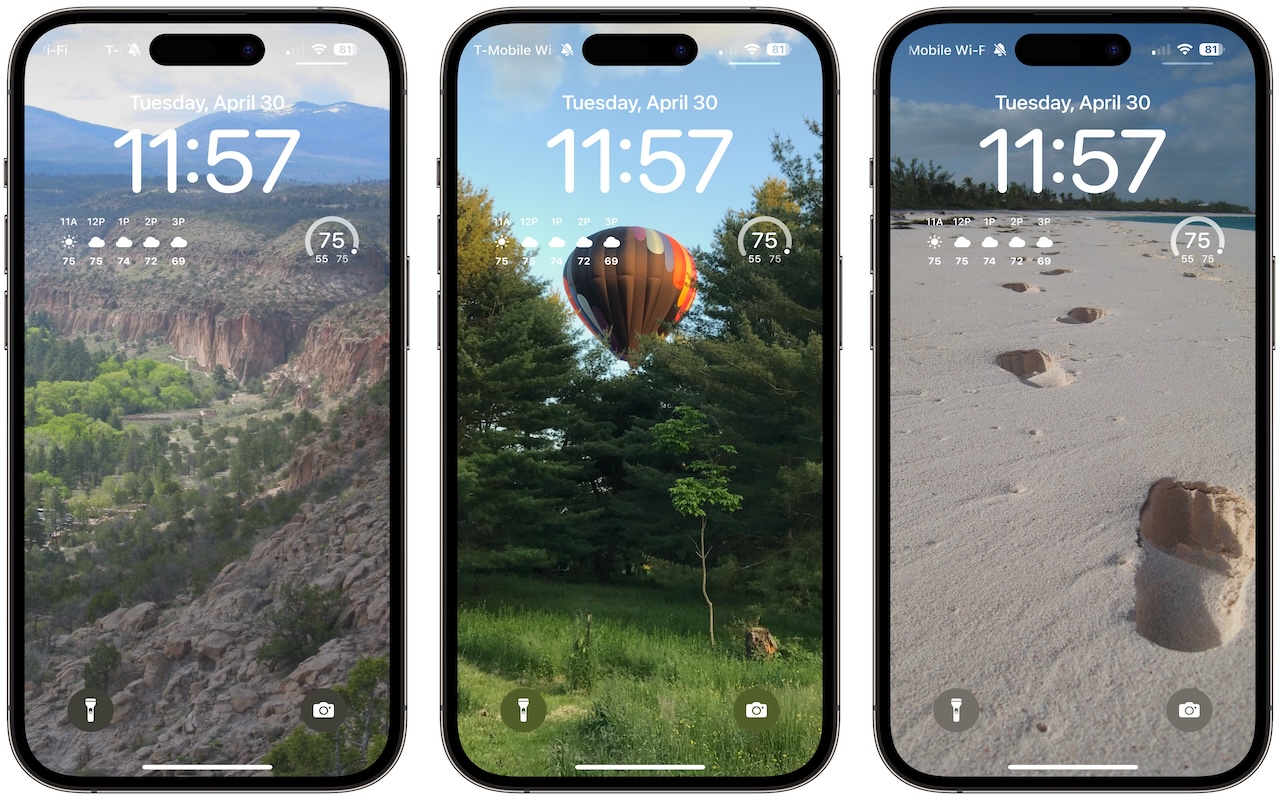
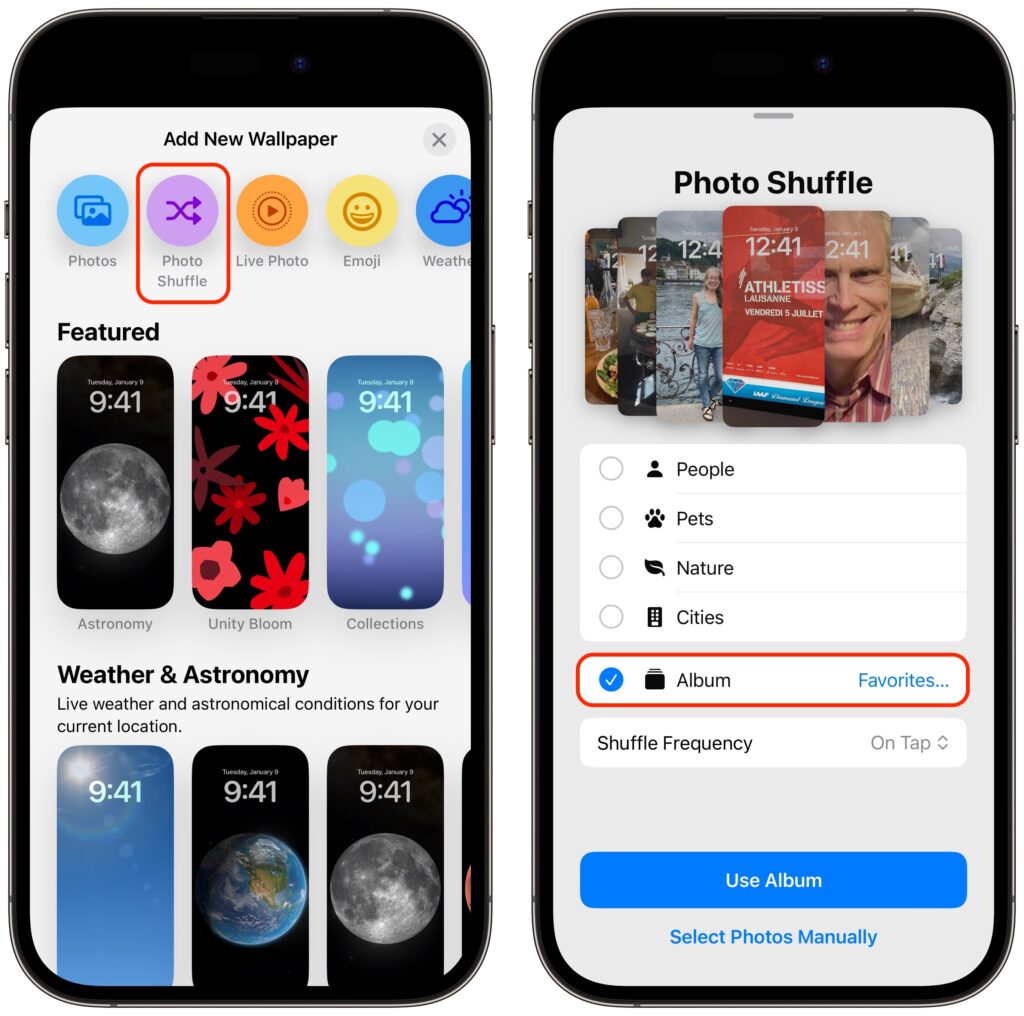
A popular feature of iOS 16 was the Photo Shuffle option for customizing the iPhone Lock Screen. It used machine learning to select photos in four categories—People, Pets, Nature, and Cities—and rotated through them when you tapped, on lock, hourly, or daily. If you didn’t like the automatic selection, you could pick photos manually, but it was clumsy. In iOS 17 (and iPadOS 17, which also added customizable Lock Screens), you can now point the Lock Screen’s Photo Shuffle wallpaper at an album. Touch and hold the Lock Screen, tap Customize, tap the blue ⨁ button to create a new wallpaper, select Photo Shuffle, select Album, choose the desired album from the pop-up menu, set a frequency, tap Use Album, and tap the Add button at the top. Then tap Set as Wallpaper Pair or Customize Home Screen to choose a different image for the Home Screen wallpaper.

(Featured image by Adam Engst)


Social Media: If you like how the Lock Screen’s Photo Shuffle wallpaper rotates through photos but would prefer that it worked from an album you specified, you’re in luck! That’s now possible in iOS 17 and iPadOS 17.

Similar Posts

  • Keyboard Shortcuts

    I got my start in using computers with CPM operating system and keyboard shortcuts were present there. I used them all the time so they come as second nature to me. But as I go out and talk with customers and help them with their Macs, I am surprised by the number of people that do not know that most of the things you can do with your mouse by clicking on a menu item can be done faster with keyboard shortcuts.

    The first thing to learn about shortcuts are the symbols that are used to show these keys.

    Command ⌘
    Shift ⇧
    Option ⌥
    Control ⌃
    Caps Lock ⇪
    Fn

    These work for your Mac Keyboard but if you are using a keyboard made for a Windows machine you need to substitute the Windows logo for the Command key and the Alt key for the option key. When you look at a menu in almost any application you will find the common commands for all these symbols next to them to indicate the keyboard shortcut. Here are some common ones:

    Command-X **Cut** Remove the selected item
    Command-C **Copy** the selected item
    Command-V **Paste** the contents
    Command-Z **Undo** the previous command
    Command-A **Select all** items
    Command-F **Find** open a Find window
    Command-G **Find Again** Find the next occurrence of the item previously found
    Command-H **Hide** the windows of the front app.
    Command-M **Minimize** the front window to the dock
    Command-M **New** Open a new document or window
    Command-P **Print** the current document

    Command-Space bar **Spotlight** show or hide the spotlight search field
    Command-Tab **Switch apps** switch to the next most recently used app
    Command-shift-3 **Screenshot** take a screenshot of the entire screen

    As you can see, there are endless keyboard shortcuts to use, and these are only a small fraction of what you can do with “**keyboard shortcuts.**”:https://support.apple.com/en-us/HT201236 So the next time you find yourself wondering what you can do if your mouse suddenly stops working or if your just looking for a more efficient way to do something, keyboard shortcuts might just be what your looking for!

  • Motorcycling down here is sort of boring. I have my bike all tuned up but there is literally only one road and the fastest speed limit in Key West is 30mph. I think we may have to trade in Grace’s Vespa to get a real motorcycle for her so we can take some longer trips down here.

    Pitchers and catchers reported for spring training and the Cubs Kyle Schwarber is already breaking windshields in Arizona at the Cubs park. Maybe this year?

    Thank you so much for reading this issue of Kibbles & Bytes!

    Your Kibbles & Bytes Team,

    _Don, Emily, & Hadley_

  • A Swinging Hot Spot in Paradise

    You are visiting Key West, accompanied by your trusty iPhone and MacBook Air. Suddenly there’s an emergency at work, and you need to get online with your Mac. You can pick up a cell signal with the iPhone, but there’s no Wi-Fi that isn’t locked up. Well, my first thought might be “oh well, I’m on vacation!” but you are dedicated and need to be online.

    Don’t worry! You can use your iPhone’s cellular data plan to create a personal Wi-Fi hotspot that lets your Mac access the Internet through your iPhone. Also called “tethering,” it’s fast, easy, and can be a life-saver when you just have to get online with a Mac or your Wi-Fi-only iPad. It supports up to 5 users, too, which means you can get your team online, too!

    Before we explain how to do set up a personal hotspot, note that most but not all cellular carriers allow tethering on existing plans. For some, you might have to pay more for tethering. Keep in mind that any data consumed by your Mac while tethered will count against your data allowance and may generate overage fees. Carriers with “unlimited” data, like T-Mobile and Sprint, generally throttle your bandwidth to slower speeds if you use too much data.

    Along those lines, if you use a file sharing service like Dropbox or Google Drive, or an Internet backup service like CrashPlan or Backblaze, turn them off before connecting. Particularly if they haven’t connected in a while, those services can transfer a lot of data quickly, which could result in a hefty overage charge or awkward data throttling for the rest of the month.

    With those warnings out of the way, follow these steps in iOS 9 to turn on Personal Hotspot:

    1. On your iPhone, if you’ve never enabled the feature before, go to Settings > Cellular > Personal Hotspot. Once you’ve turned Personal Hotspot on once, it moves up a level, so you can access it from Settings > Personal Hotspot.
    1. Tap on Wi-Fi Password and enter a password that’s at least 8 characters long and easy to type. It doesn’t need to be super secure because you can keep Personal Hotspot turned off unless you’re using it. But you do want a password so random people nearby can’t connect and use your data.
    1. Once you’ve entered a password, slide the Personal Hotspot switch.

    That’s it! The Personal Hotspot screen provides basic instructions for connecting to the iPhone via Wi-Fi, Bluetooth, and USB. Stick with Wi-Fi, since it’s the easiest and most reliable in most cases.

    • To connect to your new Personal Hot Spot on your Mac, click the Wi-Fi icon in the menu bar and choose your iPhone’s name.
    • On your iPad, go to Settings > Wi-Fi and choose your iPhone.
    • Enter your password when prompted, making sure to select Remember This Network. That way, you won’t even have to enter your password the next time.
    • The Mac or iPad then connects to your iPhone, showing a hotspot icon instead of the usual wave icon for the Wi-Fi menu.

    Could it get any simpler? When you’re done, the safest thing to do, to ensure you don’t accidentally end up using too much of your data allowance, is to turn off the Personal Hotspot switch in Settings > Personal Hotspot. Your Mac or iPad will automatically disconnect.

    Actually, it CAN be simpler! Your Mac can automatically use the personal hotspot on your iPhone to connect to the Internet when they’re within range of each other.

    Use Instant Hotspot on your iPhone (with iOS 8 or later) to provide internet access to your Mac computers and other iOS devices (with OS X Yosemite or iOS 8) that are in range and signed into iCloud using the same Apple ID. Instant Hotspot uses your iPhone — you don’t have to enter a password or even turn on Personal Hotspot.

    Make sure your iOS device and your Mac are signed into iCloud with the same Apple ID.

    On your Mac, click the Wi-Fi status icon in the menu bar, then choose your iPhone or iPad.

    After you connect to the iPhone or iPad Personal Hotspot, you can check the cellular signal strength and the battery status of the iPhone or iPad in the Wi-Fi status menu.

    When you’re not using using the hotspot, your devices automatically disconnect to save battery life.

    One more big advantage of Personal Hot Spots. When you are shopping for that new iPad, perhaps you don’t need the cellular model if you nearly always have your iPhone handy. That’s what I do. If I need internet access on my Wi-Fi iPad, I simply connect to my Hot Spot! Saves me the added cost of a cellular-enabled iPad and the monthly fees from the cell carrier!