Make Sure to Back Up iPhone Photos on Your Mac

If your iPhone were to be stolen or suffer an unfortunate accident, would you lose all your precious photos? Those using iCloud Photos are probably shaking their heads smugly, thinking that all those baby and vacation photos are backed up securely in iCloud. iCloud Photos does indeed store a copy of all your photos, but you shouldn’t assume that everything in it is completely protected. Although it’s extremely unlikely that Apple’s systems would fail so that you’d lose anything, the contents of your iCloud account aren’t as safe as would be ideal.

An Aside to Explain Why iCloud Isn’t Perfectly Secure

Recently, Wall Street Journal reporters Joanna Stern and Nicole Nguyen covered a troubling form of crime aimed at iPhone users in an article (paywalled) and accompanying video. Thieves hang out in bars, looking for users who tap in their passcodes instead of using Face ID or Touch ID. Once they’ve learned someone’s passcode with surreptitious shoulder surfing, they grab the iPhone and run. As soon as they’re clear, they use the passcode to change the user’s Apple ID password and enable or reset a recovery key, which prevents the user from employing Find My to locate and lock the iPhone. Worse, with the passcode, they can make purchases with Apple Pay, access all passwords in iCloud Keychain, and use other information on the iPhone to facilitate identity theft. It’s a disaster.

But it gets worse, as the reporters detail in a new Wall Street Journal article (paywalled) and video. By enabling a recovery key, the thief disables Apple’s normal account recovery process for resetting the Apple ID password. In other words, if this were to happen to you, along with all the financial losses and headaches, you would lose access to your iCloud account, possibly forever, and with it, all your photos in iCloud. With luck, Apple will block this attack soon.

For now, follow this commonsense advice to reduce the chances of being victimized:

  • Pay attention to your iPhone’s physical security in public.
  • Always use Face ID or Touch ID in public.
  • If you must enter your passcode in public, conceal it from anyone nearby.
  • Never share your passcode beyond highly trusted family members.

Backing Up Your iPhone Photos

As with so many other modern ills, good backups go a long way toward minimizing the pain of problems. They won’t prevent someone from stealing your iPhone or locking you out of your account, but if that were to happen, at least you won’t lose all your photos!

There are two possible backup scenarios. Using iCloud Photos and downloading originals to your Mac is easiest but requires that you pay Apple for more storage if you have more than a handful of photos. If you don’t use iCloud Photos, you can just back up your iPhone to your Mac or, better yet, import images into Photos on the Mac and then sync them back. It’s more work and fussier, but doesn’t cost anything.

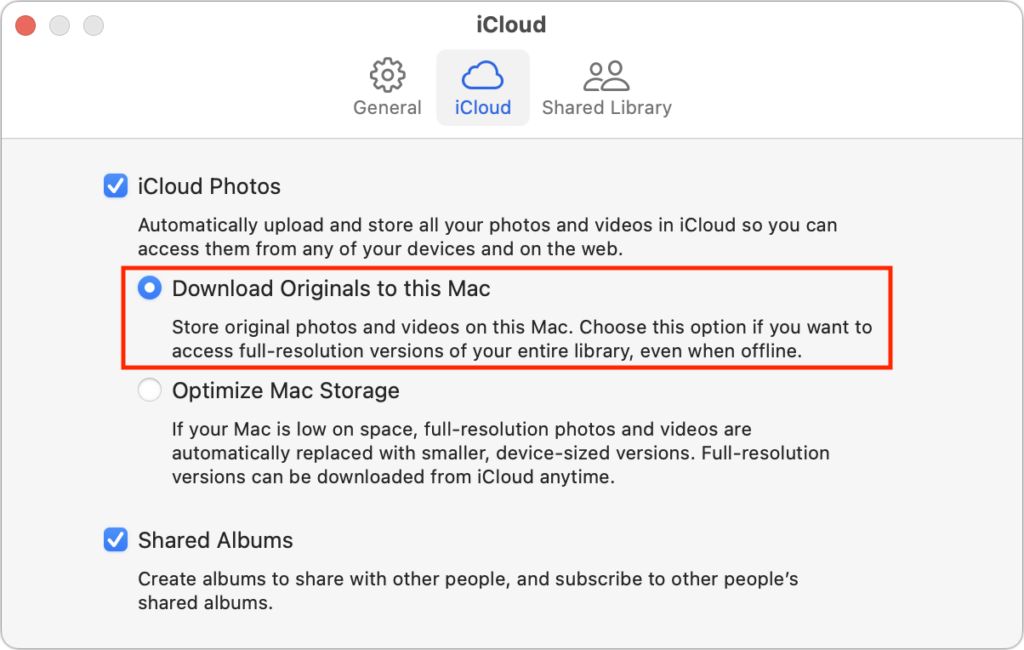
  • iCloud Photos: When using iCloud Photos, the trick to protecting your pictures is to sync the originals with your Mac. In Photos > Settings/Preferences > iCloud, select Download Originals to this Mac. The only downside of this approach is that you need enough disk space on your Mac to hold them all; if that’s not the case, you may need to move your system Photos Library to an external hard drive.
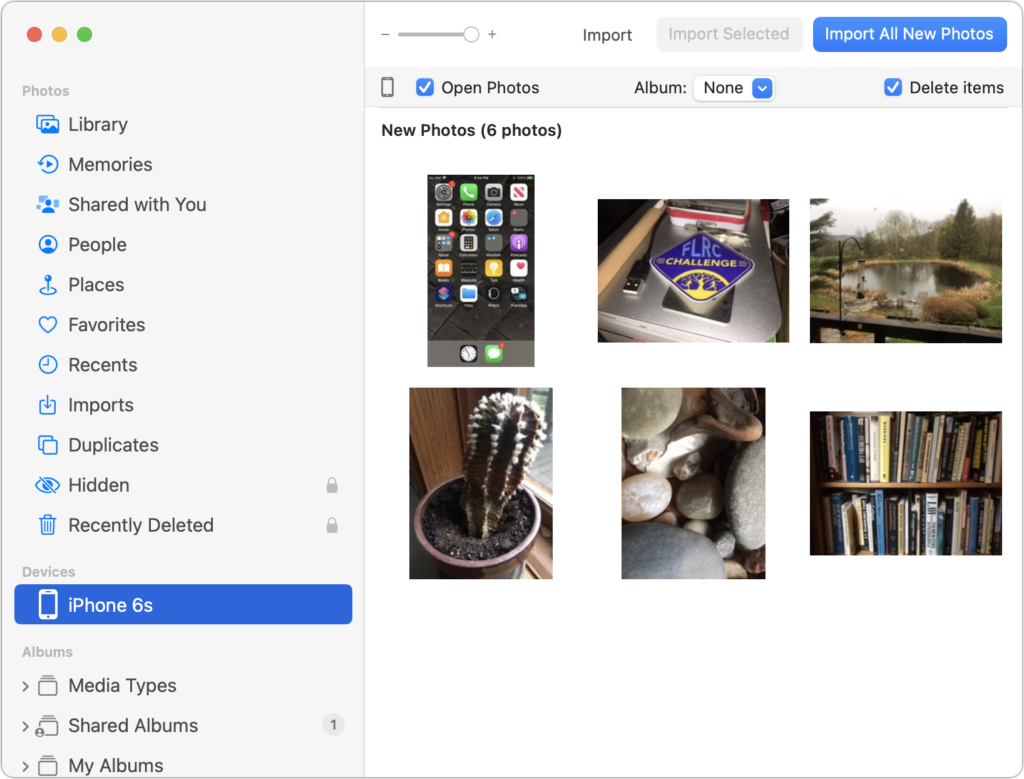
  • iPhone-only photos: If you aren’t using iCloud Photos, the best approach is to connect your iPhone to your Mac using a USB-to-Lightning cable or Wi-Fi and then import new snapshots into Photos on your Mac manually (select the iPhone in the Photos sidebar). It’s helpful to remove the original photos from the iPhone with the Delete Items checkbox after importing so you can manage them solely on the Mac.

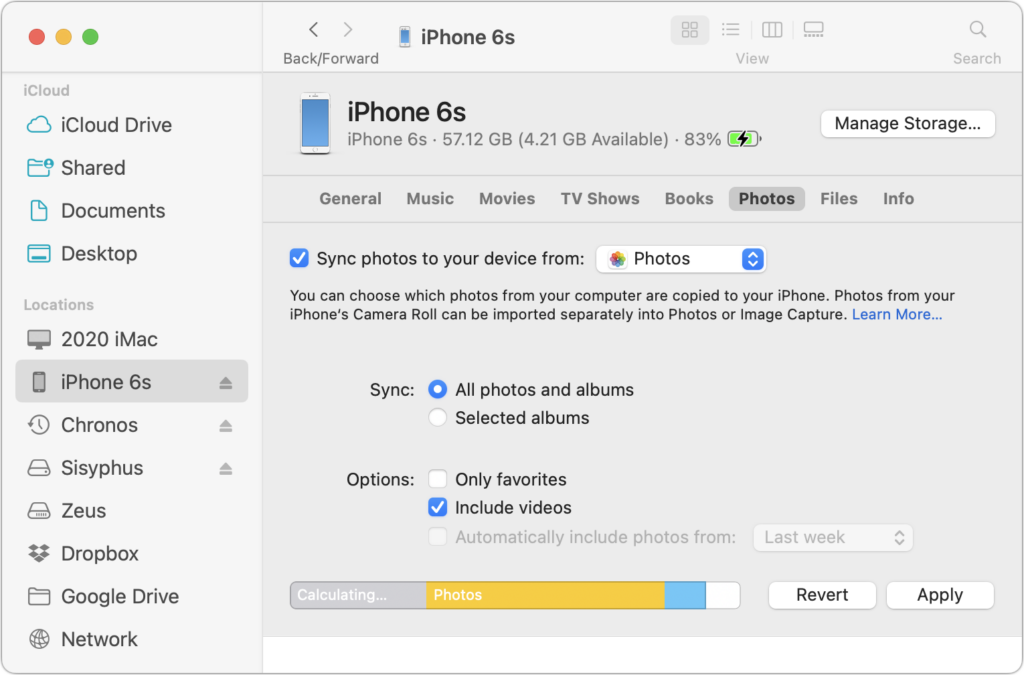
    Then you can sync all the photos (or just desired ones, if your iPhone is low on space) back to your iPhone using the Finder. First, select the iPhone in a Finder window’s sidebar. Then click Photos in the button bar at the top, and select “Sync photos to your device from Photos” along with “All photos and albums” and “Include videos” in the options below. Finally, click Apply or Sync.

    Technically speaking, backing up your iPhone to your Mac without syncing to Photos also backs up your photos, but the only way to get them back is to restore a backup onto an iPhone. It’s much better to have all the photos accessible in Photos too.

Either way, once the photos are on your Mac, you should back up all your data using Time Machine, an Internet service like Backblaze, or a third-party app like Carbon Copy Cloner or SuperDuper. If you’re concerned about the quality of your backups for preserving photos, contact us for advice.

(Featured image by iStock.com/metamorworks)


Social Media: With new reports of iPhone theft victims being locked out of their iCloud accounts, it’s all the more important that you copy your iPhone photos to a Mac and then back up that Mac.

Similar Posts

  • Motorcycling down here is sort of boring. I have my bike all tuned up but there is literally only one road and the fastest speed limit in Key West is 30mph. I think we may have to trade in Grace’s Vespa to get a real motorcycle for her so we can take some longer trips down here.

    Pitchers and catchers reported for spring training and the Cubs Kyle Schwarber is already breaking windshields in Arizona at the Cubs park. Maybe this year?

    Thank you so much for reading this issue of Kibbles & Bytes!

    Your Kibbles & Bytes Team,

    _Don, Emily, & Hadley_

  • The Importance of Staying Updated

    Does it feel like your Apple devices are always asking you to install operating system updates? You’re not wrong—from September 2022 to January…

  • Apple TV and Apple Watch

    This week I’ve been testing out some of the new features on the Apple TV and a bit on the new watchOS. You can now get an Apple Watch for $299.99. The release of watchOS 2.2 was a minor bump in improvements, including the ability to pair more than one Apple Watch to one iPhone, additional browsing options in Maps, improvements to tracking your pulse and a few other minor updates. Unlike past revisions and improvements to the watchOS this one has left me feeling a little underwhelmed. While the software updates weren’t particularly robust, I was excited to see that the Apple Watch now has even more watch bands to choose from. I’ve had my watch for about six months now and have noticed its getting a bit dingy, so now might be a good time to get another band! There are new sport band colors to choose from including a bold new yellow and a new woven nylon option. For those seeking a more traditional style band, the woven nylon might be just what you are looking for, this band features a standard watch buckle style clasp.

    Apple TV got some updates this week and just in time for the NCAA Championship. With the latest software release for Apple TV you can now get the latest NCAA games with an added feature of having two games display on your TV side by side! In addition to being able to watch the latest games, you now have approximately 5000 apps to choose from, including new workout apps. Siri now works better when searching for content, even in the App Store, and you can access your iCloud Photo library. Starting to feel like your apps are getting too cluttered? Easily create folders by dropping app icons onto of each other just like you do on your iPhone or iPad. Dictation, another added feature that can really speak up your search process. Rather than typing through letters one at a time when searching for something specific, you can now use dictation by selecting the Siri button in the search field. I will note, you do have to be in the specific search field, you can’t just use it from the home screen. My favorite updates, one of which works with both the Apple TV and the Apple watch, is the remote app. You can now use your Apple watch to navigate through the options on the Apple TV, a feature that might seem silly to some, but with a small and easily misplaced remote this is bound to be an incredibly valuable new feature. Think the watch is too small to use for a remote? Hook up your Apple bluetooth keyboard! That’s right, you can now use your standard sized keyboard as well.

    I should note, that some of these updates, like the NCAA games, do have additional fees. More and more of us are swaying away from traditional TV and with more options coming to the Apple TV and choosing your content, we are getting closer and closer to paying for only what we want.

  • Who cares about QR Codes?

    By now you’ve probably seen one of those odd-looking white squares with a bunch of smaller square dots that make up a random pattern inside–that’s a QR code. QR stands for “Quick Response,” and a QR code is a form of barcode, just like on the packaging of nearly everything you buy.

    Usually QR codes are used to store Web links–URLs–so an ad can display just the QR code instead an unwieldy and hard-to-type web address. But QR codes aren’t just for ads. They’ve appeared on business cards, in magazines and books, on coins and bills, and even on tombstones–any place it would be nice to help someone load a Web link into a smartphone but where there isn’t enough room for a URL or in situations where viewers won’t remember the URL later. And the links? They can display anything that can appear on the Web: text, photos, videos, games, and more.

    Only one built-in iPhone app can scan QR codes–the Wallet app in iOS 9–but it can scan only QR codes that are associated with Wallet passes, things like airline boarding passes, concert tickets, and iTunes gift cards. For QR codes that encode any other sort of data, Wallet shows an error. It would be nice if Apple would add general QR scanning capabilities to Wallet or the Camera app, but until that happens, you’ll need another app.
    There are numerous QR code scanning apps in the App Store, but if you need a recommendation, give TapMedia’s QR Reader for iPhone a try. It’s free with ads (remove them with a $1.99 in-app purchase), scans both QR codes and traditional barcodes on most commercial products, and displays the associated information within the app. It can even help you create your own QR codes.

    To use a QR code scanner, launch the app, allow it to access the camera when it asks, and then point it at the QR code. Good apps will scan nearly instantly, but if not, move the camera so the QR code is centered between the guides. If even that doesn’t work, move forward or back so the camera can focus on the centered code.

    Once the code has been scanned, the app will usually bring up an in-app Web browser to display whatever was encoded. For certain kinds of data, like books or grocery items, the app may go right to Amazon or a price comparison site. Good apps will also keep a record of sites you’ve scanned, so you can go back to them later, even if you can no longer scan the QR code.

    So download a QR code scanning app and keep an eye out for QR codes. Once you start looking, you’ll find them everywhere–it’s a modern-day treasure hunt!