Sidestep MacBook Optimized Battery Charging When Necessary

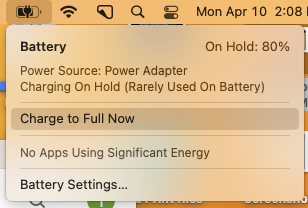
Have you ever run into a situation where the battery icon in your menu bar is stuck at 80% even though your Mac has been plugged in for hours? Luckily, there are several easy workarounds, but first, let us explain what’s going on.

In the past few years, Apple has added optimized battery charging features to many of its battery-powered products, including the iPhone, the Apple Watch, and the MacBook Air and MacBook Pro. In all cases, Apple’s goal is to increase the lifespan of your devices’ lithium-ion batteries by reducing the amount of time they spend fully charged.

With the iPhone and Apple Watch, Apple achieves this by learning your charging patterns and delaying charging past 80% in certain situations. The optimized charging algorithm then charges the device to full just before you’re likely to unplug it. For most people, that probably happens overnight, so the device is ready in the morning.

With the MacBooks, the background is slightly different. Many people use their MacBooks at desks, often connected to large displays, so they spend a lot of time plugged into power. In the past, that would keep the battery fully charged and generate heat, both of which shorten the lifespan of lithium-ion batteries. So once again, Apple’s optimized battery charging technology tries to hold the battery at 80% and charges it to full only when it thinks you’ll need to use it away from the desk. If you seldom take it anywhere, it could be held at 80% most of the time.

That works best when you have a regular schedule, but it’s easy to end up in a situation where you need to grab your MacBook and head out—such as for an overnight trip—where you won’t be able to recharge easily. If the optimized battery charging algorithm wasn’t expecting that, you could find yourself with a battery that’s only at 80% to start, significantly reducing your battery life.

There are three ways to work around this problem, depending on how troublesome it is for you:

  • Resume charging: If the optimized battery charging algorithm has paused charging at 80% but you want to leave with a full charge, click the battery icon in the menu bar and choose Charge to Full Now. That will take some time, so make sure you initiate the final charging early enough. This workaround is most helpful if you only occasionally need a full charge.
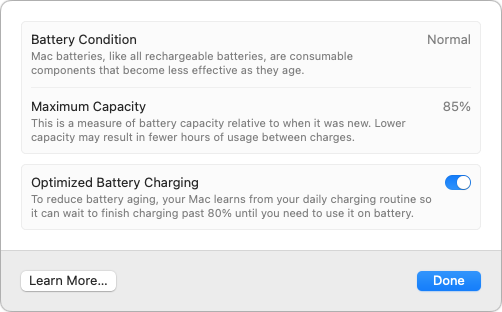
  • Disable optimized battery charging temporarily: Let’s say you’re on that overnight trip and need to be sure that your MacBook is fully charged for your 6 AM flight home. To ensure you don’t wake up to a partially full battery, you can temporarily disable optimized battery charging. In macOS 13 Ventura, choose System Settings > Battery, click the ⓘ next to Battery Health, turn off the Optimized Battery Charging switch, and click Turn Off Until Tomorrow in the dialog that appears.

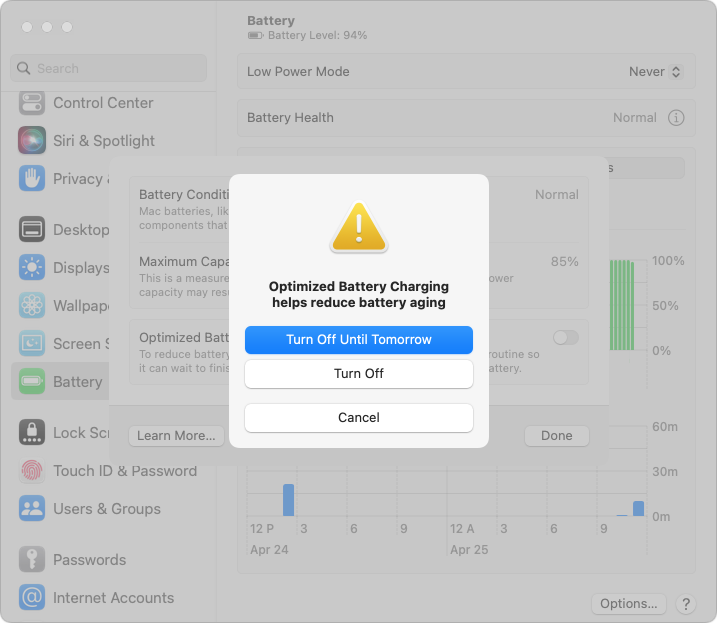
    In macOS 12 Monterey and earlier, choose System Preferences > Battery, deselect Optimized Battery Charging, and click Turn Off Until Tomorrow.
  • Disable optimized battery charging permanently: Some people have unpredictable schedules. While the optimized battery charging algorithm may simply throw up its hands and allow your battery to charge fully at all times, if you find yourself continually fighting it, follow the steps above and click Turn Off to disable it permanently. Be aware that this may reduce the overall lifespan of your battery.

If all this seems fussy, it’s because Apple was criticized some years ago when it introduced optimized battery charging for the iPhone without informing users, some of whom were upset by the seemingly unpredictable charging behavior. Apple now makes the controls accessible to users, which is good but adds complexity.

Although we recommend leaving optimized battery charging enabled in most situations, there are times when it’s reasonable to turn it off to ensure you have as much power as possible for the upcoming work session.

(Featured image by iStock.com/Konev Timur)


Social Media: Has your MacBook’s battery ever been stuck at 80% when you would prefer to have a full charge? We explain what’s happening and how to work around Apple’s optimized battery charging features.

Similar Posts

  • My visiting family went out dolphin watching today taking advantage of the sunny day. The dogs and I are hanging out at my home office and I am listening to some Eagles music as I work.

    Thank you for reading this issue of Kibbles & Bytes!

    _Don, Dean, Emily & Scott_

  • Grace has tired of riding the little Vespa scooter so we are selling it. I bought an almost antique Victory cruiser so we both have bikes down here. I am going to Jasper, GA to pick it up this weekend and riding it back through the back roads of Georgia. It should be a nice little break.

    I am going to miss Johnny Dread and the reggae show down here but I am sure Grace will be there. It is hard to believe that we are heading into March already. My granddaughter, Gracie, is a Feb 29 baby so she is celebrating her 4th birthday as a 12-year old. My other granddaughter, Khadija, was off this week visiting colleges in the Boston area. Sure makes me feel old. I remember announcing Khadija’s birth here in Kibbles with the line “just call me gramps” and they still do!

    Thank you for reading this issue of Kibbles & Bytes!

    Your Kibbles & Bytes Team,

    _Don, Emily, Morgan & Hadley_

  • A Swinging Hot Spot in Paradise

    You are visiting Key West, accompanied by your trusty iPhone and MacBook Air. Suddenly there’s an emergency at work, and you need to get online with your Mac. You can pick up a cell signal with the iPhone, but there’s no Wi-Fi that isn’t locked up. Well, my first thought might be “oh well, I’m on vacation!” but you are dedicated and need to be online.

    Don’t worry! You can use your iPhone’s cellular data plan to create a personal Wi-Fi hotspot that lets your Mac access the Internet through your iPhone. Also called “tethering,” it’s fast, easy, and can be a life-saver when you just have to get online with a Mac or your Wi-Fi-only iPad. It supports up to 5 users, too, which means you can get your team online, too!

    Before we explain how to do set up a personal hotspot, note that most but not all cellular carriers allow tethering on existing plans. For some, you might have to pay more for tethering. Keep in mind that any data consumed by your Mac while tethered will count against your data allowance and may generate overage fees. Carriers with “unlimited” data, like T-Mobile and Sprint, generally throttle your bandwidth to slower speeds if you use too much data.

    Along those lines, if you use a file sharing service like Dropbox or Google Drive, or an Internet backup service like CrashPlan or Backblaze, turn them off before connecting. Particularly if they haven’t connected in a while, those services can transfer a lot of data quickly, which could result in a hefty overage charge or awkward data throttling for the rest of the month.

    With those warnings out of the way, follow these steps in iOS 9 to turn on Personal Hotspot:

    1. On your iPhone, if you’ve never enabled the feature before, go to Settings > Cellular > Personal Hotspot. Once you’ve turned Personal Hotspot on once, it moves up a level, so you can access it from Settings > Personal Hotspot.
    1. Tap on Wi-Fi Password and enter a password that’s at least 8 characters long and easy to type. It doesn’t need to be super secure because you can keep Personal Hotspot turned off unless you’re using it. But you do want a password so random people nearby can’t connect and use your data.
    1. Once you’ve entered a password, slide the Personal Hotspot switch.

    That’s it! The Personal Hotspot screen provides basic instructions for connecting to the iPhone via Wi-Fi, Bluetooth, and USB. Stick with Wi-Fi, since it’s the easiest and most reliable in most cases.

    • To connect to your new Personal Hot Spot on your Mac, click the Wi-Fi icon in the menu bar and choose your iPhone’s name.
    • On your iPad, go to Settings > Wi-Fi and choose your iPhone.
    • Enter your password when prompted, making sure to select Remember This Network. That way, you won’t even have to enter your password the next time.
    • The Mac or iPad then connects to your iPhone, showing a hotspot icon instead of the usual wave icon for the Wi-Fi menu.

    Could it get any simpler? When you’re done, the safest thing to do, to ensure you don’t accidentally end up using too much of your data allowance, is to turn off the Personal Hotspot switch in Settings > Personal Hotspot. Your Mac or iPad will automatically disconnect.

    Actually, it CAN be simpler! Your Mac can automatically use the personal hotspot on your iPhone to connect to the Internet when they’re within range of each other.

    Use Instant Hotspot on your iPhone (with iOS 8 or later) to provide internet access to your Mac computers and other iOS devices (with OS X Yosemite or iOS 8) that are in range and signed into iCloud using the same Apple ID. Instant Hotspot uses your iPhone — you don’t have to enter a password or even turn on Personal Hotspot.

    Make sure your iOS device and your Mac are signed into iCloud with the same Apple ID.

    On your Mac, click the Wi-Fi status icon in the menu bar, then choose your iPhone or iPad.

    After you connect to the iPhone or iPad Personal Hotspot, you can check the cellular signal strength and the battery status of the iPhone or iPad in the Wi-Fi status menu.

    When you’re not using using the hotspot, your devices automatically disconnect to save battery life.

    One more big advantage of Personal Hot Spots. When you are shopping for that new iPad, perhaps you don’t need the cellular model if you nearly always have your iPhone handy. That’s what I do. If I need internet access on my Wi-Fi iPad, I simply connect to my Hot Spot! Saves me the added cost of a cellular-enabled iPad and the monthly fees from the cell carrier!

  • Ick, it is tax time and while I love Turbo Tax, I hate doing taxes. It is not that I have a problem paying taxes, especially when I see my tax dollars doing things for the public good but it always alarms me to see how much I am paying for unnecessary wars and an ineffective congress. Grace stays far away as I work on the taxes as I grumble and fret.

    It looks like it might be a rainy weekend here in Key West so I can work on that and do some much-needed motorcycle maintenance. I can’t wait to get my hands on one of the new iPad Pros to compare with its big brother. I don’t know if it will turn around the decline in Apple’s iPad sales but it does represent a new powerful digital tool.

    Thank you for reading this issue of Kibbles & Bytes!

    Your Kibbles & Bytes Team,

    _Don, Emily & Hadley_