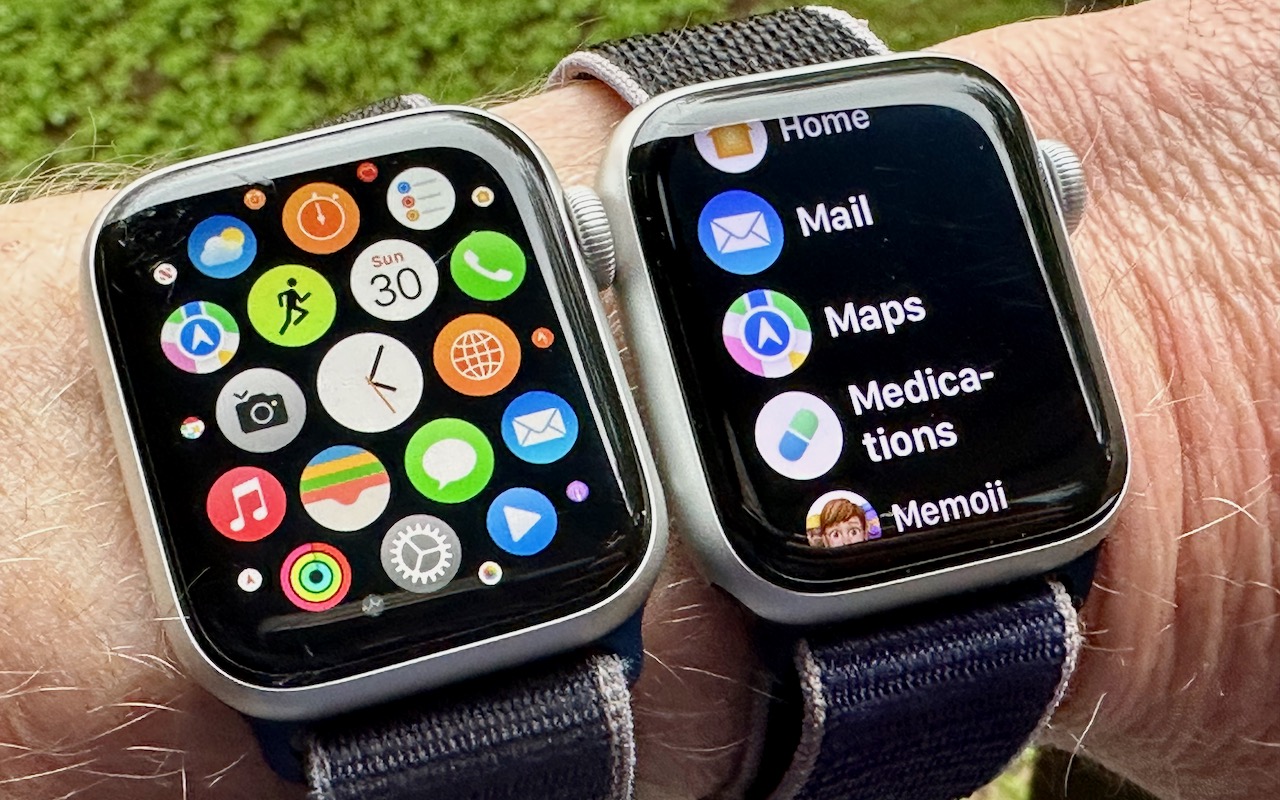
Make Apple Watch Apps Easier to Find with List View

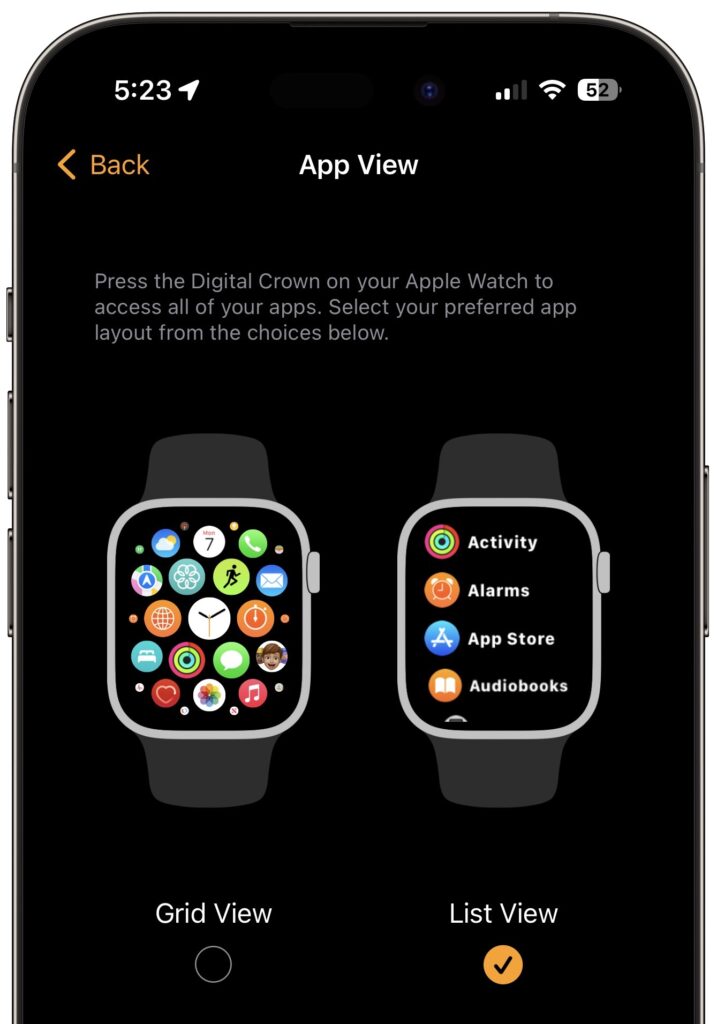
With the original version of the Apple Watch, Apple introduced “grid” view, which shows tiny icons for each app in a random circular pattern, making them difficult to find for most people. Happily, at some point, Apple relented and gave us the more sensible list view, which shows all the apps—with their names—sorted alphabetically. If your Apple Watch shows apps in grid view when you press the Digital Crown, fix it by opening the Watch app on your iPhone, tapping App View, and selecting List View. You can also do this on the watch itself in the Settings app.

(Featured image by Adam Engst)


Social Media: If you have trouble finding apps on your Apple Watch in the randomly arranged “grid” view, you’ll be pleased to learn how to switch to the more sensible list view, which sorts alphabetically.

Similar Posts

  • _Dear Friends,_

    I tuned into the Apple special “Let Us Loop You In” event on my Apple TV. We will talk about the new hardware and software but there were a few things that caught my attention that really help to define Apple as a truly different company.

    The first was Apple’s environmental commitment. They now boast that 90% of their operations, worldwide, are powered by renewable energy and 100% in the USA. This is a unique accomplishment that is made even more remarkable by Apple’s size. While Small Dog Electronics is proud to power our Waitsfield headquarters and S. Burlington store by solar energy, we have not yet reached the point of powering all our operations which is something Apple has done both by purchasing renewable energy and installing large scale solar arrays at their locations both in the USA and China.

    Their environmental commitment goes further with an awareness of the impact their products have on the waste stream. They made a point to describe the materials used which have lower impact and talked about their recycling program, too. The robot, Liam, that disassembles iPhones into its component parts was very cool and is a further demonstration of Apple’s leadership in environmental stewardship.

    The other part of the announcement that caught my eye was the extension of Apple’s altruistic Research Kit tool that has helped researchers gather data on several chronic diseases. CareKit takes that a step further, offering tools that help patients and their medical providers manage those chronic diseases. They already have several new apps in development, including one that provides post-surgical care monitoring and another for diabetes monitoring. Research Kit and CareKit are both open-source software that do not necessarily provide any revenue stream for Apple but provides the tools to improve health. I am very proud of Apple for its initiatives in these areas.

    This week’s Kibbles & Bytes exclusive is a “**home and away USB charger bundle.**”:http://www.smalldog.com/wag900002185/home-and-away-usb-charger-bundle-one-for-the-car-one-for-home This features the Hammerhead 2-port USB Automotive charger and the Hammerhead 2-port wall charger. Both have sufficient power to charge both an iPhone and iPad. If you are like me, you can never have too many chargers and this bundle is a great way to get a spare for you home and car! Normally, this bundle is $34.98 but exclusively for Kibbles & Bytes readers this week, it is $10 off at “**$24.98!**”:http://www.smalldog.com/wag900002185/home-and-away-usb-charger-bundle-one-for-the-car-one-for-home

  • Hey Dora, Follow Orders!

    Last week we talked about how to activate and use dictation to write emails and documents but there is a lot more that you can do. I keep thinking about Scotty from Star Trek when he went back in time and was “**confronted with a Mac Plus**”:https://youtu.be/LkqiDu1BQXY?t=1m8s. He picked up the mouse as natural as can be and said “computer…”. That time is coming and Dictation Commands are already built into your operating system.

    Once you have dictation activated you can activate dictation commands by going to the Accessibility system preference.

    * Choose Accessibility from System Preferences.

    * Choose Dictation from the list on the left side of the Accessibility pane.

    * Click the Dictation Commands button. You can see a list of available commands in the Dictation Commands sheet.

    * A starting set of commands are enabled by default. Additional speakable items like “Open document” and “Click item” are available by enabling advanced commands using these next steps:

    * Select (check) the option to “Enable advanced commands” in the Dictation Commands sheet that appears.

    * Click Done.

    p{text-align: center;}. !http://blog.smalldog.com/images/4710.png!

    After you have enabled advanced commands, you can also create your own commands by clicking the Add Command (+) button. This lets you link a spoken phrase to an app, a menu item, a keyboard shortcut, or an Automator workflow.

    You have enabled Dictation Commands and now you can speak any of the items in this list to perform the related action. Press the Fn key twice, then say a command to make it happen, such as “Search Spotlight for the Cubs score” or “select sentence” or “new document”. Give it a try and pretty soon you will be just like Scotty and the Mac Plus.

    As a shortcut, you can speak the command “Show commands” to see a list of the commands you can say.